
Professional-looking presentations rely on clean design and precise alignment. One of the most common yet overlooked details is the proper centering of text boxes. Whether you're preparing a corporate report, academic lecture, or sales pitch, misaligned text undermines credibility and distracts your audience. Mastering text box centering in PowerPoint ensures visual harmony and enhances readability. This guide breaks down reliable methods to achieve pixel-perfect alignment—every single time.
Why Text Box Alignment Matters
Visual consistency is not just about aesthetics—it's a communication tool. When elements are aligned correctly, the audience focuses on content rather than layout distractions. Misaligned text boxes create subconscious tension, making slides appear unprofessional or hastily prepared. Proper centering improves balance, especially on title slides, bullet-point layouts, and image-heavy designs.
PowerPoint offers multiple ways to center text boxes, but many users rely on guesswork or visual estimation. That approach leads to inconsistencies across slides. True precision comes from using built-in tools effectively and understanding how alignment interacts with slide structure.
Step-by-Step Guide to Centering Text Boxes
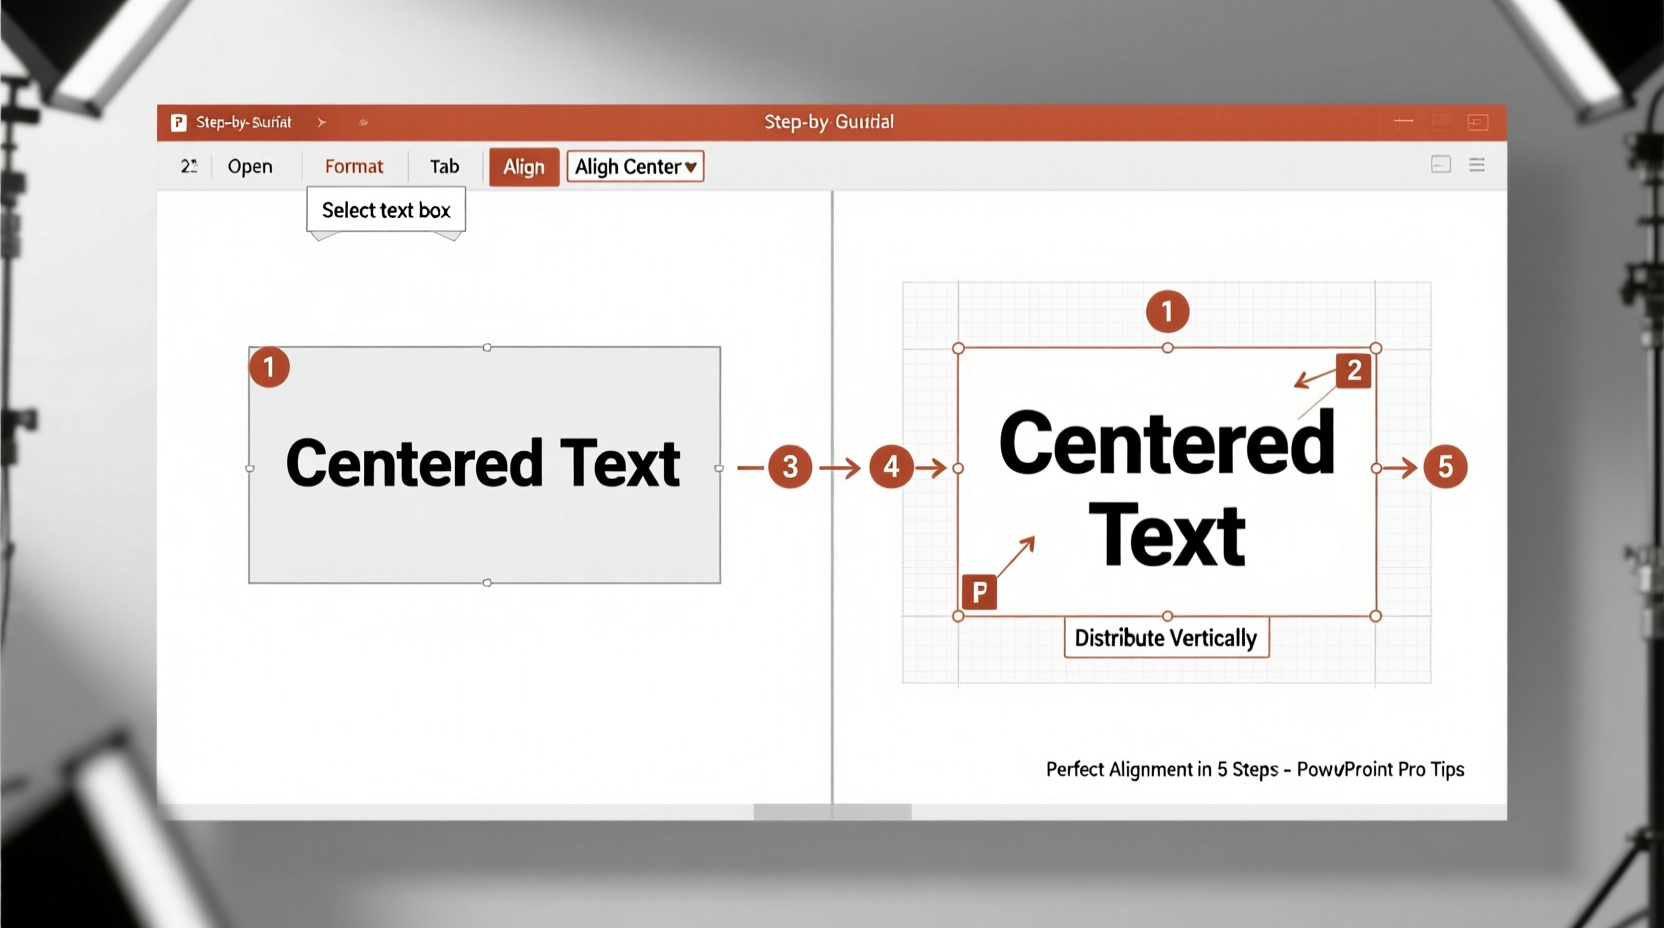
Follow this structured process to center any text box with confidence. These steps apply to all modern versions of Microsoft PowerPoint (2016, 2019, 365, and online).
- Select the text box: Click once on the border of the text box you want to center. Ensure the selection handles appear around it.
- Access the Format tab: With the text box selected, go to the “Format” tab under “Drawing Tools” in the ribbon. If you don’t see it, click the border again—this activates contextual formatting options.
- Use Align to Slide: In the “Arrange” group, click “Align.” A dropdown menu appears with alignment options. First, select “Align to Slide” to ensure alignment is relative to the entire slide, not other objects.
- Center horizontally: Choose “Align Center” from the menu. This centers the text box along the horizontal axis of the slide.
- Center vertically: Then select “Align Middle” to align it vertically. The combination of both commands places the text box exactly in the middle of the slide.
Alternative Methods for Precision Alignment
While the ribbon method works well, some scenarios require more control—especially when layering text over images or arranging multiple elements. Here are two alternative techniques for advanced precision.
Using the Ruler and Guides
PowerPoint’s rulers and smart guides help visualize alignment. Enable them via the “View” tab by checking “Ruler” and “Guides.” Drag a vertical guide to the center mark (half of your slide width—usually 5.25 inches for standard slides). Then drag your text box until it snaps to the guide. Repeat with a horizontal guide at 3.5 inches for vertical centering.
Leveraging the Selection Pane and Position Settings
For pixel-level accuracy, use the “Size & Position” pane:
- Right-click the text box and choose “Size and Position” (or open it from the Format tab > Arrange > Size).
- In the panel that appears, set the “Horizontal” position to 50% of the slide width. For a standard 10.5-inch wide slide, enter 5.25”.
- Set the “Vertical” position to 50% of slide height. For a 7-inch tall slide, input 3.5”.
- Ensure “From top-left corner of slide” is selected as the reference point.
This method is ideal for templates or animations where exact coordinates matter.
Common Pitfalls and How to Avoid Them
Even experienced users make mistakes when centering text. Below is a comparison of best practices versus common errors.
| Do’s | Don’ts |
|---|---|
| Always use “Align to Slide” before centering | Rely solely on visual estimation |
| Group related objects before aligning if needed | Forget to deselect other items, causing unintended alignment |
| Use the grid and snap-to settings for consistency | Disable snapping and then manually nudge objects |
| Check alignment in Slide Show mode to verify appearance | Assume alignment looks correct in edit view only |
Real-World Example: Fixing a Disjointed Title Slide
Sarah, a marketing manager, was preparing a client presentation. Her title slide had a headline and subtitle stacked in a single text box. She centered the box horizontally but noticed the text looked “too high” on the slide. After reviewing her design, she realized the text box itself was centered, but because it contained extra line spacing above the main title, the visual weight wasn’t balanced.
To fix it, Sarah split the headline and subheading into two separate text boxes. She aligned both to the slide, then used “Align Middle” and “Align Center” together. Finally, she adjusted the vertical spacing between boxes using the ruler guides. The result was a visually centered composition that felt balanced and professional.
This case illustrates an important principle: centering the container doesn’t always center the content. Consider typographic weight and whitespace when evaluating alignment.
Expert Insight on Design Consistency
“Perfect alignment isn’t just about symmetry—it’s about intentionality. Every element should have a purposeful place. When text boxes are consistently centered, audiences perceive the presenter as detail-oriented and trustworthy.” — Daniel Reeves, Presentation Design Consultant and Author of *Visual Impact*
Checklist: Perfect Text Box Centering in 6 Steps
- ✅ Select the text box by clicking its border
- ✅ Go to Format > Arrange > Align
- ✅ Click “Align to Slide”
- ✅ Choose “Align Center” for horizontal alignment
- ✅ Choose “Align Middle” for vertical alignment
- ✅ Preview in Slide Show mode to confirm visual balance
Frequently Asked Questions
Can I center multiple text boxes at once?
Yes. Hold Shift and click each text box to select them all. Then follow the same alignment steps—ensure “Align to Slide” is active. All selected boxes will be centered relative to the slide, not to each other.
Why does my text box look off-center even after using the align tools?
This often happens due to invisible characters, padding inside the text box, or non-uniform line spacing. Try reducing internal margins: Right-click the text box > Format Shape > Text Options > Text Box, and set internal margins to “0” or “Custom” with equal values.
Does centering work the same in PowerPoint Online?
Mostly. The interface is simplified, but the core functionality exists. Select the text box, click “Format,” then use the “Align” options. Note that “Align to Slide” may not be labeled explicitly but is usually the default behavior unless other objects are selected.
Maintaining Alignment Across Slides
Once you’ve perfected centering on one slide, replicate it efficiently. Use the “Format Painter” tool: after aligning a text box correctly, double-click “Format Painter” on the Home tab, then click other text boxes to apply the same size, position, and alignment. Alternatively, save well-aligned slides as custom layouts in your presentation theme for reuse.
Consistency across slides reinforces professionalism. Audiences notice subtle repetition in positioning, which builds trust in your message delivery.
Conclusion
Mastering text box centering in PowerPoint is a small skill with outsized impact. It transforms cluttered, amateurish slides into clean, confident visuals. By using alignment tools intentionally, avoiding common traps, and verifying results in presentation mode, you ensure every slide communicates clarity and care.


 浙公网安备
33010002000092号
浙公网安备
33010002000092号 浙B2-20120091-4
Comments
No comments yet. Why don't you start the discussion?