
Properly coiling a climbing rope is more than just tidying up after a climb—it’s a critical skill that affects both your safety and the lifespan of your gear. A poorly coiled rope can develop hidden twists, kinks, and internal damage that compromise its strength. Conversely, a well-coiled rope feeds smoothly through belay devices, reduces friction, and stores cleanly. Whether you're a weekend climber or a seasoned alpinist, mastering the correct technique ensures reliability when it matters most.
The Importance of Proper Rope Coiling
A climbing rope is one of the most vital pieces of safety equipment in your kit. It undergoes extreme stress during use, and how you handle it off the wall plays a significant role in its performance. Improper coiling introduces torsion and memory into the rope, leading to tangles, difficulty feeding through protection, and even increased wear on sheath fibers. Over time, these issues accumulate, shortening the rope's usable life and potentially creating hazardous situations mid-climb.
Additionally, many climbers overlook the psychological benefit of a neatly coiled rope: it signals preparedness. When your rope is organized, your mind is clearer, transitions are smoother, and your team operates with greater confidence.
“Rope care starts the moment you unclip from the anchor. How you treat your rope when it’s not in use determines how it will perform when you need it most.” — Sarah Peterson, AMGA Certified Rock Guide
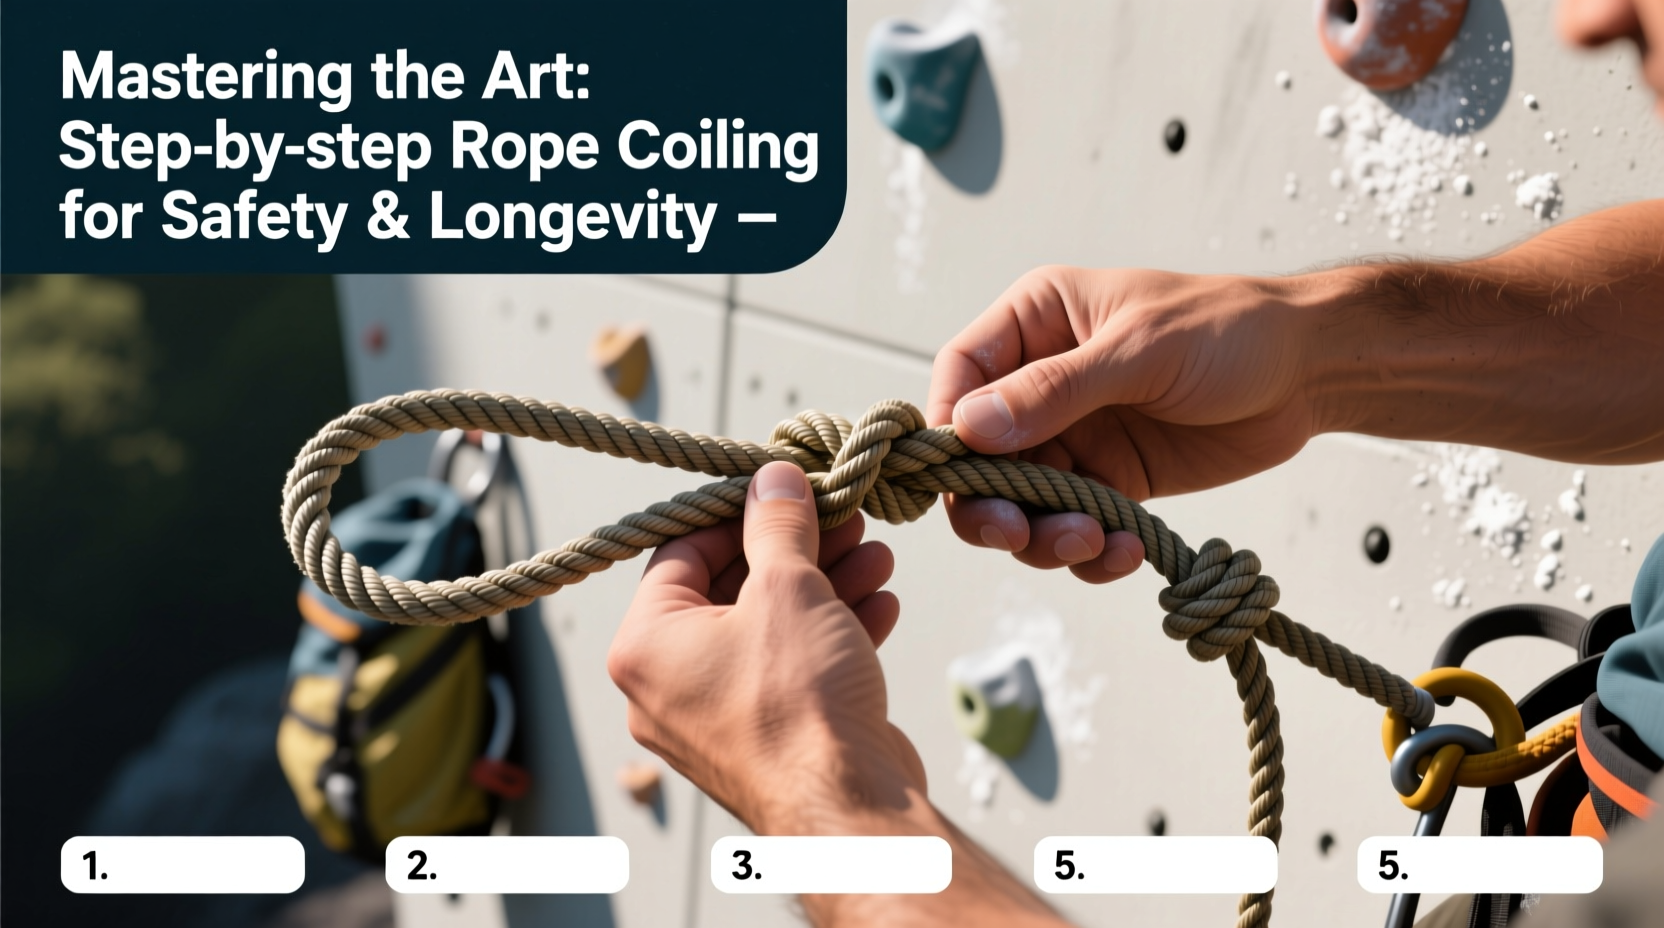
Step-by-Step Guide to Correctly Coil Your Climbing Rope
Follow this detailed process to coil your rope efficiently and safely. This method minimizes twist accumulation and keeps the rope ready for immediate deployment.
- Find a Clean, Flat Surface
Lay the rope out straight on grass, a tarp, or smooth rock. Avoid sandy or dirty areas that could grind abrasives into the sheath. - Start at One End
Identify one end of the rope (often marked with a manufacturer tag). Hold this end firmly in one hand—this will remain stationary throughout coiling. - Begin Flaking Out the Rope
Walk backward down the length of the rope, flaking it out in loose S-shaped loops. Let each section fall naturally without twisting. This “flaking” removes any stored twist from previous climbs. - Pick Up the Rope Systematically
Starting from the far end, begin coiling in consistent loops—about 1.5 to 2 feet wide. Use your non-dominant hand to form a loop, then transfer it to your dominant hand. Keep tension light and consistent. - Maintain Loop Uniformity
Avoid mixing large and small loops. Uneven coils create uneven stress points and make the rope harder to throw later. - Finish with a Secure Tie-Off
After the last loop, leave about 1–2 feet of tail. Wrap this tail around the entire coil bundle three to four times, then thread the end through the final loop to create a slip knot. Pull tight to secure.
Common Mistakes and What to Avoid
Even experienced climbers sometimes fall into bad habits. These errors may seem minor but can lead to serious consequences.
| Do’s | Don’ts |
|---|---|
| Flake the rope before coiling to remove twists | Throw the rope in a heap or yank it into a pile |
| Use consistent loop sizes | Make random-sized loops that tangle easily |
| Store coiled rope in a dry, UV-protected bag | Leave it exposed to sunlight or moisture |
| Tie off with a slip knot for quick release | Knot the rope tightly, making it hard to deploy |
| Inspect the rope while coiling for damage | Rush the process and skip inspection |
Real-World Example: The Alpine Misstep
During a multi-pitch ascent in the Tetons, a climbing team encountered delays due to a tangled rope. The second climber had hastily stuffed the rope into a backpack the previous day without flaking. When they began the next pitch, the rope fed erratically through the belay device, jamming repeatedly. The delay forced them to continue climbing into twilight, increasing exposure and fatigue. Post-climb inspection revealed several crushed core sections where kinks had formed under load.
This incident wasn’t caused by faulty gear—but by improper rope handling. A few extra minutes spent coiling correctly could have prevented the cascade of problems that followed.
Best Practices for Long-Term Rope Care
Coiling is just one part of a comprehensive rope maintenance routine. To maximize longevity and safety, integrate these practices into every climbing session.
- Inspect During Coiling: Run the rope through your hands slowly. Feel for flat spots, soft sections, or bulges indicating core damage.
- Clean When Necessary: Wash ropes only when visibly soiled, using cold water and mild, non-detergent soap. Never machine wash.
- Rotate Usage: If you own two ropes, alternate them to distribute wear evenly.
- Avoid Chemical Exposure: Keep ropes away from car batteries, solvents, and excessive sweat, which degrade nylon.
- Retire Based on Use: Replace your rope after a major fall, visible sheath damage, or approximately 5 years of regular use—even if it looks fine.
Checklist: Pre-Storage Rope Routine
Before packing your rope away, complete this checklist to ensure optimal condition for next use:
- ✅ Flake out the entire rope to remove twists
- ✅ Inspect for fraying, flattening, or core shots
- ✅ Wipe down with a damp cloth if dusty (avoid soaking)
- ✅ Coil in uniform loops using the slip-knot tie-off method
- ✅ Store in a cool, dry place away from direct sunlight
- ✅ Keep away from sharp gear like carabiners or crampons
Frequently Asked Questions
Can I throw my rope instead of coiling it?
While some climbers “throw” their rope (letting it fall in a pile), this introduces unpredictable twists and increases the risk of tangles. Throwing also skips the opportunity to inspect the rope. Coiling deliberately is always safer and more professional.
How tight should I coil the rope?
Loops should be firm enough to hold shape but not so tight that they deform the rope. Excessive tension can compress the core and accelerate wear. Think of it as wrapping a gift—neat, but not squeezed.
Is there a difference between coiling single vs. double ropes?
Yes. For double or twin ropes, coil each strand separately to avoid cross-twisting. Mark each end clearly and store them in individual bags or separated compartments to maintain pairing integrity.
Conclusion: Make It a Habit
Mastering the art of coiling isn’t about perfection—it’s about consistency. Every time you take the extra few minutes to coil your rope properly, you’re investing in future climbs, enhancing safety, and respecting your gear. This simple act builds discipline, reinforces attention to detail, and sets the tone for responsible climbing.


 浙公网安备
33010002000092号
浙公网安备
33010002000092号 浙B2-20120091-4
Comments
No comments yet. Why don't you start the discussion?