
Short square nails are a timeless favorite—practical, elegant, and versatile enough to suit any occasion. Whether you're preparing for a professional meeting or a weekend brunch, achieving a polished look starts with properly applied nail tips. While many turn to salons, mastering the technique at home saves time and money without sacrificing quality. With precision, patience, and the right tools, anyone can apply short square nail tips that appear seamless and professionally done.
Why Choose Short Square Nail Tips?
The short square nail shape is ideal for everyday wear. Its straight-across edge and flat tip provide durability and reduce the risk of snagging, making it a top choice for active individuals. Unlike longer styles, short square nails maintain strength while offering a clean, modern aesthetic. They’re also easier to apply at home because they require less shaping and filing post-application, reducing the margin for error.
Additionally, this style complements most hand shapes and enhances the appearance of neatness and professionalism. When applied correctly, artificial tips blend naturally with your real nails, creating an extended surface that’s ready for color, design, or a simple glossy finish.
Essential Tools and Materials Checklist
Success begins with preparation. Having the correct supplies on hand ensures a smooth process and professional results. Here’s what you’ll need:
- Short square nail tips (correct size for each nail)
- Nail glue or adhesive tabs
- Nail file (180/240 grit)
- Buffer block
- Cuticle pusher or orange stick
- Nail dehydrator or rubbing alcohol
- Cotton pads or swabs
- Lint-free wipes
- Nail primer (optional, for oily nail beds)
- Tweezers or applicator tool
- Top coat and base coat (if painting)
“Precision in prep work accounts for 70% of a flawless application. Never rush the cleaning and shaping stage.” — Lila Monroe, Professional Nail Technician with 12 years of experience
Step-by-Step Guide to Applying Short Square Nail Tips
Follow this detailed timeline to achieve a seamless, long-lasting result. Each step builds on the previous one, ensuring stability and visual harmony across all ten nails.
- Prepare Your Natural Nails
Remove any old polish using acetone-free remover to preserve nail health. Gently push back cuticles with a cuticle pusher. Lightly buff the surface of each nail to create texture for better adhesion, but avoid over-buffing, which weakens the nail. - Clean and Dehydrate
Wipe each nail with a cotton pad soaked in rubbing alcohol or a dedicated nail dehydrator. This removes oils and moisture, creating a dry surface essential for strong glue bonding. - Select the Right Tip Size
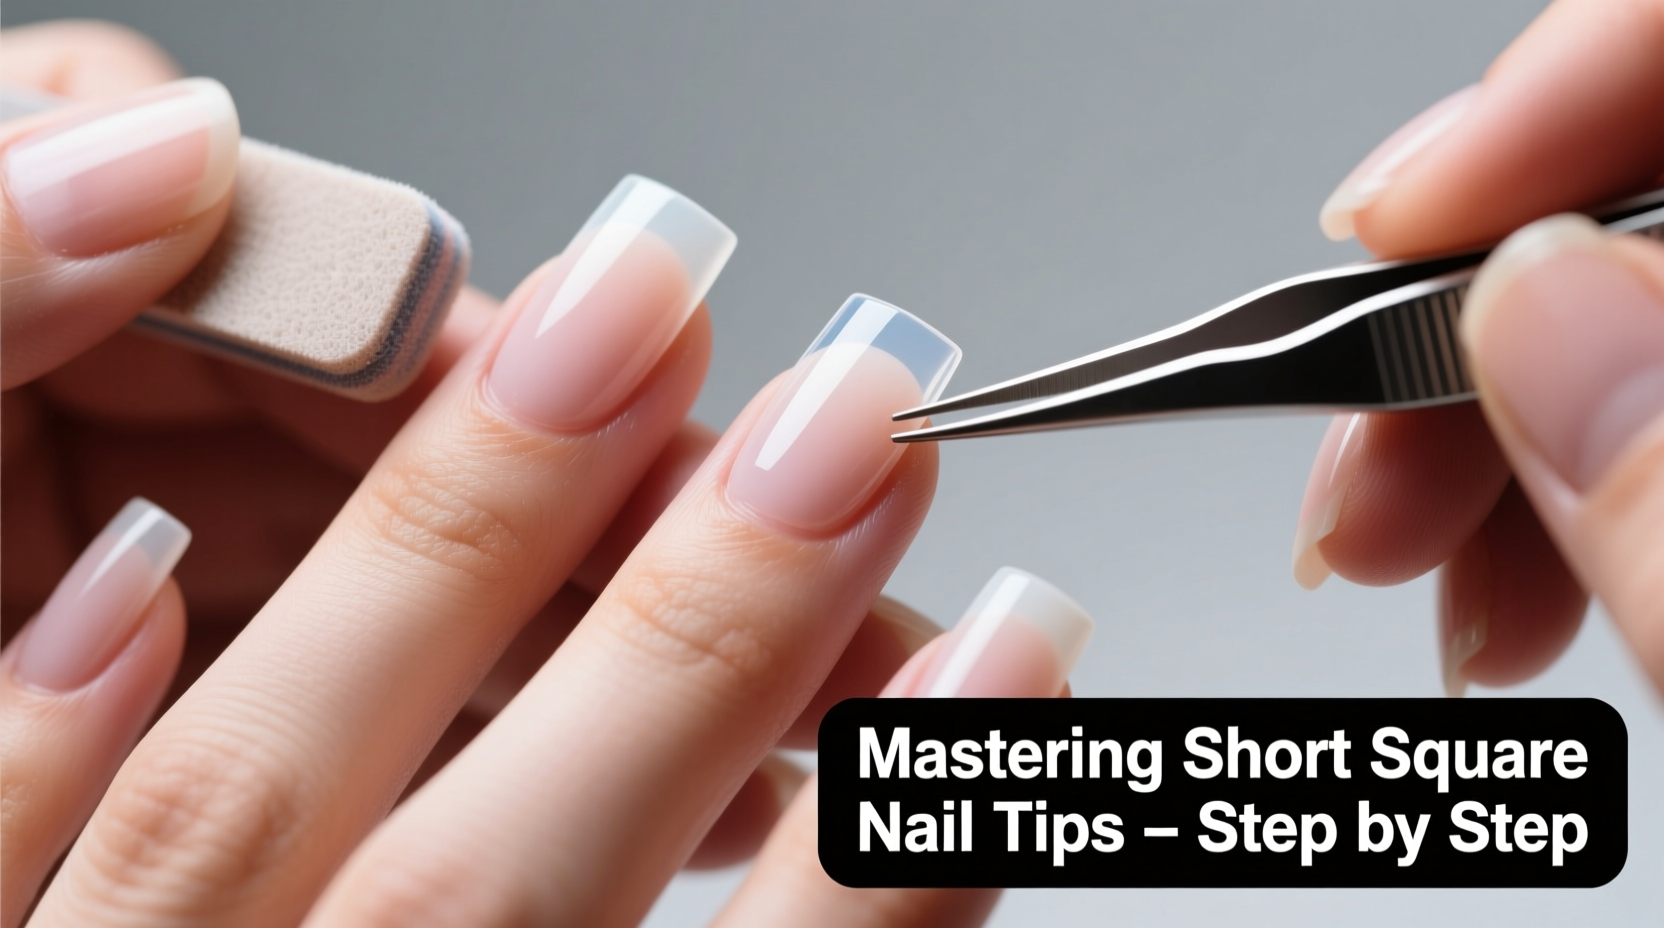
Hold different tips against your natural nails to find the best fit. The ideal tip should align flush with the sides of your nail and extend just beyond the fingertip by 1–2 mm. Use a variety pack if necessary to match each finger individually. <4>
Apply Adhesive
- Attach the Tip
Using tweezers or your fingers, press the tip firmly onto your nail. Hold for 10–15 seconds to allow the adhesive to set. Ensure the tip is centered and aligned with your cuticle line. Avoid moving the finger during this time. - Shape and Blend
Once all tips are applied, use a fine nail file to blend the seam between the artificial tip and your natural nail. File in one direction to prevent splitting. Shape the free edge into a clean square and smooth any rough edges. - Buff for Shine
Use a buffer block with medium-fine grit to gently polish the surface. This creates a uniform texture and prepares the nail for polish or top coat. - Finish with Protection
Apply a base coat if planning to paint, followed by color and a high-gloss top coat. If wearing bare, apply a clear strengthening top coat to seal the tip edge and prevent chipping.
For glue: Apply a small drop to the center of your natural nail. Too much glue can cause seepage and lifting. For adhesive tabs: Press the tab onto the nail bed, then remove the backing.
Common Mistakes and How to Avoid Them
Even experienced DIYers make errors. Recognizing these pitfalls helps you refine your technique.
| Mistake | Consequence | Solution |
|---|---|---|
| Using too much glue | Seepage, irritation, lifting | Use a toothpick for precise application |
| Poor sizing | Gaps, uneven look, discomfort | Test fit each tip before gluing |
| Rushing the drying time | Shifting, misalignment | Hold each tip for at least 15 seconds |
| Over-filing natural nails | Thinning, sensitivity | Buff lightly; focus on surface texture |
Real Application Example: Sarah’s Home Makeover
Sarah, a graphic designer from Portland, avoided nail enhancements for years, fearing they’d look unnatural or damage her nails. After struggling with breakage from typing, she decided to try short square tips at home. She followed the step-by-step method, paying close attention to sizing and blending. By using a nail dehydrator and holding each tip for 20 seconds, she achieved a set that lasted two weeks without lifting. Her colleagues assumed she’d visited a salon. “I finally feel confident showing my hands in meetings,” she said. “It took one hour the first time, now I do it in 25 minutes.”
Frequently Asked Questions
How long should short square nail tips last?
With proper application and care, tips can last 10–14 days. Avoid excessive exposure to water, harsh cleaners, and picking at the edges to maximize longevity.
Can I reuse nail tips?
Generally, no. Once removed, the adhesive surface is compromised, and reshaping often damages the structure. Reusing tips increases the risk of poor fit and bacterial buildup.
Are nail glue fumes harmful?
In well-ventilated areas, occasional use is safe. However, prolonged inhalation can irritate the lungs. Consider cyanoacrylate-based glues with added safety inhibitors, and always cap the bottle tightly after use.
Final Tips for Long-Term Success
Maintaining your short square nails goes beyond application. Keep them looking fresh by applying a top coat every 3–4 days to prevent chipping. At night, consider wearing cotton gloves if doing dishes or cleaning to protect the bond. Hydrate your cuticles daily with oil to support natural nail growth beneath the tip.
When it’s time to remove the tips, never force them off. Soak fingertips in acetone for 15–20 minutes, then gently nudge the tips from the base. Follow with a nourishing hand cream to restore moisture.
Conclusion: Elevate Your Everyday Style
Mastering the application of short square nail tips empowers you to maintain a put-together appearance without frequent salon visits. The process becomes quicker and more intuitive with practice. Each step—from selecting the right size to sealing the final coat—contributes to a result that looks intentional, polished, and enduring.


 浙公网安备
33010002000092号
浙公网安备
33010002000092号 浙B2-20120091-4
Comments
No comments yet. Why don't you start the discussion?