
Brewing exceptional coffee at home doesn’t require a barista certification or an expensive espresso machine. With the right ingredients, tools, and attention to detail, anyone can craft a cup that rivals their favorite café. The key lies in understanding the fundamentals: bean quality, grind size, water temperature, and brewing method. This guide walks you through each stage of the process, offering actionable insights to elevate your daily ritual from routine to revelation.
The Foundation: Choosing Quality Coffee Beans
The journey to great coffee begins long before the brew starts—it starts with the beans. Not all coffee is created equal, and freshness plays a critical role in flavor. Specialty-grade Arabica beans, roasted within the past two to four weeks, offer the most balanced acidity, sweetness, and aroma. Avoid pre-ground coffee when possible; whole beans retain essential oils and volatile compounds that degrade rapidly after grinding.
Origin matters too. Beans from Ethiopia often exhibit floral and citrus notes, while Colombian coffees tend to be nutty and chocolatey. Experiment with single-origin and blends to discover your palate preferences. Roast level also influences taste—light roasts preserve origin characteristics, medium roasts offer balance, and dark roasts deliver bold, smoky profiles.
Essential Equipment for Home Brewing
You don’t need every gadget on the market, but a few core tools make a dramatic difference in consistency and quality:
- Burr grinder: Ensures uniform particle size, crucial for even extraction.
- Gooseneck kettle: Offers precise pour control, ideal for pour-over methods.
- Digital scale: Measures both coffee and water accurately (grams, not scoops).
- Thermometer or temperature-controlled kettle: Maintains optimal water temperature between 195°F and 205°F (90–96°C).
- Fresh filter water: Chlorine and minerals affect taste—use filtered tap water.
“Grind consistency is more important than roast profile. A burr grinder is the single best upgrade a home brewer can make.” — James Hoffmann, World Barista Champion
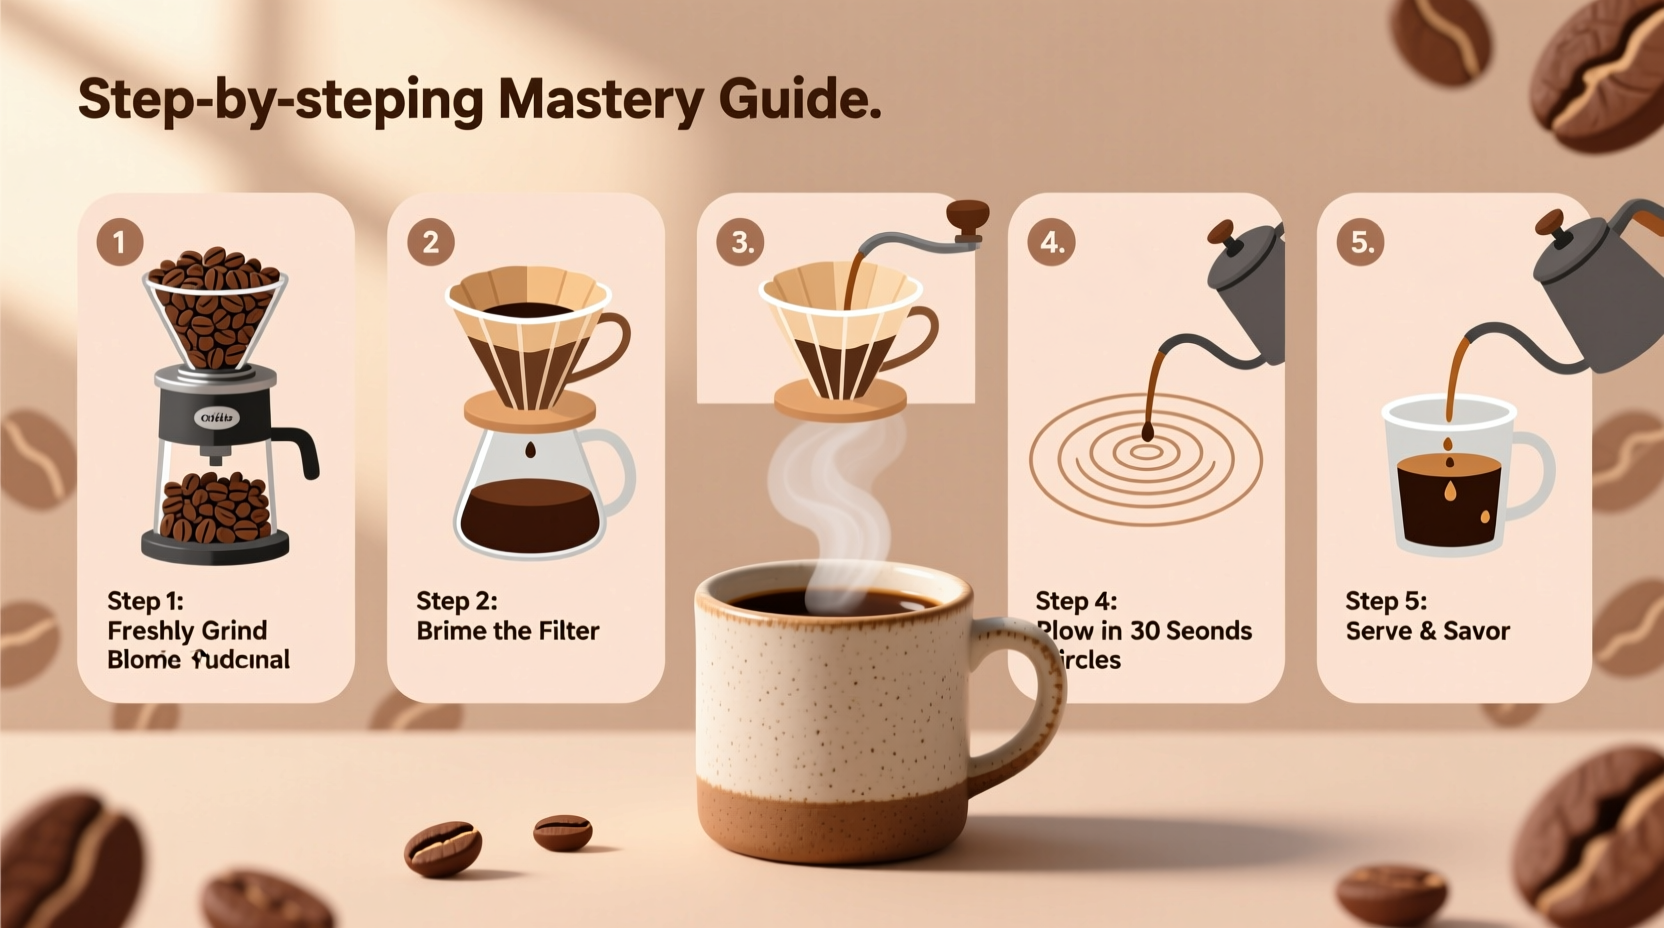
Step-by-Step Guide to Pour-Over Brewing
Pour-over brewing highlights clarity and nuance in coffee. Here’s how to execute it flawlessly using a Hario V60 or similar cone dripper:
- Boil filtered water and let it rest 30 seconds to reach ~200°F (93°C).
- Place a paper filter in the dripper and rinse it thoroughly with hot water to eliminate paper taste and preheat the vessel.
- Add 20 grams of freshly ground coffee (medium-fine, like table salt) to the filter.
- Start your timer and pour 40 grams of water evenly over the grounds to begin blooming—the release of CO₂ trapped during roasting.
- Wait 45 seconds. This allows gases to escape so water can extract flavors more efficiently.
- Slowly pour in concentric circles, maintaining a steady flow. Aim to reach 300 grams of total water by 2:30 minutes.
- Let the water drain completely. Total brew time should be between 2:45 and 3:15 minutes.
- Remove the dripper, swirl the carafe gently to homogenize the brew, and serve immediately.
Comparing Popular Brewing Methods
Different methods suit different tastes and lifestyles. Below is a comparison of three widely used techniques:
| Method | Flavor Profile | Brew Time | Skill Level | Best For |
|---|---|---|---|---|
| Pour-Over | Clean, bright, nuanced | 3–4 minutes | Intermediate | Single servings, tasting origins |
| French Press | Full-bodied, rich, slightly muddy | 4 minutes + plunge | Beginner | Morning rituals, strong cups |
| AeroPress | Smooth, low-acid, versatile | 1–2 minutes | Beginner to Advanced | Travel, experimentation, quick brews |
Each method rewards precision. The French press, for instance, benefits from a coarse grind and gentle stir after pouring water. The AeroPress allows pressure manipulation, enabling everything from espresso-like shots to Americano-style drinks.
A Real Morning Routine: From Bean to Brew
Sophia, a software developer in Portland, used to rely on drive-thru coffee until she invested in a burr grinder and learned basic pour-over technique. She now wakes up 15 minutes earlier just to enjoy her morning ritual. “I measure 22 grams of Ethiopian Yirgacheffe, grind it fresh, and follow the bloom-pour-drain rhythm. It’s meditative. My coworkers noticed the change—I’m less jittery and more focused.” Her simple shift illustrates how intentionality transforms consumption into craft.
Common Mistakes and How to Avoid Them
- Using old or stale beans: Flavor diminishes after four weeks post-roast.
- Inconsistent grind size: Blade grinders create uneven particles, leading to under- and over-extraction.
- Incorrect water-to-coffee ratio: Default to 1:15 (e.g., 20g coffee to 300g water), then adjust to taste.
- Ignoring water quality: Hard water masks flavor; distilled water lacks minerals needed for extraction.
- Rushing the bloom: Skipping or shortening the degassing phase results in flat, sour coffee.
Checklist: Brewing the Perfect Cup at Home
Before each brew, run through this checklist to ensure consistency:
- ☑ Use freshly roasted, whole-bean coffee (roasted within 4 weeks)
- ☑ Grind beans immediately before brewing with a burr grinder
- ☑ Measure coffee and water by weight (start with 1:15 ratio)
- ☑ Heat filtered water to 195–205°F (90–96°C)
- ☑ Pre-wet filter and discard rinse water
- ☑ Bloom coffee for 45 seconds with twice the weight of coffee in water
- ☑ Pour slowly and evenly, maintaining stable water level
- ☑ Finish brewing within target time (varies by method)
- ☑ Clean equipment promptly to prevent oil buildup
FAQ
How long should coffee stay fresh after roasting?
Ideal consumption is between 7 and 28 days post-roast. Light roasts peak later (10–21 days), while dark roasts are best within the first two weeks.
Can I reuse coffee grounds?
No. Used grounds have already released most soluble compounds. Rebrewing yields weak, bitter liquid with potential mold risk if stored.
Why does my coffee taste bitter or sour?
Bitterness usually means over-extraction—try a coarser grind or shorter brew time. Sourness indicates under-extraction—use a finer grind, hotter water, or extend contact time.
Conclusion: Elevate Your Everyday Ritual
Perfect coffee isn’t about perfectionism—it’s about presence. By mastering the variables within your control—bean freshness, grind size, water quality, and timing—you transform a daily habit into a moment of mindfulness and pleasure. Whether you’re brewing a single cup or sharing with loved ones, each step is an invitation to slow down and savor. The tools are simple, the knowledge accessible, and the reward profound: a truly exceptional cup, made exactly how you like it.


 浙公网安备
33010002000092号
浙公网安备
33010002000092号 浙B2-20120091-4
Comments
No comments yet. Why don't you start the discussion?