
Drawing human eyes is often considered one of the most challenging yet rewarding aspects of portrait sketching. The eye conveys emotion, depth, and personality—elements that bring a drawing to life. For beginners, the complexity of shapes, shadows, and reflections can be overwhelming. However, with structured practice and a clear understanding of anatomy and light, anyone can learn to draw realistic eyes. This guide breaks down the process into manageable steps, offering actionable advice, visual breakdowns in text form, and proven techniques used by artists worldwide.
Anatomy of the Human Eye: What You Need to Know
Before putting pencil to paper, it's essential to understand the basic structure of the eye. While artistic interpretation allows for some flexibility, grounding your drawings in anatomical accuracy ensures realism and consistency.
The visible portion of the eye includes several key components:
- Sclera – The white part of the eye, not pure white but slightly off-white with subtle variations.
- Iris – The colored ring surrounding the pupil, containing radial lines and texture.
- Pupil – The dark center that expands or contracts based on light.
- Cornea – A transparent layer covering the iris and pupil, often responsible for catchlights (reflections of light).
- Upper and Lower Eyelids – Curved folds that frame the eye, with the upper lid typically more pronounced.
- Eye Lashes – Grow from both lids, curving outward and varying in length.
- Brow Bone and Surrounding Flesh – Adds depth and context; the eye doesn’t float in isolation.
“Understanding facial anatomy isn’t about copying diagrams—it’s about seeing how forms interact with light. That’s where realism begins.” — Daniel Park, Portrait Artist & Art Instructor
Essential Tools and Materials
You don’t need an expensive toolkit to start drawing realistic eyes. Focus on functionality and control. Here’s what works best for beginners:
| Tool | Recommended Type | Purpose |
|---|---|---|
| Pencil | H, HB, 2B, 4B, 6B | Varying hardness for outlines, mid-tones, and deep shadows |
| Eraser | Kneaded eraser + precision tip | Lifting graphite gently and creating highlights |
| Blending Tool | Blending stump or tissue | Smoothing gradients, especially in the iris and sclera |
| Paper | Smooth Bristol or sketch paper | Allows fine detail and layering without tooth interference |
| Ruler (optional) | Metal or plastic straight edge | Aiding symmetry when laying out initial guidelines |
Start with a 2B pencil for initial sketching and switch to softer grades like 4B or 6B for shading. Keep your HB handy for refining edges and adding crisp lashes.
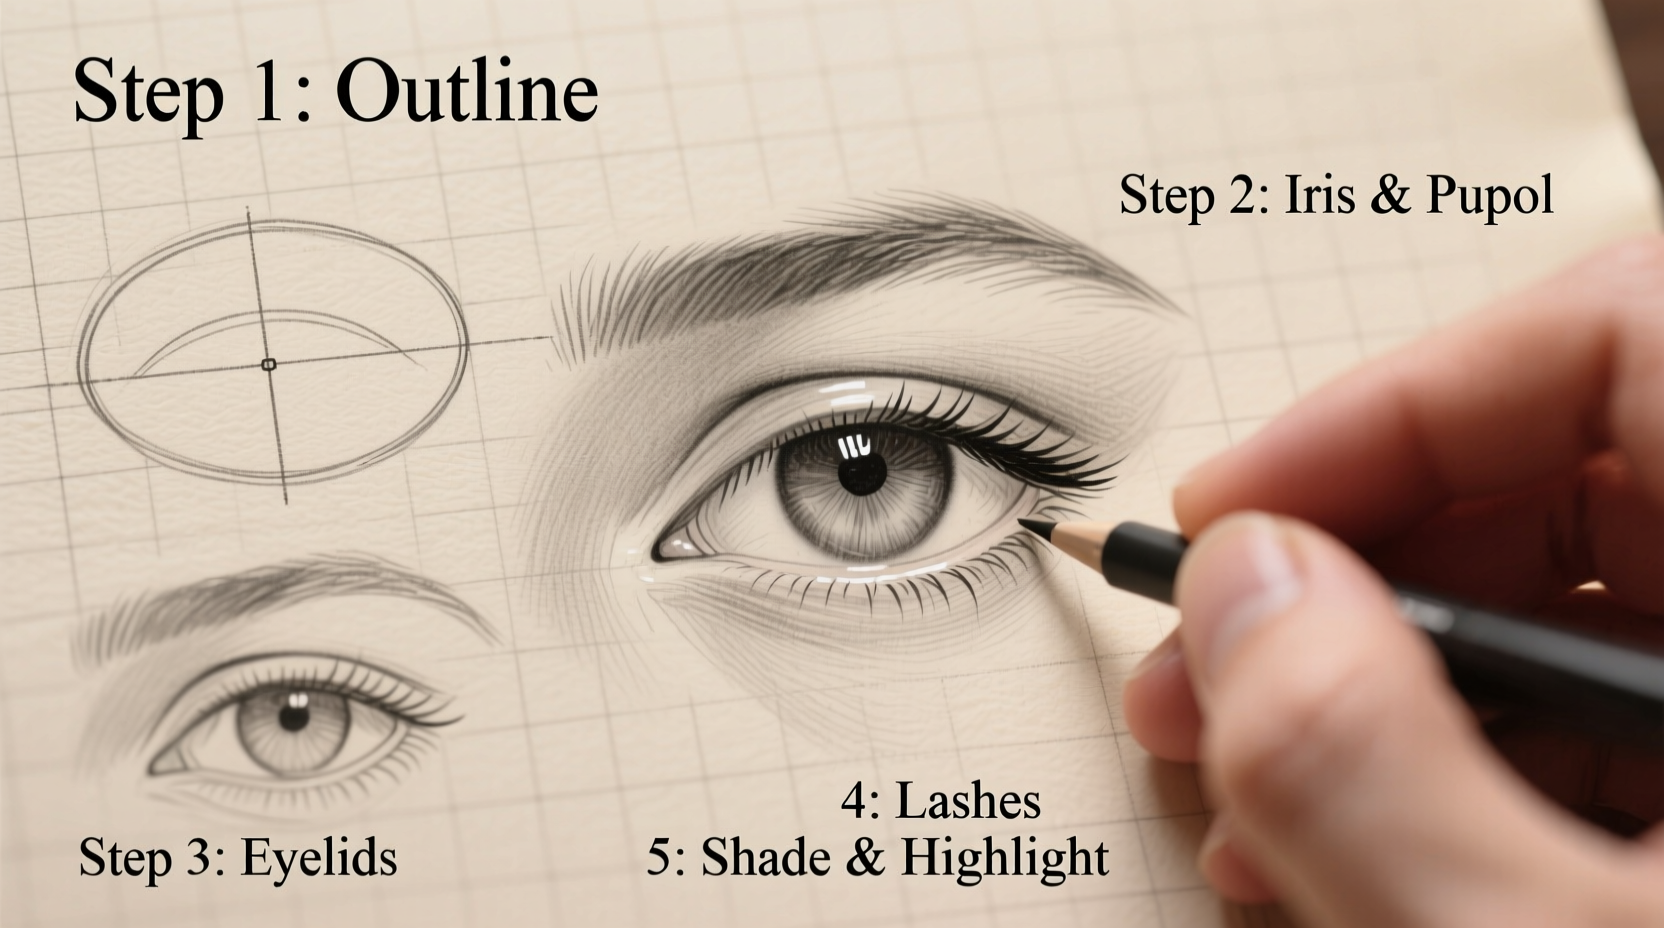
Step-by-Step Guide to Drawing a Realistic Eye
Follow this sequence to build a lifelike eye from scratch. Each stage builds upon the last, emphasizing proportion, value, and detail.
- Sketch the Basic Oval Shape
Draw a slightly tilted oval—this represents the outer boundary of the eye. Avoid perfect symmetry; real eyes have natural irregularities. Use light pressure so lines are easy to erase later. - Add the Iris and Pupil
Inside the oval, draw a smaller circle for the iris. Position it slightly toward the nose to reflect natural placement. Center the pupil within the iris. Leave a small white spot unshaded—this will become the primary catchlight. - Define the Upper and Lower Eyelids
The upper eyelid forms a soft curve over the iris, thickest near the center. The lower lid is subtler, just skimming the bottom edge of the iris. Add slight thickness to suggest volume. - Draw the Eyelashes
Begin with the upper lashes. Group them in clusters of 3–5 rather than individual strands. Curve them outward and upward. Lower lashes are shorter and sparser—use minimal strokes. - Shade the Iris with Texture
Use a 2B pencil to lay down a base tone. Then, with short radial strokes, create fibrous patterns spreading from the pupil outward. Vary pressure to simulate depth. Blend lightly at the edges but keep the center near the pupil darker. - Darken the Pupil and Enhance Catchlight
Fill the pupil completely with a 6B pencil for maximum contrast. Carefully preserve the catchlight using an eraser. You can add a secondary, smaller highlight if desired. - Render the Sclera and Shadows
The sclera isn’t flat white. Apply faint, uneven shading—darker near the eyelids and under the iris. Use a kneaded eraser to lift subtle highlights along the cornea’s curve. - Add Depth Around the Eye
Sketch the inner corner (caruncle) with soft pinkish-gray tones. Include subtle creases above the upper lid and below the lower lid. These micro-details enhance realism. - Finalize and Refine
Step back and assess proportions. Adjust asymmetry, deepen contrasts, and clean up stray marks. Use a sharp pencil to define lash tips and iris details.
Common Mistakes and How to Avoid Them
Even careful beginners fall into predictable traps. Recognizing these early saves time and frustration.
- Over-detailing too soon – Adding intricate lashes or iris patterns before establishing correct proportions leads to messy results. Build form first, then refine.
- Flat, lifeless irises – Using circular shading instead of radial strokes kills dimension. Always work from the pupil outward.
- Neglecting the socket – Eyes sit in a bony cavity. Ignoring shadows beneath the brow or along the nasal bridge makes the eye look pasted on.
- Uniform eyelash length – Lashes vary in length, with the longest near the center of the eye. Avoid comb-like uniformity.
- Perfect symmetry – No two eyes are identical. Allow slight differences in size, tilt, and lid openness for naturalism.
“Realism isn’t perfection—it’s controlled imperfection. The quirks are what make a drawing believable.” — Lena Torres, Fine Art Educator
Practice Checklist for Consistent Improvement
To progress steadily, follow this weekly routine. Mastery comes from repetition and mindful observation.
- ✅ Sketch one eye from a reference photo daily (15 minutes)
- ✅ Focus on different lighting conditions: front, side, and backlighting
- ✅ Experiment with various expressions: relaxed, squinting, wide-eyed
- ✅ Compare your drawing to the reference every 5 minutes to check proportions
- ✅ Use a mirror to study your own eye movements and lid shapes
- ✅ Shade a full grayscale scale (white to black) to improve tonal control
- ✅ Review old sketches weekly to track improvement
Mini Case Study: From Flat to Lifelike in 3 Weeks
Jamie, a self-taught beginner, struggled with cartoonish, expressionless eyes. After studying anatomy briefly, they implemented a structured 20-minute daily practice using the steps outlined here. Week one focused solely on ovals, irises, and pupils with proper placement. Week two introduced shading and blending techniques. By week three, Jamie was rendering detailed eyes with convincing depth and catchlights. The breakthrough came when they stopped trying to “draw lashes” and started observing how light shaped the entire orbital area. Their latest sketch received praise in an online art community for its emotional realism—proof that consistent, methodical practice yields rapid results.
Frequently Asked Questions
How do I make the eye look wet or glossy?
A glossy appearance comes from strategic highlights and smooth gradients. Preserve at least one strong catchlight in the cornea. Use a blending stump to create a seamless transition from dark pupil to lighter iris edge. Avoid harsh lines around the sclera.
Should I draw both eyes together or one at a time?
Beginners should focus on one eye at a time to master detail and lighting. When drawing full portraits, establish both eyes’ positions simultaneously to maintain alignment, then refine each separately.
What if my proportions are always off?
Use comparative measurement. Ask: Is the iris touching the upper lid? How much white is visible above and below? Lightly sketch cross-guides (vertical and horizontal axes) through the iris to check centering.
Keep Practicing, Keep Seeing
Drawing human eyes well is less about talent and more about observation and patience. Every face tells a story through its gaze, and learning to capture that nuance opens doors to deeper artistic expression. Start small. Master one component at a time. Return to the fundamentals whenever you feel stuck. With deliberate practice, what once seemed impossibly complex will become second nature.


 浙公网安备
33010002000092号
浙公网安备
33010002000092号 浙B2-20120091-4
Comments
No comments yet. Why don't you start the discussion?