
Baking sourdough bread at home is more than just a culinary skill—it’s a return to tradition, patience, and natural fermentation. Unlike commercial yeast breads, sourdough relies on a living culture of wild yeast and lactic acid bacteria to rise and flavor the loaf. The result? A crusty, chewy, tangy loaf that’s both nutritious and deeply satisfying. While it may seem intimidating at first, sourdough baking is accessible to anyone willing to learn the rhythm of feeding, folding, and timing. This guide walks you through every stage, from creating your first starter to pulling a golden loaf from your oven.
Creating Your Sourdough Starter: The Heart of the Bread
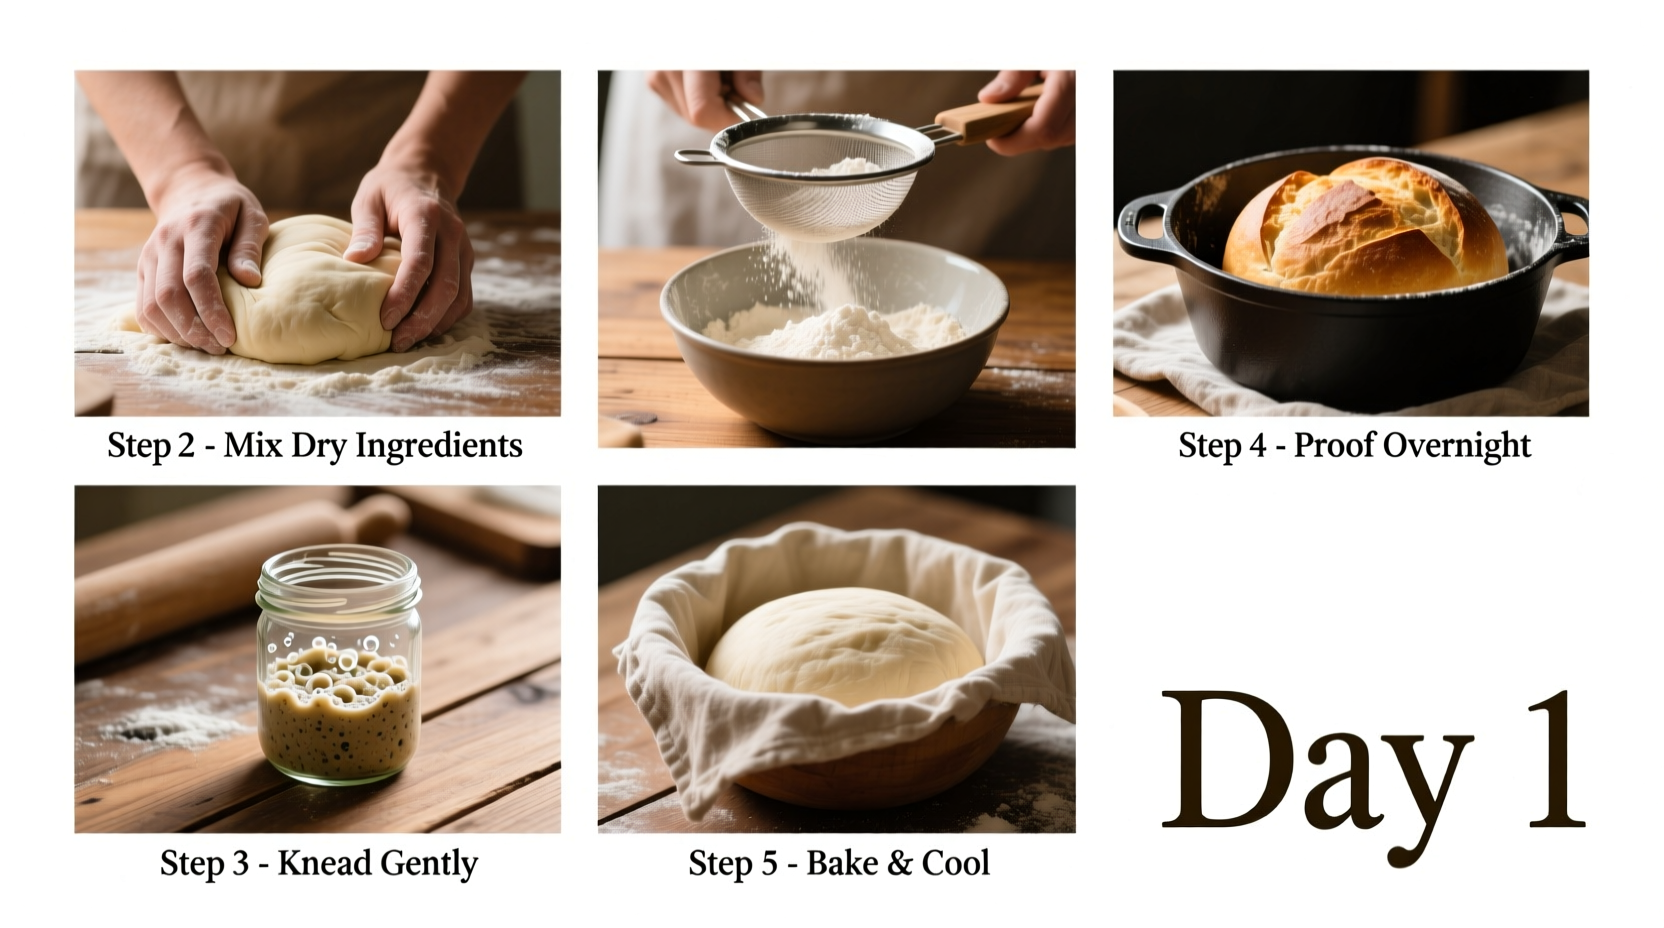
The foundation of any sourdough loaf is the starter—a mixture of flour and water teeming with wild microorganisms. These microbes, naturally present in the air and on grain, ferment the mixture, producing gas and acidity that leaven and flavor your bread.
To begin, combine 50 grams of whole wheat or rye flour with 50 grams of filtered water in a clean glass jar. Stir well, cover loosely (a lid placed on top without sealing, or a cloth secured with a rubber band), and let it sit at room temperature (ideally 70–75°F or 21–24°C).
Each day for the next 5–7 days, discard half the mixture and feed it with another 50g of flour and 50g of water. By day 3 or 4, you may notice bubbles, a pleasant sour aroma, and some expansion—signs that fermentation is underway.
A mature starter will double in size within 4–8 hours after feeding and pass the “float test”—when a spoonful dropped into water floats, it’s ready to bake with. This process takes patience; don’t rush it. Some starters take up to 10 days to stabilize.
Step-by-Step Baking Process
Once your starter is active, you’re ready to bake. Here’s a clear timeline for your first loaf:
- Feed your starter 8–12 hours before mixing your dough. Use equal parts flour and water by weight (e.g., 50g starter, 50g flour, 50g water).
- Mix the dough: Combine 500g bread flour, 350g water (70% hydration), 100g active starter, and 10g salt. Mix until no dry flour remains. Let rest (autolyse) for 30 minutes.
- Add salt after autolyse, then mix thoroughly to develop strength.
- Perform stretch and folds: Every 30 minutes for 2–3 hours, gently pull and fold the dough over itself from all four sides. This builds gluten structure.
- Bulk fermentation: Let the dough rise at room temperature for 3–5 hours, depending on warmth and starter strength. It should increase by 50–75%, feel airy, and show bubbles.
- Shape the dough: Turn out onto a lightly floured surface, pre-shape into a round, rest 20–30 minutes, then shape tightly into a boule or batard.
- Proof: Place in a lined banneton (proofing basket) and refrigerate for 12–16 hours (cold retard) or proof at room temperature for 2–3 hours.
- Bake: Preheat oven to 450°F (230°C) with a Dutch oven inside. Score the dough, transfer to the hot pot, cover, and bake 20 minutes. Uncover and bake another 20–25 minutes until deep golden brown.
Essential Tools and Ingredients Checklist
Before you begin, gather these essentials to ensure success:
- Unbleached bread flour or a mix of bread and whole wheat flour
- Filtered or bottled water (chlorine-free)
- Kitchen scale (precision is critical)
- Large mixing bowl
- Scraper (dough scraper or bench knife)
- Banneton (proofing basket) or a bowl lined with a floured towel
- Dutch oven or heavy oven-safe pot with lid
- Lame or sharp knife for scoring
- Oven thermometer (ovens often run inaccurate)
Common Pitfalls and How to Avoid Them
Even experienced bakers face challenges. Below is a comparison of common issues and their solutions:
| Problem | Possible Cause | Solution |
|---|---|---|
| Dense, gummy crumb | Under-proofed or under-baked | Extend bulk fermentation or final proof; use instant-read thermometer (internal temp should reach 205–210°F) |
| Loaf doesn’t rise | Weak starter or cold environment | Ensure starter doubles after feeding; keep dough warm (use oven with light on) |
| Collapse after scoring | Over-proofed | Reduce proofing time; perform the \"poke test\"—if indentation slowly springs back, it's ready |
| Too sour | Long cold fermentation or acidic starter | Shorten fridge time; feed starter closer to baking time |
| Sticky dough | High hydration or under-developed gluten | Adjust flour gradually; improve strength with more stretch and folds |
“Sourdough isn’t about perfection—it’s about rhythm. The more you bake, the more you’ll understand your starter’s language.” — Clara Nguyen, Artisan Baker & Fermentation Educator
A Beginner’s First Bake: A Real Example
Jamie, a home cook in Portland, had never baked bread before trying sourdough during a winter lockdown. Her first starter failed—mold appeared on day 4. Instead of giving up, she started again with filtered water and a clean jar. By day 6, her new starter bubbled vigorously. She followed a simple recipe, but over-proofed the loaf, resulting in a flat, dense bread. Undeterred, she reduced the final proof to 2 hours and used a colder fridge for retarding. On her third try, she pulled out a crackling, golden boule with an open crumb. “It wasn’t perfect,” she said, “but it tasted like accomplishment.”
Frequently Asked Questions
Can I use all-purpose flour instead of bread flour?
Yes, but bread flour has higher protein, which supports better structure and rise. All-purpose flour works, especially for beginners, but expect a slightly less chewy texture.
Why does my sourdough smell like vinegar or acetone?
This indicates an underfed or hungry starter. Feed it more frequently or reduce the time between feeds. If stored in the fridge, refresh it at least once a week.
How do I store my starter long-term?
Keep it in the refrigerator and feed it weekly. For longer breaks, dry a portion of starter on parchment, flake it, and store in an airtight container—rehydrate with water and flour when ready to use.
Conclusion: Start Small, Bake Often
Mastering sourdough is not about flawless loaves on the first try. It’s about building a relationship with a living culture, learning the subtle cues of fermentation, and embracing imperfection as part of the craft. Each bake teaches you something new—about timing, temperature, and technique. With consistent practice, what once seemed mysterious becomes intuitive. Your kitchen will fill with the scent of rising dough and toasted crust, and your table will hold bread made with care, time, and patience.


 浙公网安备
33010002000092号
浙公网安备
33010002000092号 浙B2-20120091-4
Comments
No comments yet. Why don't you start the discussion?