
Sewing your own puffer jacket may seem like a daunting task at first, but with the right tools, materials, and guidance, it becomes an achievable and rewarding project. Whether you're looking to customize fit, experiment with fabric, or simply enjoy the satisfaction of making functional outerwear, this comprehensive guide breaks down every stage—from selecting insulation to final stitching—into manageable steps. By the end, you’ll have not just a jacket, but a deeper understanding of garment construction and textile performance.
Gathering Materials and Tools
The foundation of any successful sewing project lies in preparation. A puffer jacket requires specific fabrics and components that differ from standard clothing due to its insulating function and weather-resistant properties.
- Outer Fabric: Choose tightly woven nylon or polyester with a DWR (durable water repellent) finish. These resist wind, light moisture, and are lightweight.
- Lining Fabric: Soft taffeta or ripstop polyester works well as an inner layer for comfort and heat retention.
- Insulation: Pre-cut synthetic quilt batting or loose-fill polyester fiberfill. Avoid down unless you’re experienced with baffle box construction.
- Thread: High-quality polyester thread for durability and resistance to abrasion.
- Zippers: A heavy-duty #5 or #8 separating jacket zipper, preferably waterproof.
- Elastic or Binding: For cuffs and hem if desired.
- Notions: Snaps, toggles, or Velcro for closures; seam sealant tape for seams.
Understanding Quilting Patterns and Baffle Construction
The defining feature of a puffer jacket is its quilted design, which traps insulation in compartments. There are two primary methods: stitched-through quilting and box-wall (baffle) construction.
| Method | Pros | Cons |
|---|---|---|
| Stitched-Through | Simple, beginner-friendly, uses standard sewing machine | Less efficient insulation—stitches compress filling, creating cold spots |
| Box-Wall (Baffle) | Superior warmth retention, no cold spots | Complex; requires precise sewing and hand-finishing |
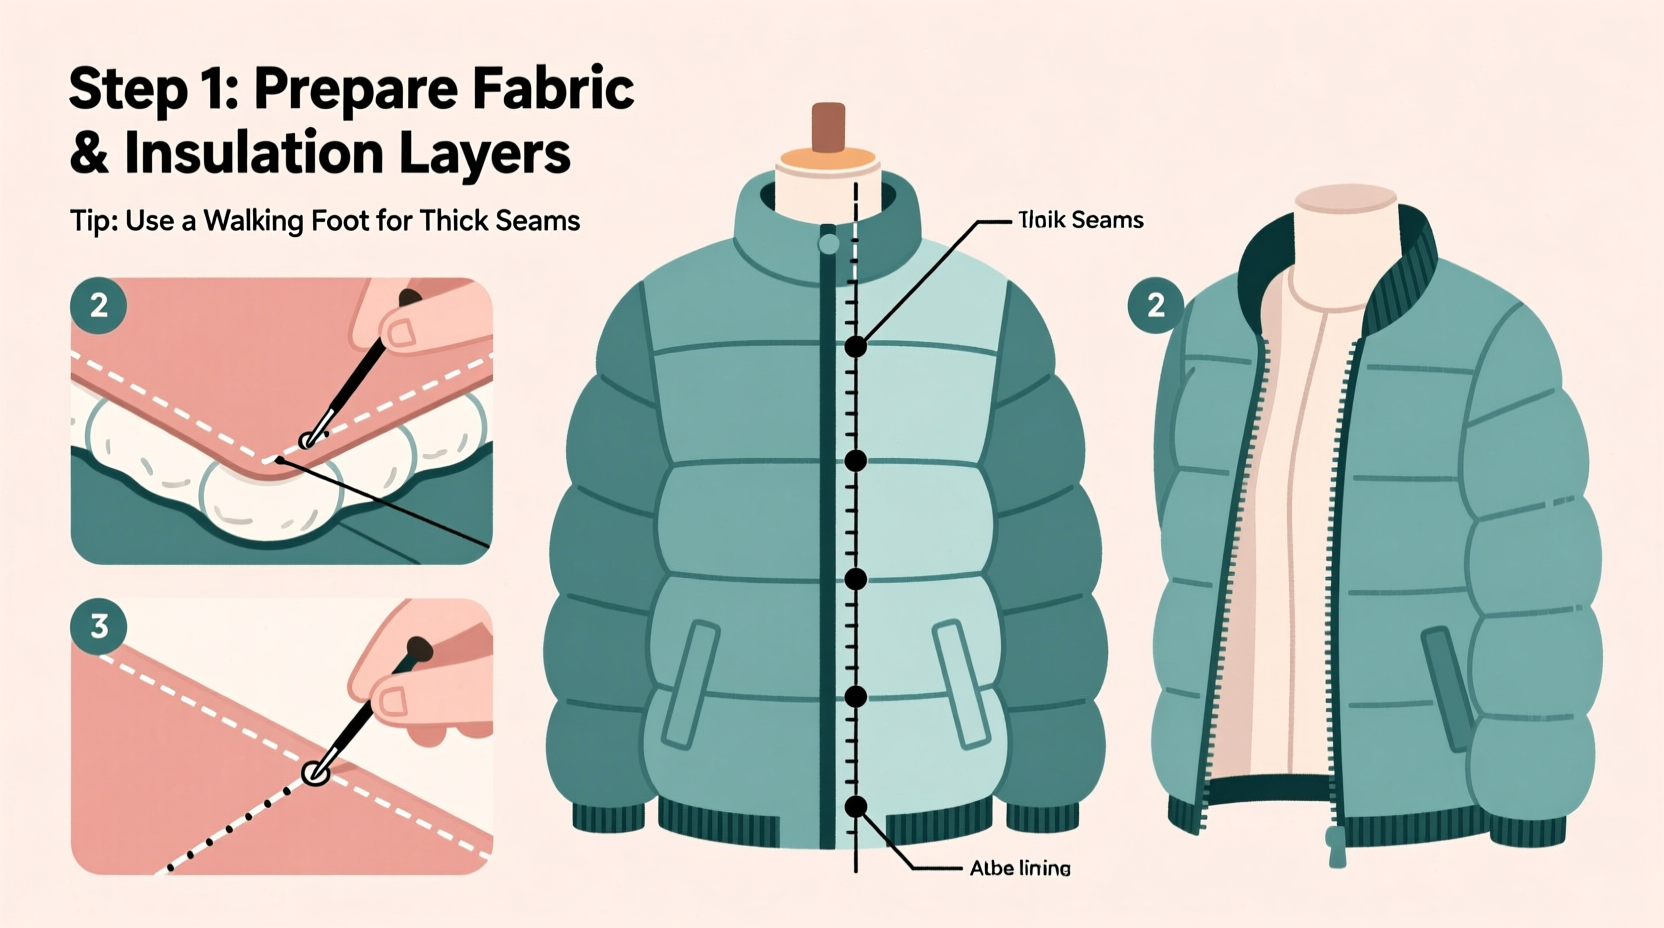
For beginners, stitched-through quilting is recommended. It involves sewing both outer and lining layers together in a grid pattern, trapping insulation between them. The spacing of the quilting lines determines puffiness—wider channels (e.g., 3” x 3”) create more volume, while narrower ones offer better structure.
“Quilting isn’t just aesthetic—it’s thermal engineering. Even spacing ensures consistent warmth.” — Lena Torres, Outdoor Apparel Designer
Step-by-Step Guide to Sewing Your Puffer Jacket
This timeline outlines the entire process in logical order. Allow 10–15 hours total, depending on complexity and experience level.
- Create or Modify a Pattern: Use a commercial jacket pattern (look for “puffer,” “insulated,” or “parka” styles). Adjust for your measurements, especially across shoulders and chest.
- Cut All Pieces: Lay out fabric and lining. Cut front, back, sleeves, collar, and pocket pieces. Mark quilting lines lightly with chalk or washable marker.
- Prepare Insulation: If using pre-batting, cut to match each section. For loose fill, plan for slightly oversized pockets to allow fluff distribution.
- Assemble Outer Shell: Sew shoulders and side seams on outer fabric. Press seams open. Repeat for lining, but leave a 6-inch gap in the bottom hem for turning later.
- Attach Zipper: Pin the zipper face-down to the front edges of the outer shell. Stitch close to the teeth using a zipper foot. Then attach the lining to the other side of the zipper.
- Layer and Baste: Sandwich insulation between outer shell and lining. Pin or spray-baste all three layers together to prevent shifting.
- Quilt the Panels: Using a walking foot, stitch along marked lines. Start from the center and work outward to avoid puckering. Backstitch at beginning and end. <8> Finish Sleeves and Cuffs: Attach elastic or knit binding to sleeve openings. Fold and stitch hems neatly.
- Add Collar and Final Edges: Sew stand-up collar to neck opening. Enclose raw edges with bias binding or fold-and-stitch method.
- Close and Turn: Pull the entire jacket through the gap in the lining. Gently push out corners. Hand-stitch the gap closed invisibly.
- Topstitch and Detail: Add final topstitching around pockets, collar, and hem for a professional look. Attach snaps or toggles as needed.
Common Challenges and How to Overcome Them
Even with careful planning, issues arise. Here’s how to handle frequent setbacks:
- Insulation Shifting: Use basting spray or temporary pins every few inches before quilting.
- Uneven Puffiness: Distribute fiberfill evenly by hand before stitching. Fluff sections gently post-quilting.
- Zipper Misalignment: Baste zipper in place before permanent stitching. Use clips instead of pins to avoid snags.
- Bulky Seams: Trim seam allowances and press carefully. Consider grading seams when multiple layers meet.
Real Example: Sarah’s First Puffer Project
Sarah, a hobby sewer from Vermont, wanted a custom-fit jacket for winter hikes. She chose olive-green ripstop nylon and bright orange taffeta lining for visibility. Her initial attempt failed when she skipped basting—insulation clumped during quilting. After reworking with spray adhesive and smaller quilting squares, her second version succeeded. “It wasn’t perfect,” she said, “but wearing something I made myself kept me warmer than any store-bought jacket.”
Essential Checklist Before You Begin
Use this checklist to ensure you're fully prepared before cutting fabric:
- ☑ Acquire or print a reliable jacket pattern in your size
- ☑ Purchase all fabrics, insulation, and notions
- ☑ Pre-wash and dry fabrics
- ☑ Test machine settings on scrap layers (including insulation)
- ☑ Transfer pattern markings clearly onto fabric
- ☑ Charge serger or prepare zigzag finish for seam allowances
- ☑ Set up a large, clean workspace with good lighting
Frequently Asked Questions
Can I use cotton fabric for a puffer jacket?
Standard cotton is not ideal—it absorbs moisture and lacks wind resistance. If you must use cotton, opt for tightly woven canvas and apply a waterproofing spray. However, synthetic fabrics perform far better in outdoor conditions.
How do I wash a homemade puffer jacket?
Machine wash on gentle cycle with mild detergent. Use tennis balls in the dryer to restore loft. Avoid high heat. Never dry clean, as solvents can degrade insulation and coatings.
Is it possible to make a reversible puffer jacket?
Yes. Design both sides with equal attention to detail. Use dual-sided zippers or omit the zipper entirely for a vest-style piece. Ensure insulation is centered and secured so it doesn’t favor one side.
Final Thoughts and Next Steps
Sewing a puffer jacket is more than a craft project—it's an investment in self-reliance, sustainability, and personal expression. Every stitch teaches something new about fit, function, and material behavior. Once you’ve completed your first jacket, consider upgrading to baffled construction, adding ventilation zips, or experimenting with recycled insulation.
The skills you gain here extend beyond outerwear. Pattern reading, layer management, and precision quilting are transferable to bags, sleeping pads, or even home decor. Don’t rush perfection. Embrace the lumps, the uneven seams, the learning curve—they’re proof you’re doing something meaningful.


 浙公网安备
33010002000092号
浙公网安备
33010002000092号 浙B2-20120091-4
Comments
No comments yet. Why don't you start the discussion?