
Croissants are celebrated for their buttery layers, airy crumb, and crisp exterior. While traditional croissants require laminating dough from scratch—a process that demands time and precision—many home bakers turn to puff pastry as an accessible alternative. When done correctly, rolling croissants with puff pastry can yield surprisingly authentic results: delicate, flaky, and rich with flavor. This guide walks through each stage of transforming store-bought or homemade puff pastry into beautifully shaped, evenly baked croissants.
Why Use Puff Pastry for Croissants?
Puff pastry already contains the essential element that gives croissants their lift: hundreds of thin layers of butter separated by dough. These layers expand in the oven due to steam, creating that signature rise and flakiness. By cutting and rolling puff pastry into crescents, you mimic the shape and texture of traditional croissants without the need for yeast fermentation or lengthy folding sequences.
This method is ideal for beginners, last-minute breakfasts, or when you want to focus on shaping and baking rather than dough development. With proper technique, the result is not just convenient—it’s genuinely delicious.
Essential Tools and Ingredients
Before beginning, gather everything you’ll need. Having tools ready streamlines the process and prevents interruptions during critical stages like handling cold pastry.
- Puff pastry sheets (preferably thawed if frozen)
- Sharp knife or pizza cutter
- Ruler or measuring tape
- Baking sheet
- Parchment paper or silicone mat
- Egg wash (1 egg + 1 tbsp water, beaten)
- Rolling pin (optional, for slight thinning)
- Pastry brush
Optional additions include fillings such as almond paste, chocolate batons, ham and cheese, or cinnamon sugar—customizations that elevate your croissants from simple to gourmet.
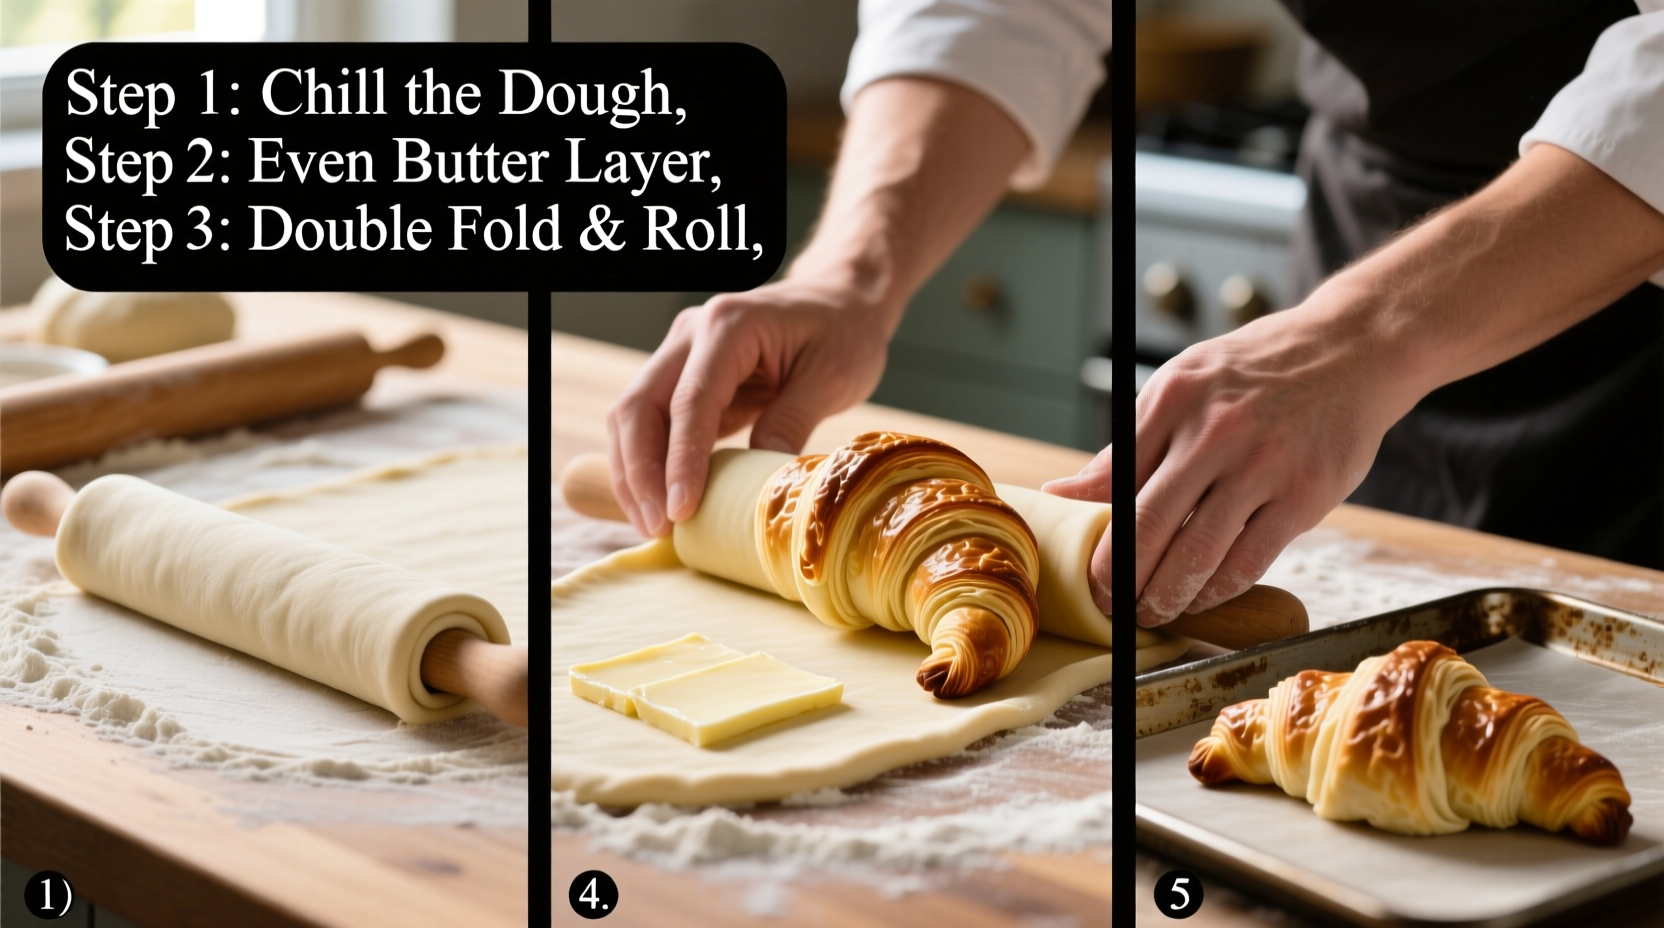
Step-by-Step Guide to Rolling Croissants
- Prepare the pastry: If using frozen puff pastry, thaw it overnight in the refrigerator. Never rush thawing at room temperature, as uneven softening leads to butter leakage and poor layering.
- Unroll and flatten: Gently unroll the pastry sheet onto a lightly floured surface. If needed, roll it out slightly thinner—about 1/8 inch thick—to enhance pliability and layer definition.
- Cut into triangles: Using a sharp knife or pizza cutter, slice the rectangle into long, narrow triangles. A standard 9x12-inch sheet yields about six triangles (cut diagonally across).
- Add filling (optional): Place a small amount of filling—like a strip of chocolate or almond cream—along the base of each triangle. Be sparing; overfilling causes bursting during baking.
- Begin rolling: Starting at the wide end, gently roll each triangle toward the tip. Keep tension even but gentle—don’t squeeze the dough. The point should tuck neatly underneath.
- Shape the curve: Bend the ends slightly inward to form a crescent. Don’t force it; let the natural elasticity create a soft arc.
- Chill before baking: Place shaped croissants on a parchment-lined tray and refrigerate for 15–20 minutes. Chilling firms the butter, ensuring better rise and preventing spreading.
- Apply egg wash: Brush each croissant lightly with egg wash. This promotes browning and adds shine.
- Bake until golden: Preheat oven to 400°F (200°C). Bake for 18–22 minutes, rotating the tray halfway, until deeply golden and puffed.
- Cool slightly: Let rest for 5–10 minutes before serving. This allows internal steam to settle, preserving crispness.
| Stage | Key Action | Common Mistake |
|---|---|---|
| Thawing | Refrigerator thawing overnight | Room-temperature thawing → melted butter |
| Rolling | Even, gentle tension | Squeezing layers → dense texture |
| Baking | Hot oven, full bake time | Underbaking → soggy interior |
| Storage | Airtight container, consume within 2 days | Leaving exposed → moisture absorption |
Expert Tips for Flawless Results
The difference between good and exceptional croissants lies in attention to detail. These professional insights ensure consistent quality.
“Even with shortcut methods, respecting the butter is non-negotiable. Cold execution and hot baking are what make puff pastry behave like true viennoiserie.” — Laurent Moreau, Pastry Chef & Instructor at Le Cordon Bleu Paris
Real Example: From Frozen Sheet to Breakfast Table
Sophie, a working mother in Portland, wanted to surprise her family with weekend pastries but lacked time for sourdough or laminated doughs. She used two sheets of all-butter puff pastry, cut into twelve triangles, filled half with dark chocolate and half left plain. After chilling and baking according to this method, the croissants rose dramatically, developed a deep amber crust, and stayed crisp for hours. Her kids described them as “better than the bakery,” and she now prepares them monthly for special mornings.
Her key insight? “I thought puff pastry would feel ‘cheap,’ but treated with care, it feels luxurious.”
Frequently Asked Questions
Can I freeze uncooked croissants made from puff pastry?
Yes. Shape the croissants, place them on a tray, and freeze until solid (about 2 hours). Transfer to a sealed bag and store for up to 3 months. Bake from frozen—add 3–5 minutes to the baking time. No thawing required.
Why did my croissants come out flat?
Flat results usually stem from one of three issues: butter melted before baking (due to warm handling), underbaking, or using low-fat or margarine-based pastry. Ensure the pastry stays cold until it enters the oven, and verify your oven temperature with a thermometer.
Can I make sweet and savory versions from the same batch?
Absolutely. Divide the puff pastry sheet and customize each triangle. Fill some with grated Gruyère and ham, others with cinnamon-sugar or Nutella. Just keep fillings narrow and centered to prevent leaks.
Checklist: Perfect Puff Pastry Croissants
- ✅ Thaw pastry slowly in the fridge
- ✅ Work quickly to keep butter cold
- ✅ Cut even, elongated triangles
- ✅ Roll with gentle, consistent pressure
- ✅ Chill before baking
- ✅ Use egg wash for color and shine
- ✅ Bake in a fully preheated oven
- ✅ Cool slightly before serving
Conclusion
Mastering the art of rolling croissants with puff pastry bridges the gap between convenience and craftsmanship. It empowers home bakers to produce elegant, restaurant-quality pastries with minimal investment in time or equipment. The principles—respecting temperature, maintaining layer integrity, and applying careful shaping—are universal, whether you’re using homemade dough or a trusted frozen sheet.


 浙公网安备
33010002000092号
浙公网安备
33010002000092号 浙B2-20120091-4
Comments
No comments yet. Why don't you start the discussion?