
Baking sourdough bread is more than a culinary act—it’s a rhythm of patience, observation, and connection to natural fermentation. Unlike commercial yeast breads, sourdough relies on a living culture of wild yeast and lactic acid bacteria cultivated from flour and water. For beginners, the idea of creating bread from \"nothing but flour and water\" can seem mystical or intimidating. Yet, with consistent attention and simple techniques, anyone can develop a thriving sourdough starter and bake deeply flavorful, airy loaves at home.
This guide walks you through the science, practice, and subtle artistry behind building a sourdough starter from scratch. You’ll learn not only the steps but also how to interpret your starter’s behavior, troubleshoot common issues, and build confidence in nurturing a living ingredient that becomes the heart of your baking.
The Science Behind Sourdough Starters
A sourdough starter is a fermented mixture of flour and water that captures wild yeast and beneficial bacteria from the environment—primarily from the air and the grain itself. These microorganisms convert starches into sugars, producing carbon dioxide (which leavens bread) and organic acids (which give sourdough its tangy flavor and improve shelf life).
Unlike commercial baker’s yeast, which is a single strain of Saccharomyces cerevisiae, sourdough cultures are complex ecosystems. The dominant bacteria, Lactobacillus, produces lactic and acetic acid, contributing to both flavor and preservation. The balance between yeast activity and bacterial fermentation determines how active, bubbly, and sour your starter becomes.
Your kitchen environment plays a crucial role. Temperature, humidity, flour type, and even local airborne microbes influence your starter’s personality. This means no two starters behave exactly alike—each develops its own unique character over time.
“Sourdough isn’t just about baking; it’s about cultivating a relationship with invisible life. The better you understand its rhythms, the better your bread will be.” — Dr. Karl De Smedt, microbiologist and sourdough library curator, Belgium
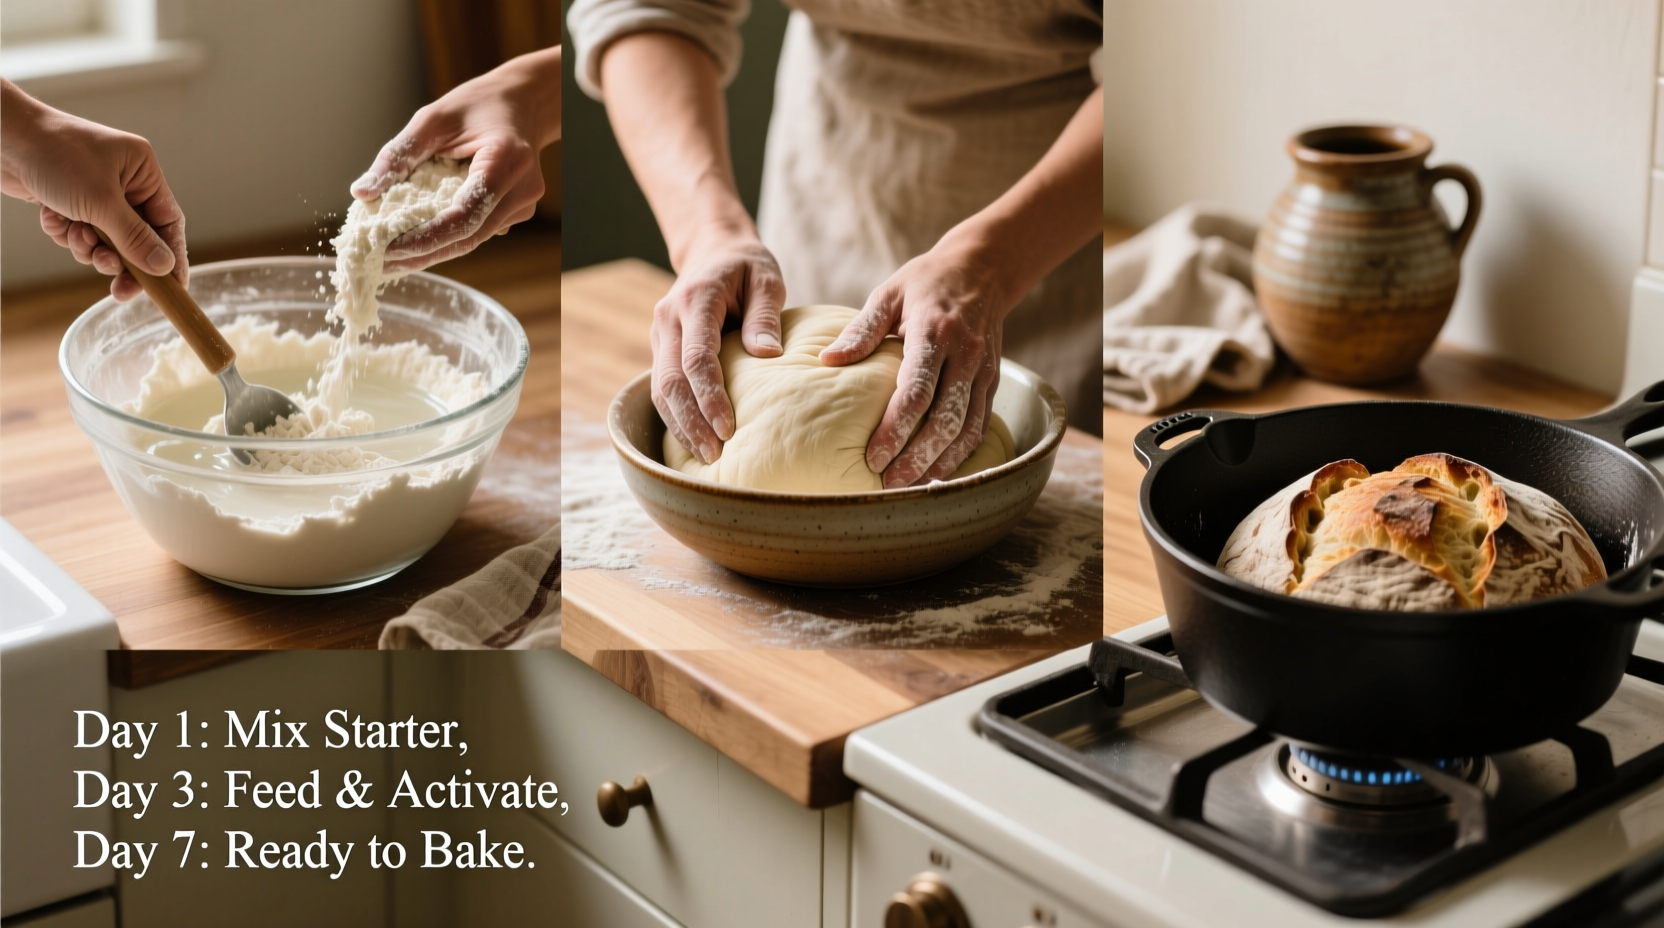
Step-by-Step Guide to Creating Your First Starter
Creating a sourdough starter takes 5–7 days under ideal conditions. Below is a reliable daily routine designed for beginners. Use unbleached all-purpose or whole wheat flour for best results during the initial phase.
- Day 1: Mix 60g of room-temperature water with 60g of whole wheat flour in a clean glass or plastic container. Stir well until no dry flour remains. Cover loosely with a lid or cloth to allow airflow while keeping debris out. Let sit at room temperature (70–75°F / 21–24°C) for 24 hours.
- Day 2: You may see little to no activity. Discard half the mixture (about 60g), then feed with 60g water and 60g all-purpose flour. Stir, cover, and rest for another 24 hours.
- Day 3: Bubbles may appear, and there could be a faint sour or fruity smell. Repeat the discard and feed process: remove half, add 60g water and 60g flour. Stir thoroughly.
- Day 4: Activity should increase—more bubbles, slight rise after feeding. Continue discarding half and feeding with equal parts water and all-purpose flour.
- Day 5: Look for doubling in size within 4–8 hours after feeding, a yeasty aroma, and a frothy texture. If these signs appear, your starter is becoming active.
- Days 6–7: If rising predictably and bubbling vigorously, perform twice-daily feedings (every 12 hours). After two successful rises, your starter is ready to bake with.
Feeding, Maintaining, and Storing Your Starter
Once established, your sourdough starter requires regular feeding to remain strong and active. How you maintain it depends on your baking frequency.
Daily Maintenance (Room Temperature)
If you bake often, keep your starter at room temperature and feed it once or twice daily. A healthy starter should double within 4–8 hours after feeding. If it slows down, try increasing the temperature slightly or refreshing with fresh flour.
Refrigerated Storage (For Infrequent Baking)
For those who bake weekly or less, store your starter in the refrigerator. Feed it, let it sit at room temperature for 1–2 hours, then refrigerate. It can go 7–10 days between feedings. Before baking, revive it with 2–3 consecutive room-temperature feedings.
| Maintenance Method | Feeding Frequency | Best For |
|---|---|---|
| Room Temperature | Every 12–24 hours | Daily or frequent bakers |
| Refrigerated | Once weekly | Occasional bakers |
| Dehydrated | Long-term storage (months) | Travel or breaks in baking |
Common Challenges and How to Solve Them
Even experienced bakers face hiccups. Recognizing early warning signs helps you correct course before losing your culture.
- Hooch Formation: A grayish liquid on top indicates hunger. Simply pour it off or stir it back in, then feed immediately.
- No Bubbles or Rise: Likely due to cold temperatures or weak flour. Move to a warmer spot (near an oven or on a counter with sunlight) and consider switching to whole rye or whole wheat flour for added microbial food.
- Foul Odor (rotten eggs or acetone): Overfermentation. Feed more frequently or reduce time between feedings. A pineapple-like scent early on is normal; persistent foulness suggests imbalance.
- Mold Growth: Rare but serious. Pink, orange, or fuzzy spots mean contamination. Discard entirely and restart with sterilized equipment.
“I started three times before my starter took off. The third time, I switched to filtered water and kept it near the window. By day five, it was bubbling like champagne.” — Maria T., home baker from Portland, OR
Essential Sourdough Starter Checklist
Follow this checklist to ensure success when beginning your sourdough journey:
- ✅ Use unchlorinated water (filtered or bottled if tap is heavily chlorinated)
- ✅ Choose high-quality, unbleached flour (whole grain for initial days)
- ✅ Maintain consistent feeding schedule (same time each day)
- ✅ Keep starter in a warm location (70–78°F / 21–26°C ideal)
- ✅ Use a non-airtight container with headspace for expansion
- ✅ Discard and refresh regularly to prevent acidity buildup
- ✅ Label your jar with start date and feeding times
- ✅ Be patient—don’t give up before day 7
Baking Your First Loaf: Putting Your Starter to Work
When your starter reliably doubles within 6–8 hours of feeding and has a pleasant, tangy aroma, it’s ready to leaven bread. Here’s a simplified approach to your first sourdough loaf:
- Prepare Levain: The night before baking, mix 20g active starter with 100g water and 100g flour. Let ferment 8–12 hours at room temperature.
- Mix Dough: Combine levain with 500g bread flour, 350g water, and 10g salt. Mix until shaggy, then rest 30 minutes (autolyse).
- Knead & Ferment: Perform stretch-and-folds every 30 minutes for 2 hours. Then let bulk ferment 3–5 hours, depending on temperature.
- Shape & Proof: Shape into a round boule or oval batard. Place in a floured banneton and refrigerate overnight (cold proof).
- Bake: Preheat Dutch oven at 450°F (230°C) for 30 minutes. Score dough, transfer to pot, cover, and bake 20 minutes. Uncover and bake 20–25 minutes more until deep golden.
The result? A crisp crust, open crumb, and complex flavor that evolves with each bite—proof that time and care yield unmatched depth.
Frequently Asked Questions
Can I use tap water for my starter?
Chlorinated tap water can inhibit microbial growth. If your tap water is heavily treated, use filtered or bottled water. Letting tap water sit uncovered for 24 hours can also dissipate chlorine.
Why does my starter smell like vinegar or nail polish remover?
This usually means it’s overdue for feeding. Acetic acid builds up when the starter runs out of food. Resume regular feedings, and the aroma should normalize within 1–2 cycles.
Can I freeze my sourdough starter?
Freezing is risky and not recommended. Instead, dehydrate your starter by spreading a thin layer on parchment, drying it completely, then crumbling and storing in an airtight container. Rehydrate with water and flour when ready to revive.
Conclusion: Your Living Culture, Your Culinary Companion
Mastering the art of sourdough starting from scratch is not about perfection—it’s about presence. Watching your starter bubble to life, learning its rhythms, and transforming it into nourishing bread connects you to centuries of bakers who worked with nature, not against it. Each discard and feed strengthens your intuition. Each loaf reveals new nuances of texture and taste.
You don’t need special equipment or years of experience. You need curiosity, consistency, and the willingness to listen to a simple mixture that responds to care. Whether you bake weekly or once a month, your starter can thrive as a quiet companion in your kitchen—a small act of daily mindfulness with delicious rewards.


 浙公网安备
33010002000092号
浙公网安备
33010002000092号 浙B2-20120091-4
Comments
No comments yet. Why don't you start the discussion?