
For many, a lace front wig is more than a hair accessory—it’s a transformation. Whether worn for fashion, convenience, or hair loss coverage, achieving a seamless, undetectable look hinges on proper application. Too often, wigs appear lifted, shiny, or obviously “fake” due to rushed prep or incorrect technique. The difference between amateur and expert results lies in precision: from prepping your natural hair to securing the lace edge and blending the hairline. With the right approach, you can wear a lace front wig that looks like your own growing hair—natural, secure, and confidence-boosting.
Understanding Lace Front Wigs: What Makes Them Unique
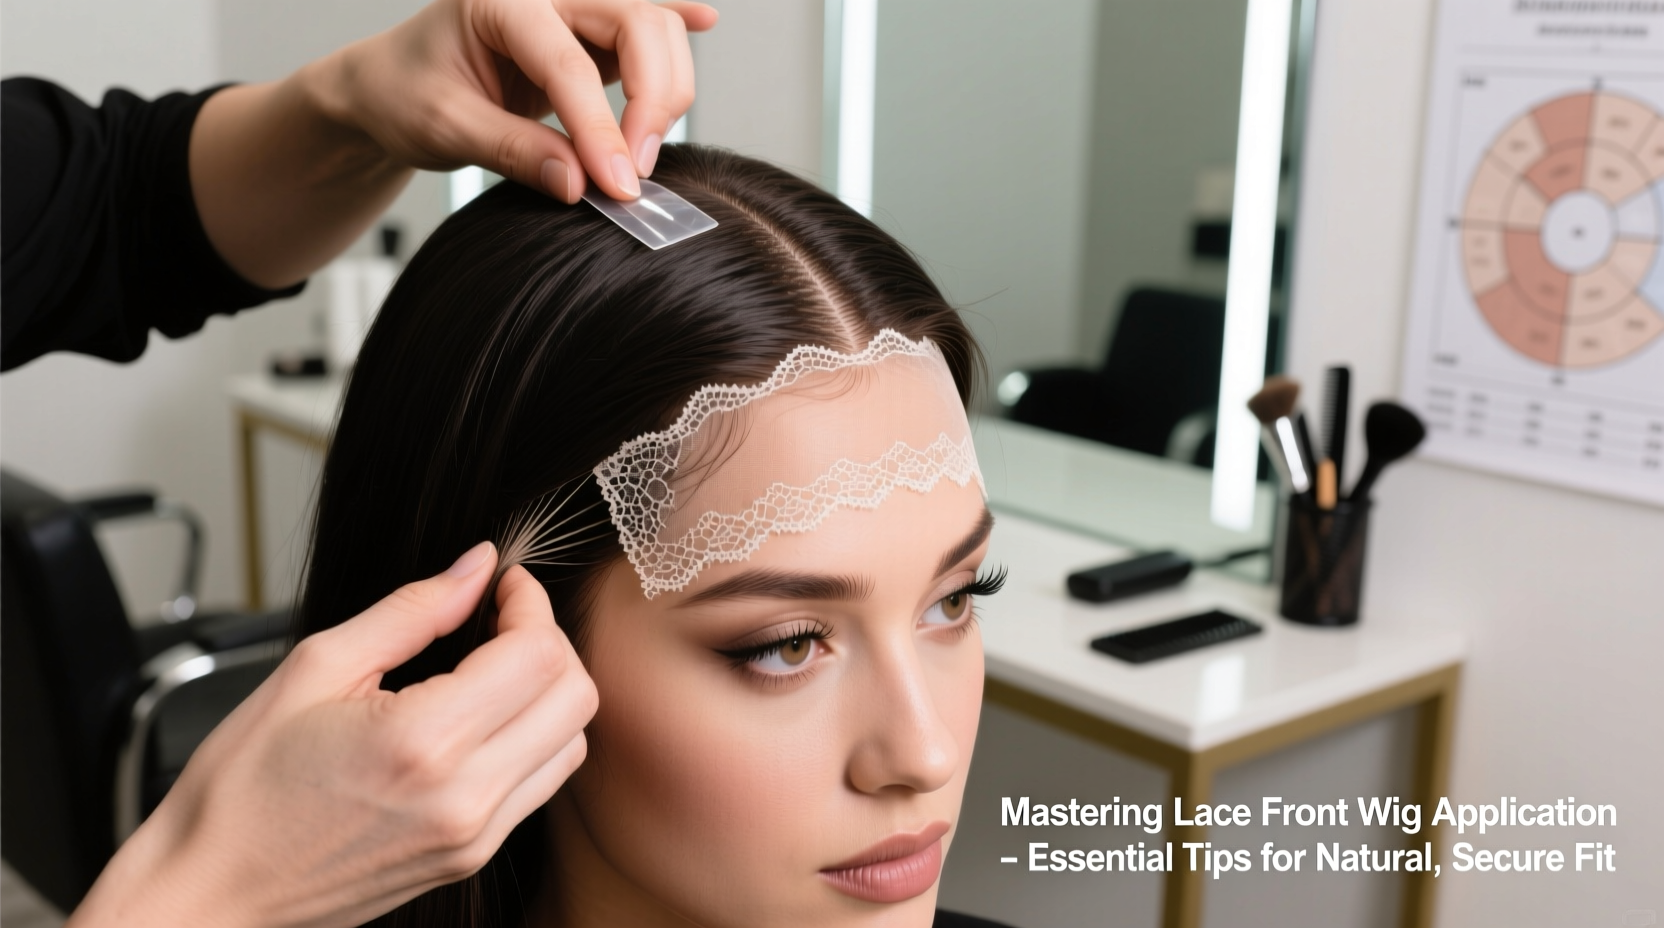
Lace front wigs feature a sheer mesh panel at the front, typically spanning from ear to ear. Individual hairs are hand-tied onto this lace, allowing for a scalp-like illusion when properly applied. Unlike traditional full-cap wigs, the lace mimics the appearance of real hair growth along the forehead, making parting and styling more flexible and realistic.
There are two primary types: HD (high-definition) lace and regular Swiss or French lace. HD lace is thinner and nearly invisible when blended correctly, while standard lace offers durability with slightly more visibility if not applied carefully. Both require meticulous handling, but the payoff is unmatched realism.
“A well-applied lace front should disappear into the skin. It’s not about hiding the wig—it’s about creating the illusion of a natural hairline.” — Jasmine Reed, Celebrity Wig Stylist
Step-by-Step Guide to Flawless Application
Applying a lace front wig isn’t just about gluing it on—it’s a process that begins days before and continues after placement. Follow this detailed timeline for consistent, long-lasting results.
- Prep Your Natural Hair (1–2 Days Before): Braid or cornrow your hair tightly flat against the scalp. This creates a smooth foundation and prevents bumps under the wig. If wearing synthetic hair, ensure edges are smoothed and secured with edge control.
- Shave or Trim Baby Hairs (Optional but Recommended): Lightly trim or shave the front hairline to eliminate bulk and create a clean surface for lace adhesion. Use a sterile razor and go slowly to avoid nicks.
- Cleanse the Forehead: On application day, wash your forehead with a gentle, oil-free cleanser. Residual oils, sweat, or product buildup prevent adhesive from bonding effectively.
- Trim the Lace Carefully: Hold the wig up to your head and trace your natural hairline with a washable marker. Trim the lace only along this line using small, sharp scissors. Never cut too close to the knots—leave a tiny margin to avoid shedding.
- Apply Adhesive: Choose between liquid glue, cream bond, or medical-grade tape based on sensitivity and hold preference. Apply a thin, even layer to the lace perimeter and let it become tacky (about 30 seconds). Press the lace firmly onto the skin, starting in the center and working outward.
- Seal the Edges: Once secured, apply a second thin layer of adhesive over the top edge of the lace for added durability. Allow it to dry completely before styling.
- Blend the Hairline: Use a small toothbrush and translucent powder to soften any visible lace or adhesive. Add concealer if needed to match your skin tone precisely.
Do’s and Don’ts of Lace Front Maintenance
Even the best application can fail without proper care. Follow these guidelines to extend wear time and preserve the wig’s integrity.
| Do’s | Don’ts |
|---|---|
| Use alcohol-free adhesive removers to protect skin and lace | Peel off the wig forcefully—always soak adhesive first |
| Sleep with a silk bonnet to reduce friction | Go to bed with wet glue—this weakens the bond overnight |
| Wash the wig every 7–10 days if worn daily | Use hot water or harsh shampoos that damage hand-tied knots |
| Store the wig on a stand to maintain shape | Fold or crush the front lace when storing |
| Reinforce edges with a light spray sealant in humid climates | Over-apply glue—more isn’t better and can cause irritation |
Tips for Achieving a Truly Natural Look
The goal isn’t just to wear a wig—it’s to wear one no one can detect. These advanced techniques elevate your results from good to flawless.
- Pluck the Front Hairline: Gently remove a few strands near the front edge of the lace to mimic natural hair density. Avoid over-plucking, which can create gaps.
- Create a Widow’s Peak or Natural Curve: When trimming the lace, study your biological hairline. Most people don’t have a straight line—replicate its subtle curves for authenticity.
- Style with Heat Wisely: If using heat tools, keep temperatures below 350°F (177°C) and always use a heat protectant. Overheating synthetic fibers causes melting; human hair can still burn or dry out.
- Part Strategically: Avoid deep side parts unless the wig is specifically designed for it. Center or loose off-center parts tend to look more natural initially.
Real-World Example: From Frumpy to Flawless in One Weekend
Chloe, a 28-year-old marketing professional, had struggled with her lace front for months. She’d bought a high-end unit but kept experiencing lifting at the temples and an obvious “wig line” by midday. After researching, she realized she was skipping key steps: she wasn’t prepping her skin, used too much glue, and didn’t blend the lace with makeup.
She started over: braided her hair flat, shaved her edges, used a tacky glue method, and sealed with spirit gum. Then, she matched her foundation to her forehead and lightly powdered the lace. The result? A colleague asked if she’d gotten a new haircut—no one suspected a wig. Chloe now wears hers confidently for 10-day stretches with minimal touch-ups.
Essential Checklist Before Every Application
Use this checklist each time you prepare to wear your lace front wig. Consistency eliminates errors and builds muscle memory.
- ✅ Natural hair cornrowed or flattened securely
- ✅ Hairline cleaned and free of oils
- ✅ Lace trimmed to match natural hairline (not too short)
- ✅ Adhesive tested and ready (patch test done if new product)
- ✅ Tools on hand: tweezers, mini scissors, applicator brush, setting spray
- ✅ Work area well-lit with a magnifying mirror available
- ✅ Skin tone matched for concealer and powder
- ✅ Backup plan ready (e.g., spare tape or clips) in case of emergency lift
Frequently Asked Questions
How long should a lace front wig stay on?
With proper adhesive and care, a lace front can safely stay on for 2–4 weeks. However, most wearers choose to remove and clean it every 7–10 days to maintain scalp health and hygiene.
Can I swim or sweat with a lace front wig?
Yes, but with precautions. Chlorine and saltwater weaken adhesives and damage hair fibers. Use waterproof glue, wear a swimming cap, and rinse immediately after exposure. Sweat buildup can also loosen edges—consider taping the perimeter during intense workouts.
Why does my lace turn yellow over time?
Yellowing occurs due to oxidation, product buildup, or improper washing. To prevent it, avoid silicone-heavy products, wash regularly with a clarifying shampoo, and store the wig away from sunlight. For existing stains, use a mixture of baking soda and mild shampoo to gently lift discoloration.
Mastery Is Within Reach
Mastering lace front wig application isn’t reserved for professionals. It’s a skill built through patience, repetition, and attention to detail. Each step—from prepping your base to sealing the final edge—contributes to a result that feels effortless but speaks volumes. When done right, your wig won’t just sit on your head; it will become part of your identity, enhancing your presence without drawing attention to itself.


 浙公网安备
33010002000092号
浙公网安备
33010002000092号 浙B2-20120091-4
Comments
No comments yet. Why don't you start the discussion?