
Finding the center of a circle may seem like a trivial task when working with perfect geometric diagrams, but in real-world applications—whether you're designing furniture, restoring antique wheels, or laying out garden beds—it becomes essential to locate the center accurately without relying on pre-marked points. Unlike textbook problems, physical circles rarely come with labeled centers. This guide demystifies the process, offering reliable methods grounded in geometry, accessible tools, and practical techniques anyone can apply with confidence.
The Importance of Precision in Circle Geometry
The center of a circle is more than just a point—it's the foundation of symmetry, balance, and radial measurement. In engineering, misidentifying the center can lead to imbalanced rotating parts. In woodworking or metalworking, even a small offset can ruin alignment. Artists and designers use the center to distribute elements evenly. Whether you're dealing with a drawn circle on paper or a circular object like a plate, pipe, or tabletop, knowing how to find the exact center ensures accuracy in your work.
Historically, ancient builders and mathematicians used compasses and straightedges to construct perfect circles and locate their centers. These classical principles remain valid today and form the basis of modern techniques. The key insight is this: any chord (a line segment connecting two points on a circle) has a perpendicular bisector that passes through the center. By constructing two such bisectors, their intersection reveals the center.
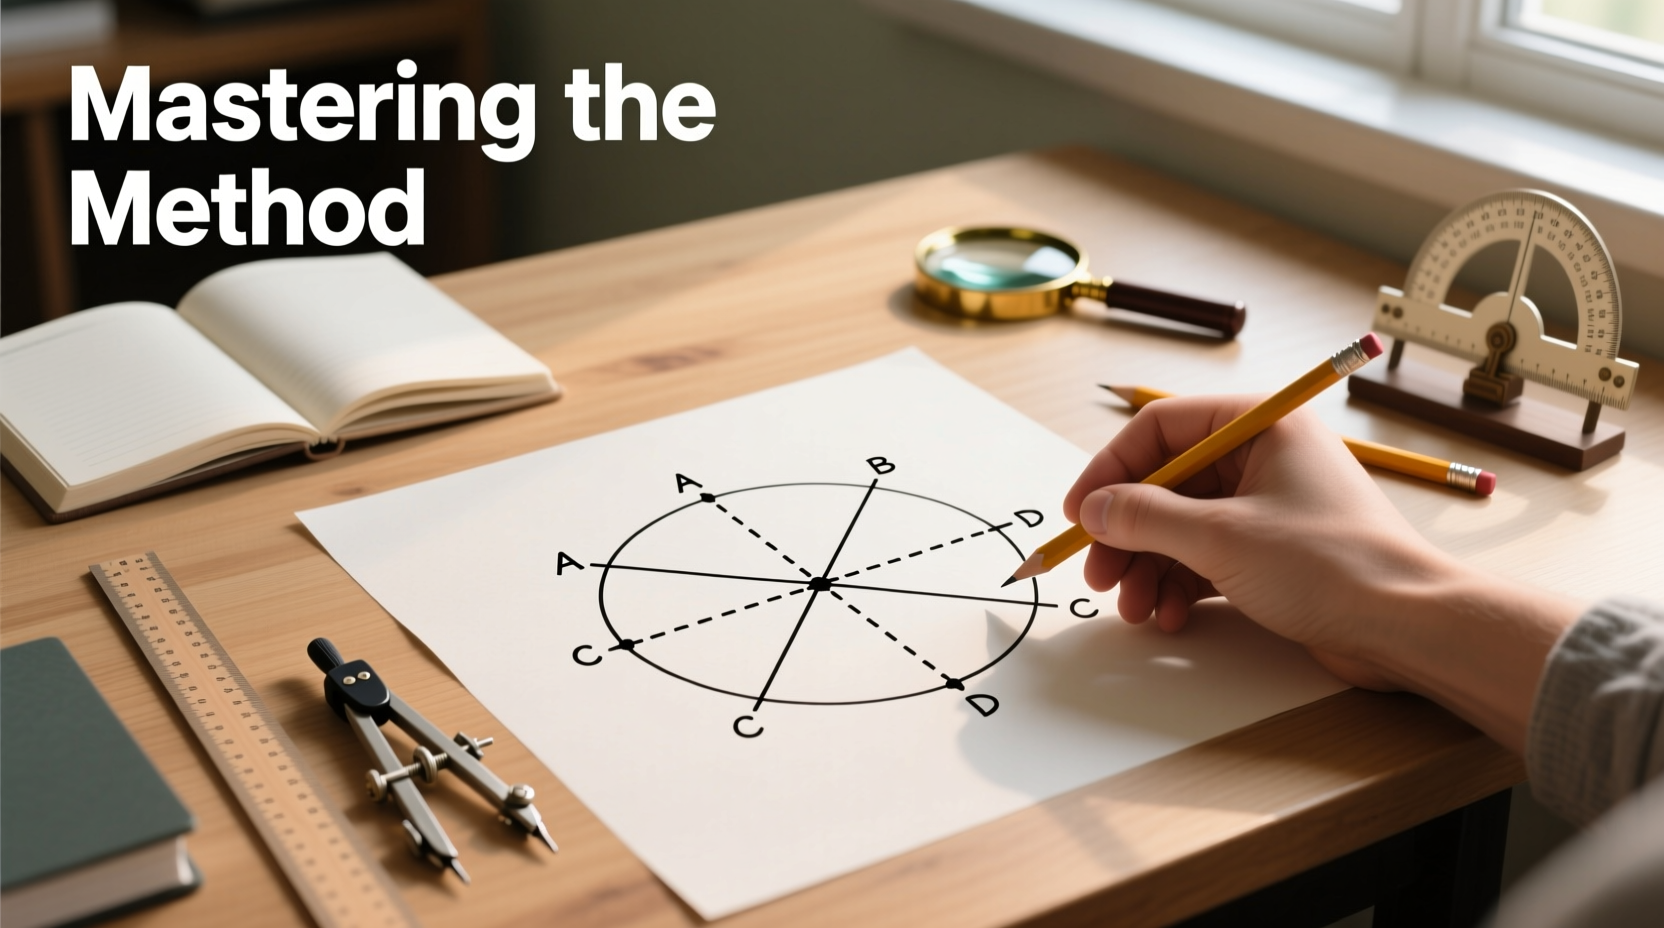
Step-by-Step Method: Using Chords and Perpendicular Bisectors
This geometric approach requires only a ruler, a pencil, and a compass or string. It works for both drawn circles and physical objects where you can mark reference lines.
- Draw or identify a chord across the circle. Choose any two points on the circumference and connect them with a straight line.
- Bisect the chord. Measure its length and mark the midpoint. Alternatively, use a compass set wider than half the chord’s length: draw arcs above and below the chord from each endpoint. Connect the arc intersections with a straight line—the midpoint lies where this line crosses the chord.
- Construct the perpendicular bisector. At the midpoint, draw a line perpendicular to the chord. Use a right-angle tool or repeat the arc method to ensure the line is truly perpendicular.
- Repeat with a second chord. Choose another chord that is not parallel to the first. Follow steps 1–3 to construct its perpendicular bisector.
- Find the intersection. The point where the two perpendicular bisectors cross is the center of the circle.
Alternative Tools and Techniques for Physical Objects
When working with tangible items—such as a circular tabletop, a metal disc, or a ceramic plate—you can't always draw permanent lines. However, several non-destructive methods exist.
- Using a framing square: Place the inside corner of an L-shaped square against the edge of the circle. Draw a line along the outer edges. Rotate the square and repeat. The intersection of two such lines marks the center.
- String and pin method: Wrap a string around the perimeter to measure circumference, then divide by π to get diameter. Use this to estimate radius and probe inward from multiple points.
- Laser level or optical tools: For high precision, align laser beams tangent to opposite sides of the circle. The midpoint between parallel tangents gives the centerline; repeat in another direction to find the intersection.
Checklist: How to Find the Center of Any Circle
Use this checklist to ensure consistency and accuracy regardless of method:
- ✔ Ensure the surface or object is stable and clean
- ✔ Select at least two non-parallel chords or reference points
- ✔ Accurately mark midpoints using measuring tools or compass arcs
- ✔ Construct true perpendiculars—verify with a square if possible
- ✔ Confirm the intersection point by testing radial distances to the edge
- ✔ Double-check with a third chord if uncertainty remains
Real Example: Restoring a Vintage Wooden Wheel
A woodworker restoring a 19th-century cartwheel needed to re-center the hub for new spokes. The original center was worn away, and no markings remained. Using calipers, he measured several diameters across the rim and averaged them to confirm it was still circular. He then placed the wheel on a flat surface and used a carpenter’s square, aligning the inner corner against the rim and drawing two intersecting lines from different angles. The intersection gave him a precise center, which he verified by measuring equal radii in eight directions. With the center confirmed, he drilled a new hub hole and completed the restoration with symmetrical spoke placement.
“Geometry isn’t just theory—it’s the silent partner in every precise craft.” — Dr. Alan Reeves, Professor of Applied Mathematics, MIT
Comparison Table: Methods for Finding the Center
| Method | Tools Required | Accuracy | Best For | Limitations |
|---|---|---|---|---|
| Perpendicular Bisector (Geometric) | Ruler, compass, pencil | High | Drawing, drafting, education | Requires access to draw lines |
| Framing Square | Carpenter’s square | Moderate to High | Wood, metal, large objects | Needs flat edge contact |
| String and Measurement | Tape measure, string, calculator | Moderate | Irregular or inaccessible surfaces | Assumes perfect circularity |
| Laser Alignment | Laser level, mounts | Very High | Engineering, industrial use | Expensive equipment required |
| Coordinate Grid Method | Graph paper, calipers | High | Small objects, lab settings | Limited by grid resolution |
Frequently Asked Questions
Can I find the center of a circle with only a ruler?
Yes, but with reduced accuracy. You can estimate midpoints and sketch perpendiculars, but without a compass or square, ensuring true right angles is difficult. For better results, combine the ruler with a known right angle (like a book corner) to help draw perpendiculars.
What if the circle isn’t perfectly round?
If the shape is slightly elliptical or distorted, no single “center” exists in the geometric sense. In such cases, calculate the centroid—the average position of all points. Use multiple diameter measurements, average them, and find the balancing point. This is common in aged materials or handmade objects.
Is there a digital tool that can help?
Yes. Apps and software like CAD programs allow you to upload an image of a circle and use built-in tools to detect symmetry and calculate the center. Some even use AI to correct for perspective distortion. However, these should be verified physically when used for construction or manufacturing.
Conclusion: Confidence Through Clarity
Finding the center of a circle is a fundamental skill that bridges mathematics and practical craftsmanship. Whether you’re using classical geometric construction or modern tools, the underlying principle remains unchanged: symmetry leads to truth. By understanding the logic behind chords and bisectors, and applying tested methods with care, you can confidently locate the center of any circle—no matter its size or context. Mastery comes not from memorizing steps, but from practicing them with intention and precision.


 浙公网安备
33010002000092号
浙公网安备
33010002000092号 浙B2-20120091-4
Comments
No comments yet. Why don't you start the discussion?