
The plank is deceptively simple: hold a push-up position and resist gravity. Yet beneath its simplicity lies one of the most effective full-core exercises ever developed. Unlike crunches or sit-ups that isolate abdominal muscles, the plank engages the entire anterior chain—rectus abdominis, transverse abdominis, obliques, lower back, glutes, shoulders, and even quads. When performed correctly, it builds functional strength, enhances posture, and stabilizes the spine. But like any movement, form is everything. Done poorly, the plank loses effectiveness and can even strain the lower back or shoulders. This guide breaks down every phase of mastering the plank, from beginner modifications to advanced variations, ensuring you get the most out of this foundational exercise.
The Science Behind the Plank
At its core, the plank is an isometric hold—meaning your muscles contract without changing length. This type of contraction increases muscular endurance, joint stability, and neuromuscular control. Research published in the Journal of Strength and Conditioning Research shows that consistent plank training improves trunk stability, which directly correlates with reduced risk of lower back pain and enhanced athletic performance.
Dr. Sarah Mitchell, a physical therapist specializing in functional movement, explains:
“Isometric holds like the plank teach the body how to brace under load. That bracing reflex is critical not just for lifting weights, but for everyday movements like bending, twisting, and standing up from a chair.” — Dr. Sarah Mitchell, DPT
The plank doesn’t just sculpt a tighter midsection—it trains your body to move safely and efficiently across all planes of motion.
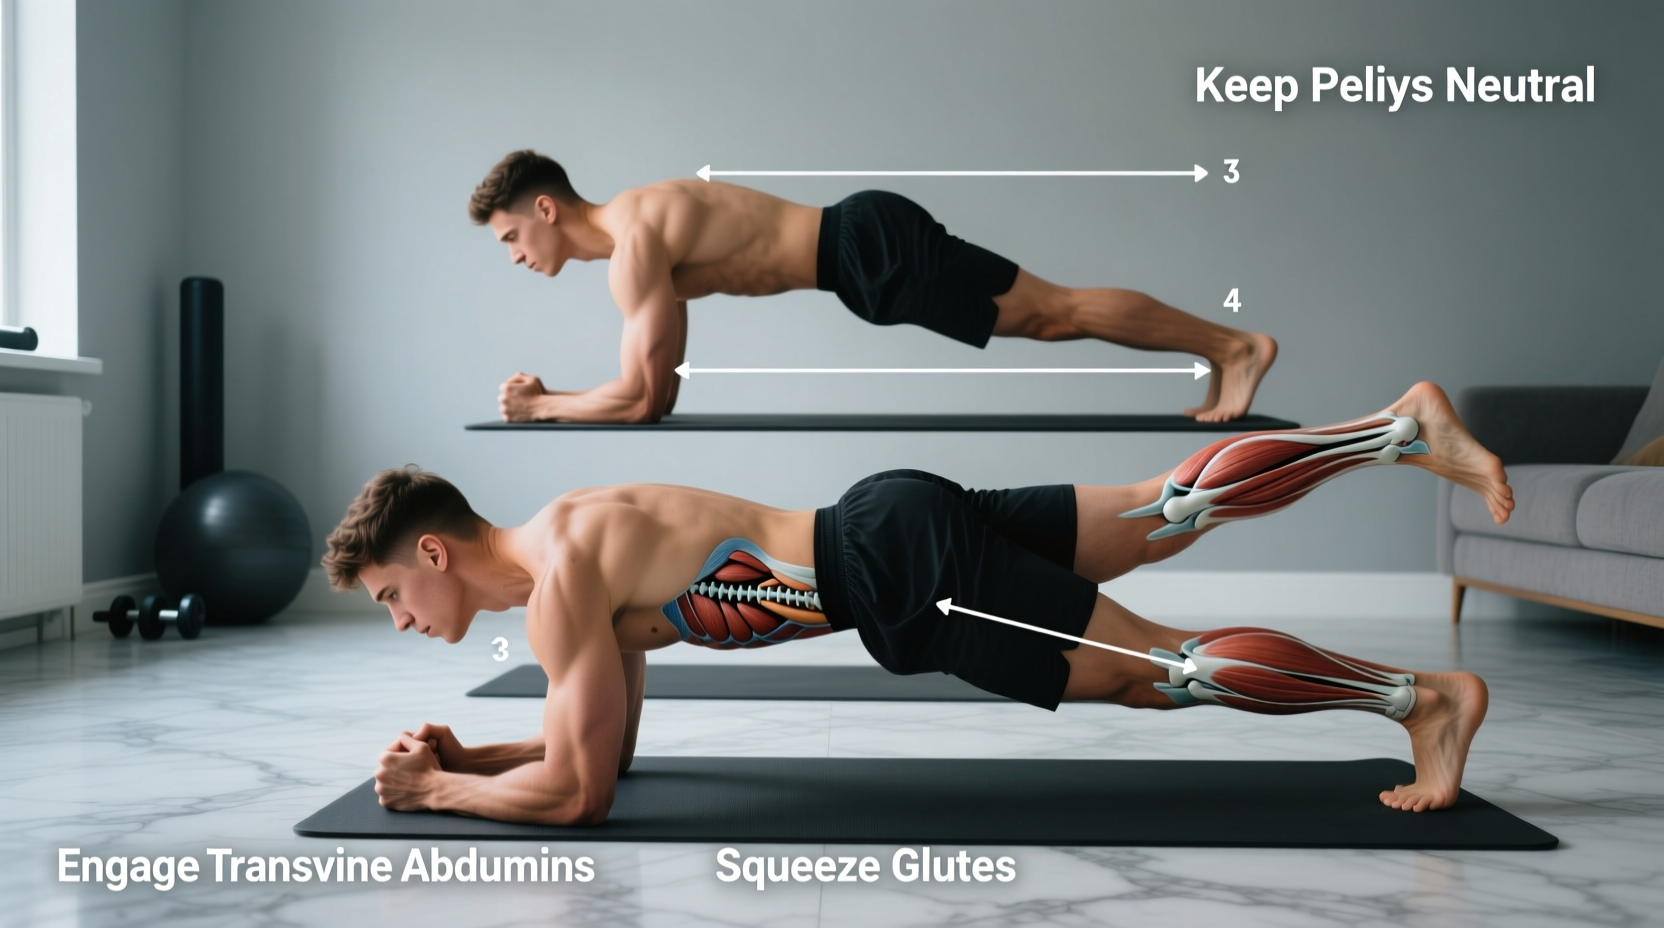
Step-by-Step Guide to Perfect Plank Form
Mastering the plank starts with precision. Follow these steps to ensure optimal alignment and muscle engagement:
- Start in a forearm position: Place your elbows directly under your shoulders, forearms flat on the ground, palms facing down or clasped together.
- Engage your core: Draw your navel toward your spine without holding your breath. Imagine tightening a corset around your waist.
- Align your body: Extend your legs behind you, toes tucked under. Your body should form a straight line from head to heels. Avoid sagging hips or hiking your butt too high.
- Neutral neck and gaze: Keep your head in line with your spine. Look at the floor about a foot in front of your hands to avoid straining your neck.
- Squeeze key muscles: Activate your glutes, engage your quadriceps, and press your forearms firmly into the floor to stabilize the upper body.
- Breathe steadily: Inhale deeply through the nose, exhale slowly through the mouth. Never hold your breath.
- Hold for time: Begin with 15–20 seconds. Focus on quality over duration.
Common Mistakes and How to Fix Them
Even experienced fitness enthusiasts fall into plank pitfalls. Recognizing and correcting these errors is essential for progress and injury prevention.
| Mistake | Why It’s Bad | How to Correct |
|---|---|---|
| Hips sagging | Increases pressure on the lumbar spine; reduces core activation | Engage glutes and abs harder; visualize a straight rod from head to heels |
| Hips lifted too high | Shifts work away from core to shoulders; limits abdominal tension | Lower your hips until body forms a straight diagonal line |
| Elbows too far forward | Overloads shoulders; destabilizes posture | Align elbows directly under shoulders |
| Holding breath | Reduces oxygen flow; increases fatigue | Practice rhythmic breathing: inhale for 3 counts, exhale for 3 |
| Neck craning upward | Strains cervical vertebrae | Keep chin slightly tucked; gaze at the floor 12 inches ahead |
Progression Plan: From Beginner to Advanced
Not everyone can hold a perfect plank for 60 seconds right away—and that’s okay. Use this structured progression plan to build strength safely and consistently.
- Week 1–2: Knee Plank (Modified Plank)
Perform the plank on your knees instead of toes. Maintain a straight line from head to knees. Hold for 20–30 seconds, 3 sets. - Week 3–4: Standard Forearm Plank
Transition to full plank on toes. Aim for 3 sets of 30 seconds with proper form. - Week 5–6: Increasing Duration
Gradually increase hold time by 5–10 seconds per week. Target: 60 seconds sustained with no form breakdown. - Week 7+: Advanced Variations
Once you can hold a standard plank for 60 seconds, challenge yourself:- Side Plank: Builds oblique strength. Hold 20–30 seconds per side.
- Plank with Shoulder Taps: Adds instability. Perform 10 taps per side, 3 sets.
- Raised Foot Plank: Place feet on a bench or step to increase core demand.
- Plank-to-Push-Up: Move from forearm plank to high plank and back. 8–10 reps.
Real Example: Building Core Resilience After Injury
Mark, a 42-year-old office worker, suffered a minor herniated disc two years ago. His doctor recommended low-impact core stabilization exercises to prevent recurrence. He started with 10-second knee planks three times a week. At first, his lower back ached after each session. His physical therapist corrected his hip alignment and emphasized glute engagement. Within six weeks, Mark progressed to 45-second standard planks. After three months, he added side planks and reported improved posture, less back stiffness, and greater confidence during daily activities like lifting groceries or playing with his kids.
“I used to think core work meant crunches,” Mark said. “Now I realize stability matters more than reps. The plank changed how my body feels every day.”
Do’s and Don’ts of Plank Training
| Do’s | Don’ts |
|---|---|
| Warm up before planking (e.g., cat-cow, bird-dog) | Perform planks on a hard surface without padding if it causes elbow discomfort |
| Focus on muscle engagement, not just time | Push through sharp pain—stop immediately if you feel joint or nerve discomfort |
| Combine planks with dynamic core work (e.g., dead bugs, Pallof presses) | Use planks as your only core exercise |
| Practice daily or every other day for consistency | Hold your breath or clench your jaw during the exercise |
| Stretch after your session (child’s pose, hip flexor stretch) | Compare your hold time to others—form trumps duration |
Frequently Asked Questions
How long should I hold a plank as a beginner?
Start with 15–20 seconds for 2–3 sets. Focus on maintaining perfect form. As your strength improves, add 5–10 seconds per week until you reach 60 seconds.
Can planks help reduce belly fat?
Planks strengthen and tone the abdominal muscles, but they don’t directly burn belly fat. Fat loss occurs through a caloric deficit achieved via diet and full-body exercise. However, a stronger core supports better posture and movement efficiency, enhancing overall physique.
Are planks safe for people with back problems?
Yes—when done correctly. Individuals with back issues should start with modified versions (e.g., knee plank) and consult a physical therapist. Proper bracing and neutral spine alignment make planks a rehabilitative tool, not a risk.
Conclusion: Build a Stronger Foundation, One Hold at a Time
The plank is more than a test of endurance—it’s a cornerstone of functional fitness. By mastering its mechanics, progressing intelligently, and integrating it into a balanced routine, you develop a resilient core that supports every movement you make. Whether you're rehabbing an injury, training for sport, or simply aiming to stand taller and feel stronger, the plank delivers measurable results with minimal equipment and maximum efficiency.


 浙公网安备
33010002000092号
浙公网安备
33010002000092号 浙B2-20120091-4
Comments
No comments yet. Why don't you start the discussion?