
The vol au vent is a classic French pastry that embodies elegance and precision. At its core, it’s a hollow, buttery puff pastry shell designed to cradle savory or sweet fillings—from creamy chicken à la king to delicate custards. While the concept seems simple, mastering the perfect vol au vent requires attention to detail, especially when working with puff pastry. The ideal shell should be crisp, uniformly golden, and fully risen, with clean layers that shatter at the touch. Achieving this result consistently means understanding the science behind puff pastry, proper handling techniques, and baking conditions.
Whether you're preparing for a dinner party or simply refining your pastry skills, this guide walks you through every stage of creating flawless vol au vents—starting from store-bought or homemade puff pastry—ensuring consistent results that impress both visually and texturally.
Understanding Puff Pastry: The Foundation of Vol Au Vent
Puff pastry is a laminated dough made by folding butter into flour-based dough multiple times, creating hundreds of thin layers. When baked, moisture in the butter turns to steam, lifting the layers apart and producing that signature flakiness. For vol au vents, this structure must be preserved throughout cutting, shaping, and baking.
There are two primary options: homemade or commercial puff pastry. While homemade offers superior flavor and control, high-quality frozen puff pastry (like Dufour or Trader Joe’s) can yield excellent results with less effort. Thaw frozen pastry in the refrigerator overnight; never rush this process at room temperature, as uneven thawing leads to butter leakage and poor rise.
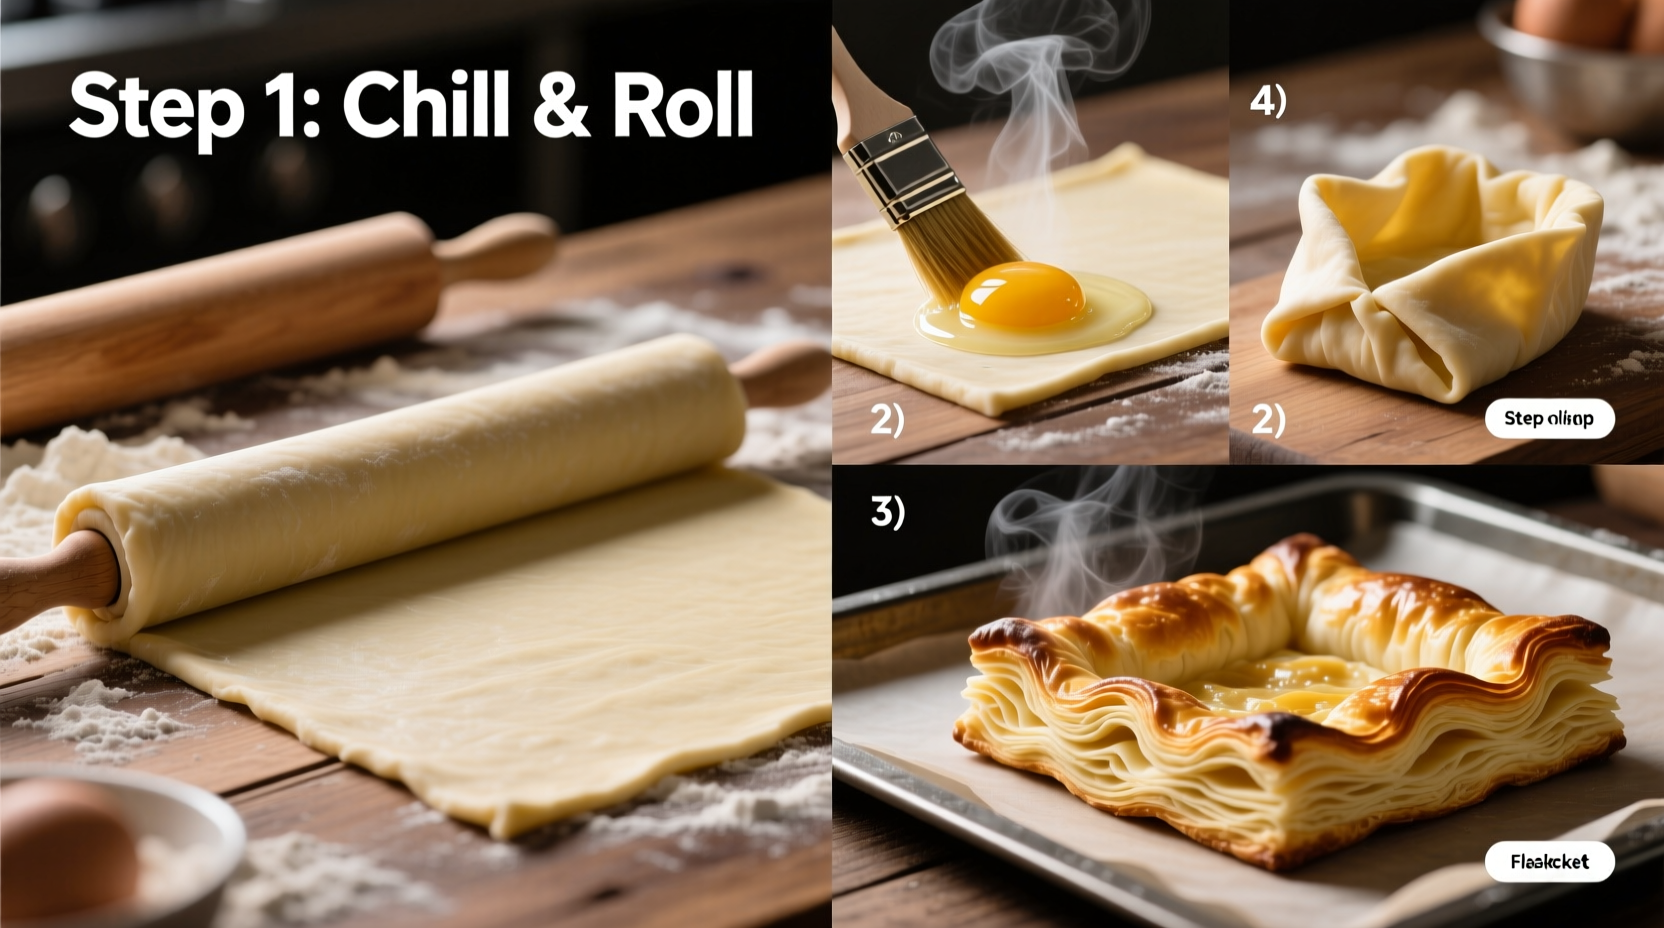
Step-by-Step Guide to Perfect Vol Au Vent Shells
Crafting ideal vol au vents involves precise technique. Follow these steps carefully for consistent, professional-grade results.
- Prepare Your Workspace: Chill your rolling pin and work surface if possible. A cool environment prevents the butter from melting prematurely.
- Roll Out the Dough: Gently roll the thawed puff pastry to about 1/8 inch (3 mm) thick. Avoid pressing too hard; maintain even thickness across the sheet.
- Cut the Circles: Use a sharp 3–4 inch round cutter to cut out base circles. These will form the bottom of your shells.
- Create the Lids: Using a slightly smaller cutter (about 1/4 inch narrower), cut lids from another piece of pastry. Alternatively, cut a second set of same-sized circles and later trim their edges after baking for a neater fit.
- Egg Wash Application: Lightly brush the tops of the base circles with beaten egg yolk mixed with a splash of water. This promotes browning and shine.
- Add the Collar (Optional but Recommended): Cut thin strips of pastry (about 1/2 inch wide) and stand them upright around the edge of each base circle, sealing gently with water. This creates a deeper cavity for more filling.
- Chill Before Baking: Place the assembled shells on a parchment-lined tray and refrigerate for 20–30 minutes. This firms up the butter and helps maintain shape during baking.
- Bake Until Fully Risen and Golden: Preheat oven to 400°F (200°C). Bake for 15–20 minutes, then reduce heat to 375°F (190°C) and continue for another 10–15 minutes until deeply golden and puffed. Do not open the oven door during the first 15 minutes—this risks collapse.
- Release Steam and Dry Interiors: Remove from oven and immediately use a small knife or skewer to lift the lid slightly, allowing steam to escape. Then, carefully remove the soft interior crumbs (save for garnish if desired) and return empty shells to the oven for 3–5 additional minutes to dry out completely.
- Cool Completely: Let shells cool on a wire rack before filling. Warm shells soften quickly when filled.
Common Pitfalls and How to Avoid Them
Even experienced bakers encounter issues with puff pastry. Recognizing common mistakes helps prevent disappointment.
| Issue | Causes | Solutions |
|---|---|---|
| Shells don’t rise | Dough too warm, oven not hot enough, frequent door opening | Keep dough chilled, preheat oven thoroughly, avoid opening oven early |
| Uneven browning | Inconsistent thickness, poor oven circulation | Roll evenly, rotate tray halfway, use convection setting if available |
| Soggy bottoms | Underbaked base, moist fillings added while shells are warm | Bake longer, dry interiors post-bake, fill only when completely cooled |
| Collapsed shells | Overfilling collar, weak seal, premature removal from oven | Support sides well, chill before baking, ensure full structural stability |
Expert Insight: What Professional Pastry Chefs Emphasize
Pastry chefs stress consistency and patience when working with delicate doughs like puff pastry. Their methods reflect years of refinement.
“Temperature control is everything. Cold hands, cold tools, cold dough. If the butter melts before the oven sets the structure, you lose lift. That’s why resting between steps isn’t optional—it’s essential.” — Chef Laurent Moreau, Executive Pastry Chef, Le Cercle Restaurant
“The key to elegant vol au vents? Uniformity. Use templates for cutting, measure collar height, and bake in batches with consistent spacing. Presentation starts long before the plate.” — Sophie Renard, Instructor at Parisian School of Culinary Arts
Mini Case Study: From Dinner Disaster to Centerpiece Success
When amateur baker Clara Thompson attempted vol au vents for her anniversary dinner, her first batch collapsed into greasy puddles. Frustrated, she reviewed her process: she had rolled the dough too thin, skipped the chilling step, and opened the oven repeatedly to check progress. After researching proper technique and adjusting her approach—chilling the shaped shells, using an oven thermometer, and resisting the urge to peek—her second attempt rose beautifully. She filled the crisp shells with a duxelles-stuffed mushroom cream and topped them with microgreens. Guests assumed she’d bought them from a boutique patisserie. The experience transformed her view of baking: precision wasn’t fussy—it was empowering.
Checklist for Foolproof Vol Au Vent Preparation
- ✅ Thaw puff pastry slowly in the refrigerator overnight
- ✅ Work in a cool kitchen; chill tools if needed
- ✅ Roll dough to uniform 1/8-inch thickness
- ✅ Use sharp cutters for clean edges
- ✅ Apply egg wash lightly and evenly
- ✅ Add pastry collars securely and chill before baking
- ✅ Preheat oven fully and avoid opening during initial rise
- ✅ Vent steam and dry interiors after baking
- ✅ Cool shells completely before filling
- ✅ Store unfilled shells in an airtight container for up to 2 days
Frequently Asked Questions
Can I make vol au vents ahead of time?
Yes. Fully baked and cooled shells can be stored in an airtight container at room temperature for up to 48 hours. For longer storage, freeze them and re-crisp in a 350°F (175°C) oven for 5–7 minutes before filling.
What fillings work best in vol au vents?
Savory options include chicken in white wine cream, spinach and goat cheese, or seafood mousse. Sweet versions hold custard, fruit compote, or whipped chocolate ganache. Always ensure fillings are thick—not runny—to prevent sogginess.
Why did my vol au vents brown too quickly on top but stay raw underneath?
This typically indicates an oven with strong top heat. Try placing the tray on a lower rack, using a double baking sheet for insulation, or covering the tops loosely with foil during the final minutes of baking.
Mastery Through Practice and Precision
Perfecting vol au vents isn’t about luck—it’s about discipline in execution. Each element, from dough temperature to oven dynamics, plays a role in whether your shells soar or sink. But with this guide, the right tools, and a patient mindset, you can produce restaurant-quality pastries at home. The elegance of a well-made vol au vent lies not just in its appearance, but in the craftsmanship behind it.


 浙公网安备
33010002000092号
浙公网安备
33010002000092号 浙B2-20120091-4
Comments
No comments yet. Why don't you start the discussion?