
Watercolor pencils occupy a unique space between drawing and painting. They offer the precision of colored pencils and the fluid expressiveness of watercolors—making them ideal for artists who want control and spontaneity in one medium. Yet many beginners struggle to move beyond sketchy results or muddy washes. The key lies not in the tools themselves, but in understanding how to manipulate pigment, water, and timing. With deliberate technique and structured practice, anyone can create luminous, professional-quality artwork using watercolor pencils.
The Unique Advantage of Watercolor Pencils
Unlike traditional colored pencils, watercolor pencils are designed to reactivate with moisture. This allows artists to build dry layers first and then transform them into painted areas using a wet brush. The dual nature of the medium supports both detailed work and loose washes, making it exceptionally versatile for everything from botanical illustrations to impressionistic landscapes.
Because they’re portable and require minimal setup—no palettes, jars, or tubes—watercolor pencils are favored by travelers, journal keepers, and urban sketchers. But their convenience shouldn’t be mistaken for limitation. In skilled hands, these pencils produce layered, transparent effects that rival traditional watercolor techniques.
Essential Materials for Success
While watercolor pencils are forgiving, choosing the right supporting materials makes a significant difference in outcome. Using inappropriate paper or brushes can lead to frustration, regardless of skill level.
| Material | Recommended Choice | Avoid |
|---|---|---|
| Paper | 300 gsm cold-pressed watercolor paper | Thin printer paper or smooth bristol |
| Brushes | Natural or synthetic round brushes (sizes 4–8) | Stiff bristle brushes or worn-out tips |
| Pencils | Professional-grade (e.g., Derwent, Caran d'Ache, Faber-Castell) | Student-grade sets with weak pigment |
| Water Container | Dual-container system (clean/used water) | One jar that turns muddy quickly |
Investing in quality supplies doesn’t mean buying everything at once. Start with a mid-range pencil set, a pad of proper watercolor paper, and one good brush. Upgrade as your technique improves.
Step-by-Step Guide to Creating a Vibrant Painting
The following sequence outlines a reliable method for producing rich, controlled watercolor pencil art. Follow each stage deliberately to avoid common pitfalls like streakiness or dull color.
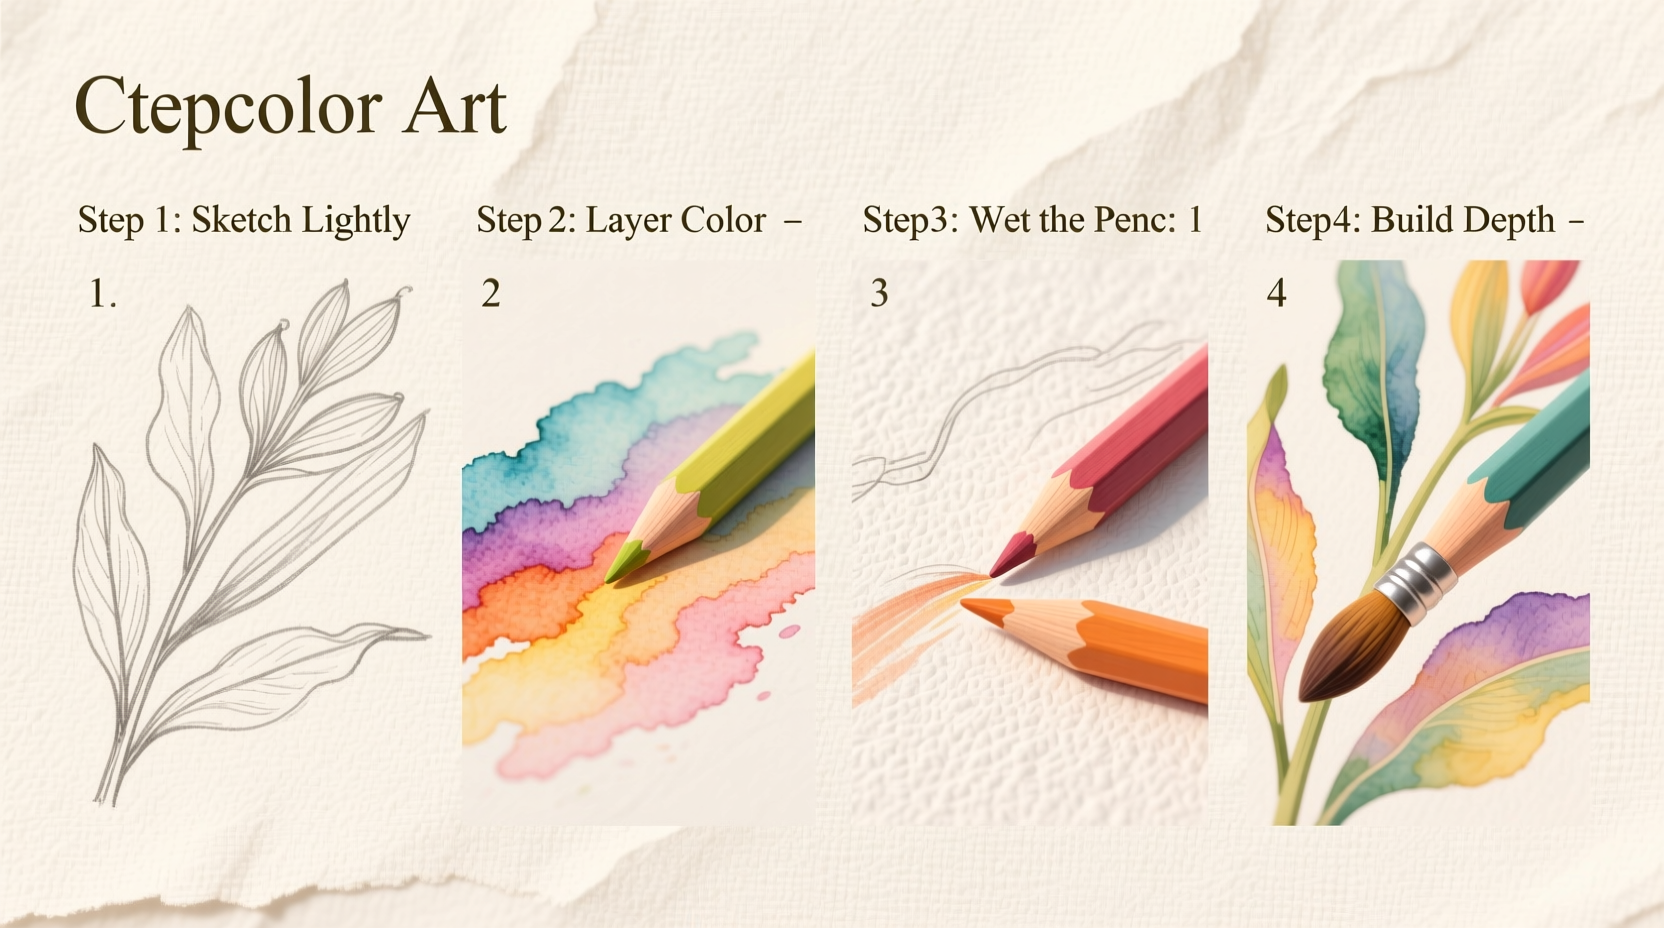
- Sketch Lightly in Pencil
Begin with a light graphite outline. Use a hard pencil (H or 2H) so lines don’t smudge when wet. Keep details minimal—over-drawing leads to rigidity later. - Apply Dry Color Layers
Build up pigment gradually using light pressure. Focus on darks early; you can always add more, but removing excess is difficult. Layer complementary colors subtly—for example, deep blue under yellow in shadows—to enrich tones when activated. - Activate with Water Strategically
Use a clean, damp brush to dissolve the pigment. Work in small sections to maintain control. For soft gradients, pull color outward from dense areas. For sharp edges, let the dry line meet the wet zone abruptly. - Layer Wet-on-Dry for Depth
Allow the first wash to dry completely. Then apply additional dry pencil and re-wet. This builds dimension without muddying the initial layer. - Refine with Dry Details
Once fully dry, add final highlights or crisp lines with the pencil alone. White gel pens or opaque pencils work well for tiny accents like sunlit edges or texture.
Avoiding Common Mistakes
Even experienced artists encounter issues with water distribution and pigment saturation. Recognizing these problems early prevents wasted effort.
- Overworking the surface: Repeated brushing breaks down paper fibers and lifts pigment. Apply water decisively and let it settle.
- Using dirty water: A murky rinse dilutes color and introduces grime. Change water frequently, especially after dark tones.
- Pressing too hard: Heavy pencil pressure fills paper tooth, leaving little room for water absorption. Build intensity through multiple light layers instead.
- Ignoring paper warp: Thin paper buckles when wet. Stretch it beforehand or tape edges firmly to a board.
“Watercolor pencils reward patience. Let the water do the work—don’t scrub. The pigment will bloom naturally if you give it space.” — Lena Torres, Botanical Illustrator & Workshop Instructor
Mini Case Study: From Sketch to Finished Artwork
Sophie, an amateur artist, wanted to paint a red poppy using only watercolor pencils. Her first attempt used thick outlines and full saturation from the start. When she applied water, the red bled uncontrollably, creating a flat, shapeless blotch.
For her second try, she adjusted her approach. She sketched lightly, applied red sparingly in the center, and used orange and soft pink around the edges. After wetting the area, the colors diffused organically, mimicking natural petal gradients. She added dark veins with a dry pencil after drying and finished with a single white highlight. The result was dimensional and alive—proof that technique outweighs tools.
Expert Checklist for Confident Results
Follow this checklist before and during each session to stay on track:
- ✅ Use 300 gsm watercolor paper, taped to a board
- ✅ Sketch with light, erasable lines
- ✅ Begin with mid-tones, not darkest values
- ✅ Blend from wet to dry zones for smooth transitions
- ✅ Rinse brush and change water between major color shifts
- ✅ Allow layers to dry fully before reworking
- ✅ Reserve whites with masking fluid or careful placement
- ✅ Step back periodically to assess overall balance
Frequently Asked Questions
Can I mix watercolor pencils with regular colored pencils?
Yes, but be mindful of wax bloom and hardness differences. Watercolor pencils often have a softer core. Layer water-based ones beneath standard pencils to avoid lifting issues.
Why do my colors look dull after adding water?
This usually happens when too much water dilutes concentrated pigment. Try applying denser dry color first, or use less water. Also, ensure your paper isn’t overly absorbent—some surfaces drain vibrancy quickly.
How do I fix a muddy section?
If caught early, blot gently with a tissue or sponge to lift excess pigment. Once dry, you can layer again—but avoid overworking. Prevention through controlled layering is more effective than correction.
Conclusion: Turn Technique Into Expression
Mastering watercolor pencils isn’t about achieving perfection—it’s about learning to trust the flow of pigment and water while maintaining creative control. Each stroke teaches something new about transparency, timing, and texture. Whether you're illustrating journals, developing fine art, or simply exploring creativity, this medium rewards thoughtful experimentation.
Start small. Paint a single leaf. Then a stone. Then a sky. With every piece, your confidence grows. Don’t wait for inspiration—create the conditions for it by showing up regularly with your pencils, paper, and patience.


 浙公网安备
33010002000092号
浙公网安备
33010002000092号 浙B2-20120091-4
Comments
No comments yet. Why don't you start the discussion?