
Clean, crisp product images with pure white backgrounds are the gold standard in e-commerce, advertising, and editorial work. They convey professionalism, focus attention on the subject, and integrate seamlessly into websites and catalogs. Yet achieving that flawless, evenly lit, shadow-free white can be surprisingly challenging—especially without the right technique. The difference between amateur snapshots and studio-quality results lies not in expensive gear alone, but in understanding light, setup, and post-processing as a cohesive system.
This guide breaks down the entire process into actionable steps, from choosing your equipment to final retouching. Whether you're photographing jewelry, apparel, or electronics, these methods will help you consistently produce polished, commercial-grade images.
The Foundation: Lighting Setup and Control
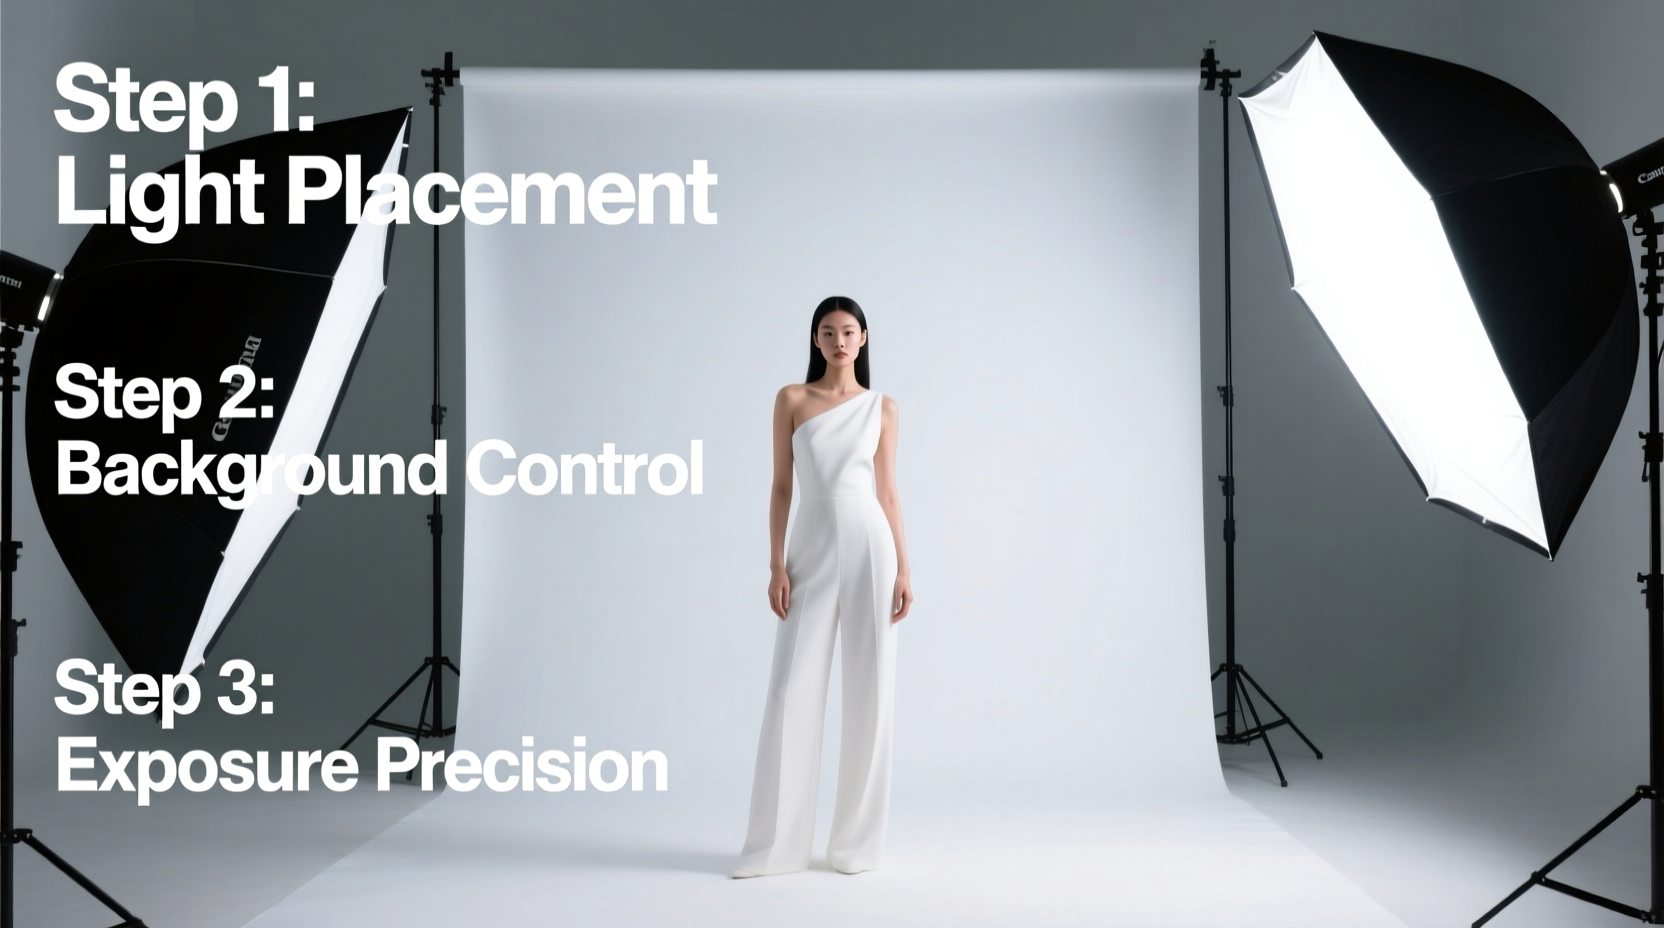
Light is the most critical factor in white background photography. The goal is to illuminate the subject fully while ensuring the background appears uniformly bright—without overexposing it into a blown-out mess or leaving gray patches. Achieving this requires controlled lighting and proper separation.
A two- or three-light setup is ideal. Use one light for the subject (key light), and additional lights aimed directly at the background. Position the subject at least 4–6 feet from the backdrop to prevent spill and shadows. Softboxes or umbrellas help diffuse the light, reducing harsh reflections and creating even illumination.
For smaller products, a light tent can be an affordable alternative. It diffuses light from multiple directions, minimizing glare on reflective surfaces like glass or metal. However, for larger items or full-body portraits, a manual setup with adjustable strobes or continuous lights offers greater precision.
Equipment Checklist for Studio-Quality Results
You don’t need a full commercial studio, but certain tools make the process significantly easier and more consistent.
- Digital camera with manual mode (DSLR or mirrorless)
- Prime lens (50mm f/1.8 recommended for sharpness and low distortion)
- Sturdy tripod (to eliminate camera shake and maintain framing)
- Backdrop: seamless white paper, fabric, or vinyl
- Two or three adjustable lights (strobes or continuous LED panels)
- Light modifiers: softboxes, umbrellas, or grids
- Light stands and clamps
- Gray card or color checker (for accurate white balance)
- Remote shutter release (optional but helpful)
“Consistency starts before you press the shutter. A repeatable setup means every shot matches the last.” — Daniel Reyes, Commercial Product Photographer
Step-by-Step Shooting Process
Follow this sequence to ensure technical accuracy and visual consistency:
- Set up the backdrop: Stretch seamless paper tightly across a support frame or tape it smoothly to a wall. Avoid wrinkles, which create shadows.
- Position the subject: Place the item on a transparent acrylic stand or low platform if needed to separate it from the base.
- Place background lights: Aim one light at the top half of the backdrop and another at the bottom. Adjust height and angle to achieve even brightness from corner to corner.
- Add key light: Position the main light at a 30–45 degree angle to the subject. Use a softbox to avoid hard highlights.
- Check exposure: Use your camera’s histogram. The background should peak near the right edge without clipping. Enable highlight warnings (blinkies) to detect overexposure.
- Set camera settings manually: Use low ISO (100–200), aperture between f/8 and f/11 for depth of field, and shutter speed synced with your lights.
- Shoot a test frame: Review for hotspots, shadows, and color casts. Adjust light intensity or position as needed.
- Capture with a remote or timer: Prevent camera movement during exposure.
Common Pitfalls and How to Avoid Them
Even experienced photographers encounter issues when shooting against white. Recognizing and correcting these early saves time in post-production.
| Issue | Causes | Solutions |
|---|---|---|
| Gray or uneven background | Insufficient or misdirected lighting | Add more lights; increase power; check for shadows cast by subject or gear |
| Harsh shadows | Hard light source too close or direct | Diffuse with softbox; increase distance; use reflectors |
| Blown-out highlights | Background overexposed beyond recovery | Reduce background light intensity; shoot in RAW for better recovery |
| Color cast (yellow/blue tint) | Mixed lighting temperatures or incorrect white balance | Use same Kelvin-rated lights; set custom white balance using a gray card |
| Subject looks flat | Lack of directional lighting | Introduce subtle rim or fill light to add dimension |
Post-Processing: From Good to Perfect
No white background shoot is complete without careful editing. Even the best in-camera results benefit from minor adjustments to ensure the background is truly neutral white and the subject pops.
In software like Adobe Lightroom or Photoshop, follow this workflow:
- Adjust white balance using the eyedropper on a neutral area.
- Use the Highlights and Whites sliders to bring the background to +100% luminance without clipping texture.
- Enhance clarity and contrast subtly on the subject only.
- In Photoshop, use a layer mask to selectively dodge or burn areas needing refinement.
- For complex edges (e.g., hair or lace), refine the selection using Select Subject > Refine Edge.
- Export in sRGB for web use, preserving transparency if needed (PNG format).
“The best white background image doesn’t look edited—it looks inevitable.” — Lena Park, Retouching Specialist
Real-World Example: E-Commerce Jewelry Shoot
A boutique jewelry brand struggled with inconsistent product images. Some photos had dingy backgrounds; others showed visible shadows under pendants. Using a small home studio, they implemented a three-light setup: two strip boxes angled at the backdrop and one softbox above the product.
By raising the subject on an acrylic stand and calibrating each light independently, they achieved even illumination. Shooting tethered to a laptop allowed instant feedback. In post, they used a global preset in Lightroom to standardize all images. The result was a cohesive catalog that increased customer trust and reduced return rates due to inaccurate color representation.
Frequently Asked Questions
Can I use natural light for white background photography?
Yes, but it's difficult to control. Indirect daylight in a shaded area can work, but changing sun conditions cause inconsistency. Artificial lighting is preferred for reliability and repeatability.
How do I remove shadows in post without making the image look fake?
Instead of erasing shadows completely, soften them with a low-opacity clone stamp or healing brush. Shadows add realism—eliminate harsh ones, but preserve subtle gradients for depth.
What’s the best backdrop material for pure white results?
Seamless paper is ideal because it’s non-reflective and available in large rolls. Polyester backdrops are durable but may reflect light. Avoid textured materials that show grain under bright lighting.
Final Steps to Mastery
Perfect white background photography isn’t about perfection in a single shot—it’s about building a repeatable system. Master the interplay between light placement, exposure settings, and post-processing discipline. Test different apertures, light distances, and angles until you understand how each variable affects the final image.
Once your workflow is locked in, batch processing becomes efficient, and your portfolio gains a professional uniformity that clients notice. Start small, document your settings, and refine incrementally.


 浙公网安备
33010002000092号
浙公网安备
33010002000092号 浙B2-20120091-4
Comments
No comments yet. Why don't you start the discussion?