
Yarn puffs—soft, textured clusters of looped stitches—are more than just decorative elements. They add dimension, whimsy, and tactile richness to scarves, hats, baby blankets, and even home décor. While many assume this technique requires special tools or complex crochet skills, it’s entirely possible to create beautiful, consistent puffs using only two knitting needles. With patience and practice, you can master this versatile stitch and elevate your hand-knit projects from simple to stunning.
Why Use the Two-Needle Puff Stitch?
The puff stitch is traditionally associated with crochet, but knitters have adapted it into a needle-based version that mimics the same plush, rounded effect. Unlike bobbles or cables, puff stitches are lightweight and springy, creating a three-dimensional texture without adding bulk. The two-needle method keeps things accessible—no need for extra hooks or complicated maneuvers. It’s ideal for intermediate knitters ready to explore beyond garter and stockinette.
This technique works especially well with soft, lofty yarns like merino wool, alpaca blends, or chenille, which enhance the fluffiness of each puff. When repeated in rows, the pattern forms a dense yet flexible fabric perfect for cozy accessories.
Essential Tools and Materials
Before beginning, gather the right supplies. Using appropriate materials ensures smoother execution and better-looking results.
- Yarn: Medium-weight (worsted) or bulky yarn works best. Avoid slippery silk or tightly twisted cotton, as they resist holding the puff shape.
- Needles: Size US 7–9 (4.5–5.5 mm) for worsted, or larger for bulky yarn. Wooden or bamboo needles offer more grip than metal.
- Stitch markers: Helpful when repeating puff patterns across long rows.
- Tapestry needle: For weaving in ends after completion.
- Scissors: Sharp, small-bladed scissors for clean cuts.
Recommended Yarn Types for Fluffy Puffs
| Yarn Type | Texture Benefit | Best Needle Size |
|---|---|---|
| Merino Wool | Natural elasticity holds puff shape | US 8 (5 mm) |
| Alpaca Blend | Soft halo enhances fluffiness | US 9 (5.5 mm) |
| Chenille | Ultra-plush finish, instant volume | US 10 (6 mm) |
| Acrylic Bulky | Affordable, easy care | US 9–10 (5.5–6 mm) |
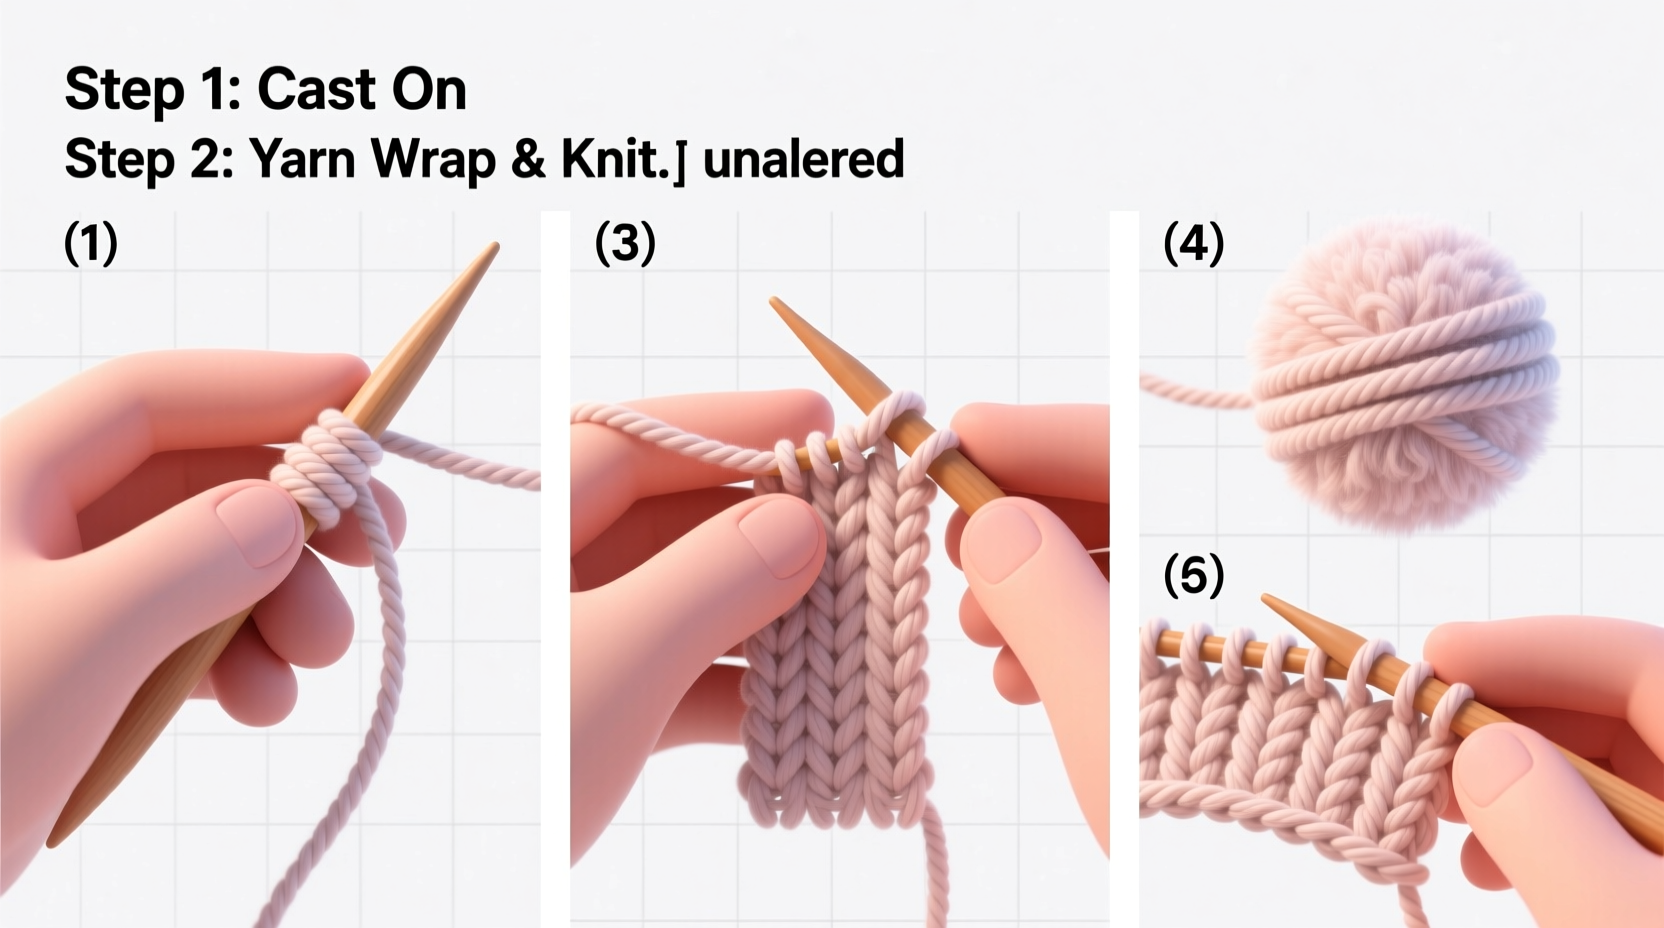
Step-by-Step: Creating a Puff Stitch with Two Needles
The key to a successful puff lies in controlled looping and careful tightening. Each puff is formed by stacking multiple incomplete stitches, then pulling them all together through a single loop. Follow these steps precisely for uniform results.
- Select your base row: Begin with a foundation of knit or purl stitches. A garter stitch base (knit every row) provides stability.
- Insert needle into next stitch: Bring your right-hand needle into the next available stitch on the left needle as if to knit.
- Create first loop: Wrap the yarn around the right needle and pull through, but do not slide the original stitch off yet. You now have two loops on the right needle.
- Repeat loop creation: Without advancing to the next stitch, repeat the wrap-and-pull motion two more times (for a total of four loops on the right needle).
- Secure the puff: Slide the original stitch off the left needle. Then, use the tip of the left needle to lift the first three loops over the fourth and off the right needle.
- Finish with a knit: Knit the next stitch normally to anchor the puff and maintain tension.
Each puff consumes one stitch from the row below but creates a raised cluster approximately half an inch tall, depending on yarn thickness. Repeat the sequence across the row, spacing puffs evenly or clustering them for dramatic effect.
“Puff stitches bring rhythm and depth to knitting. Their success depends less on complexity and more on consistency in loop height and final tightening.” — Lena Ruiz, Textile Artist & Instructor
Tips for Consistent, Fluffy Results
Even experienced knitters struggle with uneven puffs. These practical guidelines help refine your technique.
- Count your loops: Always form the same number of loops per puff—typically 3 to 5—for visual harmony.
- Use stitch markers: Place one every 10 puffs to prevent miscounting over long stretches.
- Block finished pieces: Wet blocking helps set the puff shape and evens out minor inconsistencies.
- Avoid twisting loops: Ensure each new loop sits flat on the needle; twisted strands distort the final look.
- Practice swatching: Make a 4x4 inch sample before starting a project to test gauge and adjust needle size if needed.
Mini Case Study: Reviving a Simple Scarf Design
Sophie, a hobby knitter from Portland, had been making plain ribbed scarves for years. Seeking more visual interest, she experimented with puff stitches on a worsted-weight merino scarf. After initial frustration with loose, sagging puffs, she switched to bamboo needles and slowed her pace during loop formation. By anchoring each puff with a tight knit stitch and blocking the final piece, she achieved a balanced, cloud-like texture. Her updated design became a favorite gift among friends—proof that subtle changes yield significant impact.
Common Mistakes and How to Fix Them
Mistakes are part of learning. Recognizing them early prevents wasted time and materials.
| Issue | Cause | Solution |
|---|---|---|
| Puffs lie flat | Too few loops or overly tight finishing | Increase loop count; loosen final pull-through |
| Uneven spacing | Inconsistent placement between puffs | Use stitch markers; count stitches between clusters |
| Loose base stitches | Original stitch dropped too early | Hold base stitch securely until all loops are lifted |
| Twisted puff appearance | Loops inserted incorrectly | Ensure all wraps go over the needle in the same direction |
Frequently Asked Questions
Can I combine puff stitches with other patterns?
Yes. Puff stitches pair beautifully with seed stitch backgrounds or alternating rows of stockinette. Just maintain a consistent stitch count and consider how texture affects drape.
Are puff stitches suitable for beginners?
They’re best for knitters comfortable with basic stitches and tension control. If you’ve mastered ribbing and simple increases, you’re ready to try puffs.
How do I wash a garment with puff stitches?
Hand wash in cool water with mild detergent. Lay flat to dry to preserve puff structure. Avoid wringing or hanging, which can stretch the clusters.
Checklist: Mastering the Two-Needle Puff Stitch
- Choose a grippy yarn and appropriately sized needles
- Knit a test swatch to practice loop consistency
- Form 4–5 loops per puff for optimal fullness
- Lift excess loops cleanly over the final one
- Anchoring each puff with a knit stitch
- Use stitch markers for even spacing
- Block the finished piece for professional shaping
- Inspect for twists or dropped base stitches
Conclusion: Bring Texture to Life
Creating fluffy yarn puffs with just two needles opens up a world of creative possibility. No longer limited to flat textures, you can now craft pieces that invite touch and stand out visually. Whether you're embellishing a baby hat, designing a statement cowl, or adding detail to a throw blanket, the puff stitch adds personality and craftsmanship. What begins as a simple loop repetition evolves into expressive textile art with attention and care.


 浙公网安备
33010002000092号
浙公网安备
33010002000092号 浙B2-20120091-4
Comments
No comments yet. Why don't you start the discussion?