
Compact, reliable, and built for performance—mini pumps like the Air Support series are essential tools for cyclists who value preparedness. Whether you're commuting, trail riding, or embarking on a weekend adventure, maintaining proper tire pressure ensures comfort, traction, and safety. Yet many riders underutilize their mini pumps due to confusion over valve types, pressure accuracy, or technique. This guide breaks down everything you need to know to use your Air Support mini pump confidently and efficiently.
Understanding Your Air Support Mini Pump
The Air Support mini pump is designed for portability without sacrificing function. Most models feature dual-valve compatibility (Presta and Schrader), a compact aluminum barrel, and a flexible hose that reduces strain on the valve stem. Unlike older frame-mounted pumps, modern mini pumps prioritize user ergonomics and sealing efficiency, making them suitable even for high-pressure road tires.
Key components include:
- Pump head: Switchable between Presta and Schrader valves—some models auto-detect, others require manual flipping.
- Flexible hose: Reduces stress on the valve and improves pumping angle.
- Pressure gauge: Integrated in select models; allows real-time monitoring up to 120+ PSI.
- Handle and barrel: Ergonomic design for better grip and reduced fatigue.
Step-by-Step Guide to Inflating Your Tires
Follow this sequence to achieve accurate, leak-free inflation every time—especially critical when you’re miles from home.
- Check current tire pressure: Use a portable digital gauge or feel the tire squeeze. Underinflated tires increase rolling resistance and risk pinch flats.
- Remove the valve cap: Unscrew and store safely. For Presta valves, unscrew the tiny lock nut at the tip to open the valve.
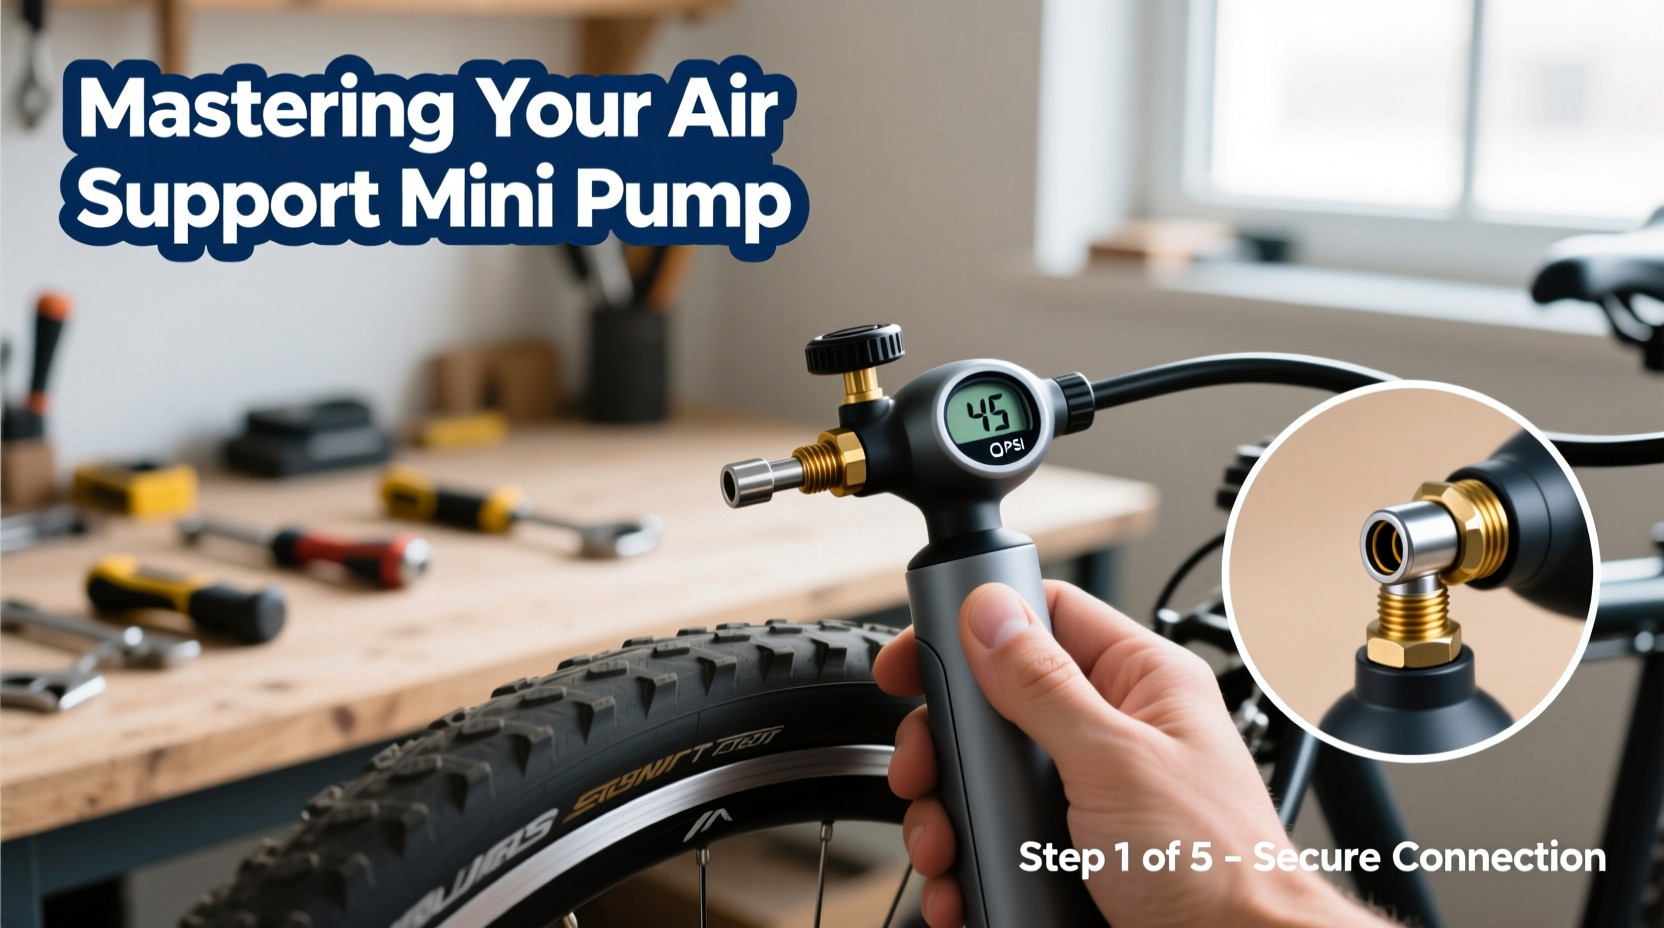
- Attach the pump head securely: Align the pump head with the valve. Press firmly until fully seated. A clicking sound often indicates a proper seal.
- Pump steadily and evenly: Use full strokes from handle base to top. Short pumps waste energy and reduce efficiency.
- Monitor pressure (if gauge-equipped): Stop when reaching the recommended PSI marked on the tire sidewall.
- Detach the pump carefully: Release pressure from the hose first (if applicable), then pull straight off to avoid damaging the valve.
- Screw the Presta valve shut (if used): Re-tighten the lock nut to prevent slow leaks.
- Replace the valve cap: Helps keep dirt and moisture out.
“Proper pump technique can save up to 30% effort and prevent valve damage—a crucial factor during roadside repairs.” — Jordan Lee, Bike Mechanic & Product Tester, ProCycle Labs
Valve Types: Presta vs. Schrader – What You Need to Know
One of the most common sources of frustration with mini pumps is incorrect valve engagement. Understanding the differences prevents leaks and equipment damage.
| Feature | Presta Valve | Schrader Valve |
|---|---|---|
| Common On | Road bikes, gravel bikes, high-performance wheels | Mountain bikes, e-bikes, car tires, kids’ bikes |
| Valve Core | Lock nut must be unscrewed before inflating | Spring-loaded; always open when pump is attached |
| Diameter | 6mm (narrower) | 8mm (wider) |
| Max Pressure | Up to 160 PSI | Typically up to 100 PSI |
| Pump Head Compatibility | Requires Presta-specific setting or dual-head design | Broadly compatible; same as car tires |
Optimizing Efficiency: How to Pump Less and Inflate More
Mini pumps demand more effort than floor pumps, so maximizing each stroke is key. Here’s how to reduce fatigue and get results faster.
- Use the hose extension: If your model includes one, attach it first. This isolates pump movement from the valve, reducing wobble and improving seal stability.
- Pump in a stable stance: Sit or kneel with the bike stabilized. Hold the wheel between your feet or against a wall to prevent rotation.
- Engage full compression: Don’t shorten your stroke. Each partial pump loses momentum and heat buildup increases resistance.
- Inflate before a ride, not after a flat: Preventative topping-off takes fewer strokes than reinflating a completely flat tire.
- Know your target PSI: Over-pumping wastes energy. Road tires typically need 80–130 PSI; mountain bikes 25–50 PSI; hybrids 50–70 PSI.
Real-World Example: Trailside Repair Done Right
During a gravel ride near Sedona, Maya noticed her rear tire felt soft. She pulled over, assessed the damage (a small puncture, but tube still held air), and decided to top off rather than replace. Using her Air Support Mini Pump with integrated gauge, she:
- Checked the tire label: “Max 100 PSI”
- Unscrewed the Presta valve tip
- Attached the pump head with the hose pre-connected
- Pumped 25 firm strokes while seated on a rock, stabilizing the wheel with her foot
- Watched the gauge climb from 60 to 92 PSI
- Detached, re-capped, and continued riding—arriving at her destination with no further issues
This approach saved her from a lengthy repair and allowed her to finish strong. The right tool, used correctly, made all the difference.
Essential Maintenance Checklist for Long-Term Reliability
Your mini pump is only as good as its condition. Regular care prevents failure when you need it most.
- Monthly:
- Inspect the hose for cracks or kinks. Clean the pump head with a dry cloth.
- Every 3 Months:
- Lubricate the inner shaft with a drop of silicone oil. Wipe seals gently to remove grit.
- After Wet Rides:
- Dry the pump thoroughly before storage. Moisture causes internal corrosion and seal degradation.
- Before Long Trips:
- Test the pump on a tire at home. Verify gauge accuracy and check for air leaks at the connection point.
Do’s and Don’ts of Mini Pump Use
| Do | Don’t |
|---|---|
| Always open the Presta valve before attaching | Force the pump head onto the valve |
| Use full, controlled strokes | Rapidly jackhammer the handle (reduces efficiency) |
| Carry a backup CO2 inflator for emergencies | Store the pump loose in a bag where it can get damaged |
| Check tire pressure weekly, even if not riding | Ignore a hissing sound at the valve—indicates poor seal |
Frequently Asked Questions
Can I inflate a completely flat tire with a mini pump?
Yes, but it requires significant effort—especially for road tires above 90 PSI. It may take 100+ strokes. Consider carrying a CO2 cartridge for rapid reinflation after a flat, then use the pump for fine-tuning pressure later.
Why won’t my pump stay attached to the valve?
This usually means the pump head isn’t properly engaged or the valve isn’t open (for Presta). Double-check that the locking lever is flipped correctly and the Presta nut is unscrewed. Dirt or debris in the valve can also prevent a seal—clean with compressed air or a small brush.
How accurate are built-in pressure gauges on mini pumps?
Higher-end models are generally within ±5 PSI of actual pressure. Budget versions may lack precision. For critical applications (e.g., racing), verify with a standalone digital gauge monthly.
Final Thoughts: Confidence Starts with Preparation
Mastery of your Air Support mini pump isn’t just about mechanics—it’s about confidence. Knowing you can restore optimal pressure anywhere transforms unexpected flats into minor delays. By understanding valve types, refining your technique, and maintaining your tool, you turn a simple piece of gear into a reliable ally.


 浙公网安备
33010002000092号
浙公网安备
33010002000092号 浙B2-20120091-4
Comments
No comments yet. Why don't you start the discussion?