
For decades, Max Factor Creme Puff has been a cult favorite among makeup artists and beauty enthusiasts. Known for its matte finish, buildable coverage, and staying power, this compact powder foundation can deliver a professional-quality look—especially when applied using the wet method. While dry application is common, the wet technique unlocks superior blending, longer wear, and a more airbrushed effect. Understanding how to apply it correctly makes all the difference between a patchy result and a truly flawless complexion.
The Science Behind Wet Application
Applying Max Factor Creme Puff with a damp sponge transforms the texture and performance of the product. When water activates the formula, the pigments bind more smoothly to the skin, reducing streaks and minimizing visible powderiness. The moisture helps the powder adhere evenly, especially in areas prone to dryness or fine lines like around the eyes and mouth.
This method also allows for greater control over coverage. A light swipe delivers sheer, natural-looking color; multiple layers build up to full coverage without caking. Unlike liquid foundations that may oxidize or settle into creases, the wet-applied Creme Puff sets quickly and remains stable throughout the day.
“The wet technique was standard in studio makeup during the golden age of Hollywood. It gives you precision, longevity, and a finish that photographs beautifully.” — Diane Reeves, Professional Makeup Artist & Vintage Beauty Archivist
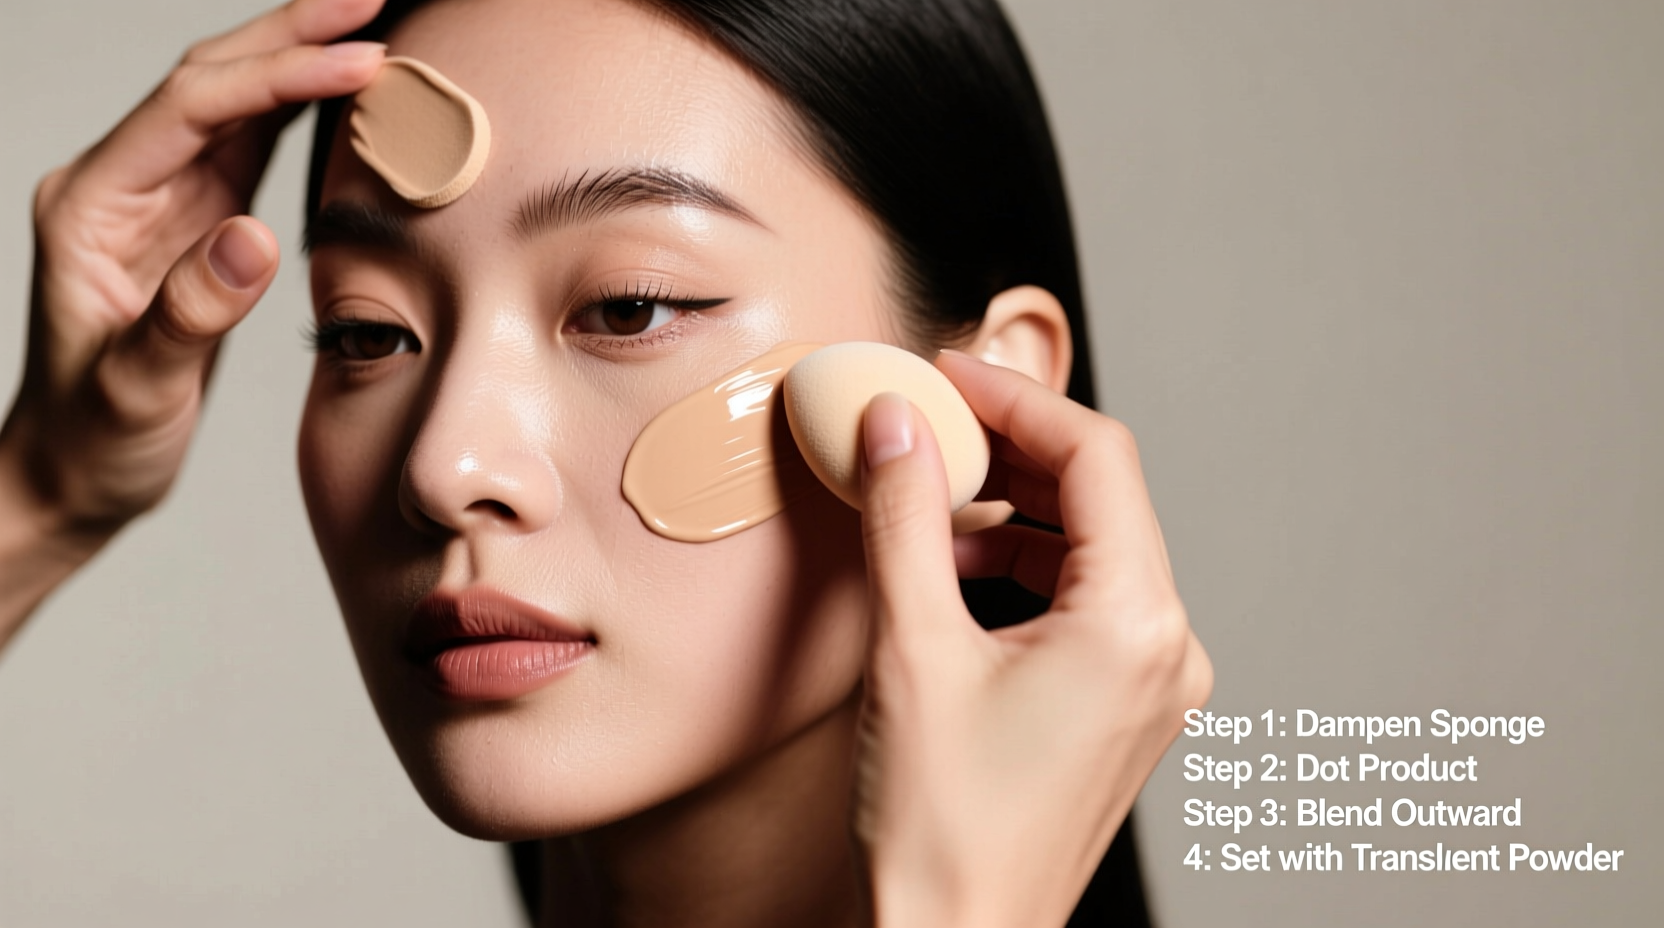
Step-by-Step Guide to Perfect Wet Application
Follow these steps carefully to achieve a polished, camera-ready finish every time.
- Prepare your skin: Begin with clean, moisturized skin. Use a lightweight, non-greasy moisturizer suited to your skin type. Allow it to absorb fully—this prevents pilling and ensures even application.
- Gather your tools: You’ll need the Max Factor Creme Puff compact, a high-density makeup sponge (such as a beauty blender), and a spray bottle filled with water or facial mist.
- Dampen the sponge: Lightly mist your sponge until it’s moist but not dripping. Squeeze out excess water. A saturated sponge will dilute the product too much.
- Activate the powder: Open the Creme Puff compact. Press the damp sponge gently into the powder, rotating slightly to pick up an even amount. Don’t press too hard—let the moisture do the work.
- Apply in sections: Start at the center of your face (forehead, nose, cheeks, chin) and blend outward using tapping motions. Avoid dragging the sponge, which can disrupt the even laydown.
- Build coverage gradually: Let the first layer set for 30 seconds, then re-dampen the sponge lightly and apply a second pass only where needed—under eyes, blemishes, or redness.
- Set and refine: Once the foundation is applied, use a clean, dry part of the sponge or a soft brush to lightly buff the edges for seamless blending.
- Finish with setting spray (optional): To lock in the look and enhance durability, spritz a hydrating setting spray. This prevents the powder from looking flat or chalky under flash photography.
Do’s and Don’ts of Wet Application
| Do’s | Don’ts |
|---|---|
| Use filtered or distilled water to prevent mineral buildup on the sponge | Soak the sponge—excess water breaks down the emollients in the powder |
| Replace or sanitize your sponge weekly to avoid bacterial growth | Use alcohol-based cleansers on the sponge—they degrade elasticity |
| Tap, don’t swipe—tapping mimics the motion of airbrushing | Apply over dewy serums—wait until they’re fully absorbed |
| Store the compact in a cool, dry place away from humidity | Leave the compact open—moisture can cause clumping |
Real-Life Example: Bridal Makeup Session
Sophie, a bride preparing for her outdoor summer wedding, wanted a foundation that would last through tears, heat, and hours of photos. Her makeup artist opted for Max Factor Creme Puff using the wet method. After prepping Sophie’s skin with a mattifying primer and hydrating serum, she applied the powder with a chilled, damp sponge in thin layers. The result? A luminous yet non-shiny finish that resisted sweat and touch-ups for over 10 hours. Even in close-up shots, her skin looked smooth and poreless. Guests later commented that she “glowed without looking oily”—a testament to the balanced finish the wet technique provides.
Tips for Different Skin Types
- Oily skin: Focus on T-zone application. Reapply lightly midday if needed. Pair with an oil-blotting sheet instead of additional powder to avoid buildup.
- Dry skin: Exfoliate gently the night before. Mix a drop of facial oil with your moisturizer prior to application. Avoid over-powdering—target only shiny zones post-application.
- Combination skin: Use the wet method on oily areas and dry-blend on drier patches. Buff transition zones thoroughly to prevent demarcation lines.
- Mature skin: Skip heavy layers. Apply one sheer coat with a finely misted sponge, focusing on evening tone rather than concealing every line. Finish with a dewy highlighter on cheekbones for radiance.
Frequently Asked Questions
Can I use any sponge for wet application?
While any sponge can be used, high-density sponges with a smooth surface yield the best results. Cheaper sponges tend to absorb too much product and break apart easily when wet. Replace your sponge every 4–6 weeks, especially if used daily.
Does the wet method work for touch-ups during the day?
Yes, but with caution. Carry a mini spray bottle and a folded tissue. Dab excess oil first, lightly mist the sponge, then press—don’t rub—the powder onto problem areas. Avoid layering over existing makeup unless necessary, as this can lead to caking.
Is Max Factor Creme Puff suitable for sensitive skin?
Many users with sensitive skin report no irritation, thanks to its simple, fragrance-free formula. However, always patch-test behind the ear before full-face use. Discontinue if redness or itching occurs.
Essential Checklist Before You Begin
- ✔ Cleanse and moisturize face
- ✔ Choose a high-quality, clean sponge
- ✔ Fill spray bottle with purified water or facial mist
- ✔ Ensure adequate lighting (natural or bright white)
- ✔ Test shade match on jawline in daylight
- ✔ Have a mirror with magnification for detail work
- ✔ Keep blotting papers nearby for post-application refinement
Final Thoughts and Call to Action
Max Factor Creme Puff isn’t just a vintage relic—it’s a timeless tool that, when used correctly, delivers unmatched finish and endurance. The wet application method elevates it from basic powder to a pro-level complexion solution. Whether you're prepping for a special event, long workday, or simply want reliable everyday coverage, mastering this technique pays dividends in confidence and appearance.
Now that you know the secrets behind a flawless finish, try it yourself. Experiment with sponge dampness, pressure, and layering to find what works best for your skin. Once you experience the smooth, lasting results, you may never go back to dry application.


 浙公网安备
33010002000092号
浙公网安备
33010002000092号 浙B2-20120091-4
Comments
No comments yet. Why don't you start the discussion?