
Remodeling a small bathroom presents unique challenges—but also remarkable opportunities. Limited square footage doesn’t mean sacrificing comfort or aesthetics. With thoughtful planning and strategic design choices, even the tiniest bathroom can feel spacious, functional, and stylish. The key lies in balancing practicality with visual appeal, using every inch wisely without overwhelming the senses. From layout optimization to smart storage and illusion-enhancing finishes, this guide delivers actionable insights from industry professionals who specialize in compact spaces.
Optimize Layout for Maximum Flow
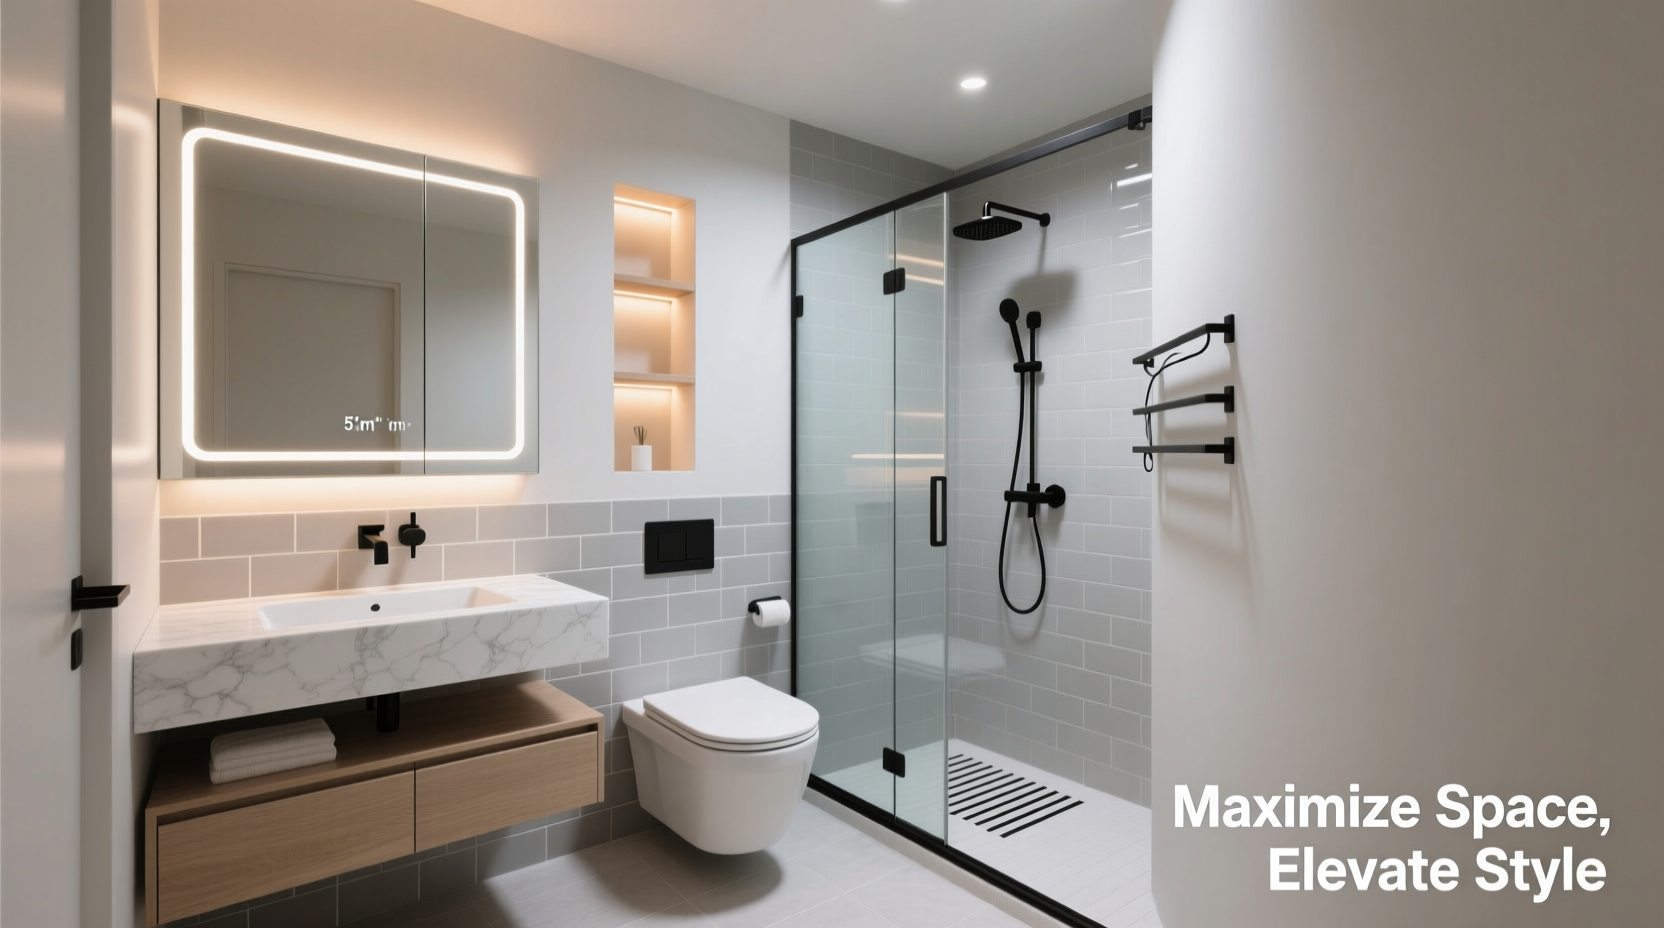
The foundation of any successful small bathroom remodel is an efficient layout. In spaces under 50 square feet, poor planning can lead to cramped movement and cluttered fixtures. Begin by evaluating traffic patterns: ensure there’s at least 24 inches of clearance in front of fixtures, especially around the toilet and shower entry. Consider shifting from a traditional tub-shower combo to a walk-in shower with a frameless glass door. This not only opens up floor space but also enhances light diffusion.
If possible, reposition plumbing to allow for a more balanced arrangement. Moving the sink off-center or installing a corner vanity can free up central room. Wall-mounted toilets and pedestal sinks reduce visual bulk, making walls appear farther apart. For powder rooms, a pocket door saves up to six square feet compared to a standard swinging door.
Smart Storage Solutions That Don’t Sacrifice Style
Storage is often the biggest pain point in small bathrooms. However, clever integration means you don’t have to choose between function and form. Recessed niches in showers provide shelf space without protruding into the room. Medicine cabinets with mirrored fronts double as storage and reflective surfaces, amplifying light.
Consider vertical storage: tall, narrow cabinets between the wall and vanity offer hidden space for towels and toiletries. Over-the-toilet shelving units, when styled minimally, add utility without visual clutter. For modern aesthetics, built-in wall shelves in stone or floating wood create open display areas while maintaining clean lines.
Drawer organizers, pull-out baskets, and magnetic strips inside cabinet doors help maintain order. Avoid over-accessorizing; each item should earn its place.
“Every inch counts in a small bathroom. Prioritize multi-functional elements—like a vanity with deep drawers and a countertop that doubles as a styling station.” — Lena Torres, Interior Designer & Small Space Specialist
Design Tricks to Create the Illusion of Space
Visual perception plays a critical role in how spacious a bathroom feels. Light colors dominate professional designs for a reason: whites, soft grays, and pale blues reflect natural and artificial light, making walls recede. But color alone isn’t enough. Strategic use of mirrors and lighting completes the illusion.
A large mirror opposite a window reflects daylight, effectively doubling illumination. Frameless mirrors extend edge-to-edge for a seamless look. LED backlit mirrors add ambient glow and eliminate shadows during grooming.
Large-format tiles reduce grout lines, creating a smoother surface that appears less fragmented. Running tiles vertically on walls draws the eye upward, enhancing ceiling height. For floors, continue the same tile from wall to wall—avoid dividing zones with different materials.
| Design Element | Do | Avoid |
|---|---|---|
| Flooring | Use large-format porcelain tiles in light tones | Small mosaic tiles with dark grout |
| Lighting | Layer ambient, task, and accent lights | Single overhead fixture |
| Ceilings | Add a semi-gloss finish to reflect light | Matt black or dark paint |
| Fixtures | Wall-mounted vanities and toilets | Bulky cabinetry with closed bases |
Step-by-Step Guide to Your Small Bathroom Remodel
Follow this timeline to ensure a smooth, stress-free transformation:
- Week 1–2: Assess & Plan
Measure dimensions, take photos, note plumbing locations. Define your budget and aesthetic preferences. Consult a contractor if structural changes are needed. - Week 3: Finalize Design
Select fixtures, tiles, lighting, and storage solutions. Order materials with lead times in mind. Confirm layout with a scaled floor plan. - Week 4: Demolition & Prep
Remove old fixtures, flooring, and walls if necessary. Update electrical and plumbing as required. Install moisture-resistant drywall or cement board. - Week 5–6: Install Core Elements
Lay new flooring, tile walls, install the shower base or tub. Mount the vanity, toilet, and lighting rough-ins. - Week 7: Finishing Touches
Seal grout, install mirrors, hardware, and accessories. Test all systems for leaks and proper drainage. - Week 8: Styling & Evaluation
Add towels, plants, and decor. Walk through daily routines to assess functionality. Make minor adjustments as needed.
Real-World Example: Transforming a 35-Square-Foot Powder Room
In a Brooklyn brownstone, homeowner Maya Chen faced a cramped half-bath dominated by a bulky vanity and outdated tile. Her goal was a spa-like feel without expanding the footprint. Working with a designer, they replaced the vanity with a wall-mounted model featuring concealed storage. A full-height mirror extended from sink to ceiling, backed by warm LED lighting.
The original tub was swapped for a curbless shower with a single sliding glass panel. Large white hexagonal floor tiles ran continuously into the shower, blurring boundaries. Navy-blue matte tiles on one accent wall added depth without shrinking the space. The result? A sophisticated, airy retreat that guests consistently mistake for being much larger.
Essential Remodeling Checklist
- ✔ Measure exact dimensions including door swing and fixture clearances
- ✔ Choose water-efficient fixtures (low-flow toilet, aerated faucet)
- ✔ Select mold-resistant paint and grout for durability
- ✔ Install adequate ventilation (fan with humidity sensor)
- ✔ Opt for pre-fabricated shower kits to reduce labor costs
- ✔ Use consistent flooring across wet and dry zones
- ✔ Plan for future maintenance access (e.g., behind-wall shut-off valves)
- ✔ Incorporate at least two lighting sources (e.g., overhead + mirror lights)
FAQ
Can I include a bathtub in a small bathroom?
Yes, but consider alternatives like a Japanese soaking tub or a corner-designed unit. If space is extremely limited, prioritize a walk-in shower—many modern designs now offer luxurious features like rainfall heads and built-in seating.
What’s the most cost-effective way to remodel a small bathroom?
Keep existing plumbing locations to avoid expensive rerouting. Refinish rather than replace tiles if possible. Choose prefabricated shower bases and stock vanities instead of custom builds. Focus upgrades on high-impact items like lighting and hardware.
How do I prevent the bathroom from feeling claustrophobic?
Avoid heavy window treatments; use frosted glass or privacy film for natural light. Stick to a cohesive color palette with minimal contrast. Use continuous flooring and ceiling finishes to blur boundaries. Introduce subtle texture instead of bold patterns.
Final Thoughts: Style Meets Functionality
A small bathroom doesn’t need to be a compromise. When thoughtfully remodeled, it becomes one of the most efficient and expressive spaces in the home. The principles of smart layout, intelligent storage, and optical enhancement work together to deliver both comfort and elegance. Whether you're updating a guest powder room or reimagining a primary bath, the strategies outlined here are proven to maximize every square inch.


 浙公网安备
33010002000092号
浙公网安备
33010002000092号 浙B2-20120091-4
Comments
No comments yet. Why don't you start the discussion?