
A microwave oven relies on even heat distribution to cook food efficiently, and the turntable plays a crucial role in this process. When it stops spinning, you may notice unevenly heated meals, cold spots, or longer cooking times. While a non-spinning turntable can be frustrating, the issue is often easier to fix than most people assume. In many cases, the problem stems from simple mechanical failures or misalignment—not expensive electronic malfunctions. This guide walks through the most common causes and provides practical, step-by-step DIY solutions to get your microwave working properly again.
Why the Turntable Matters
The rotating glass plate inside your microwave ensures that microwaves interact uniformly with food. Without rotation, certain areas absorb more energy than others, leading to inconsistent results. Over time, standing waves in the cavity cause hot and cold zones, which is why manufacturers integrate turntables into most models. If yours has stopped turning, it's not just an inconvenience—it compromises the appliance’s core functionality.
“Even heating depends on consistent motion. A stalled turntable defeats the purpose of modern microwave design.” — Dr. Alan Reed, Appliance Engineer
Common Reasons the Turntable Isn’t Spinning
Before reaching for tools, it’s essential to identify the root cause. Here are the six most frequent culprits behind a stationary turntable:
- Obstructed rotation: Something inside the microwave is blocking the tray.
- Misaligned roller guide or support: The ring or wheel assembly beneath the turntable is off-track.
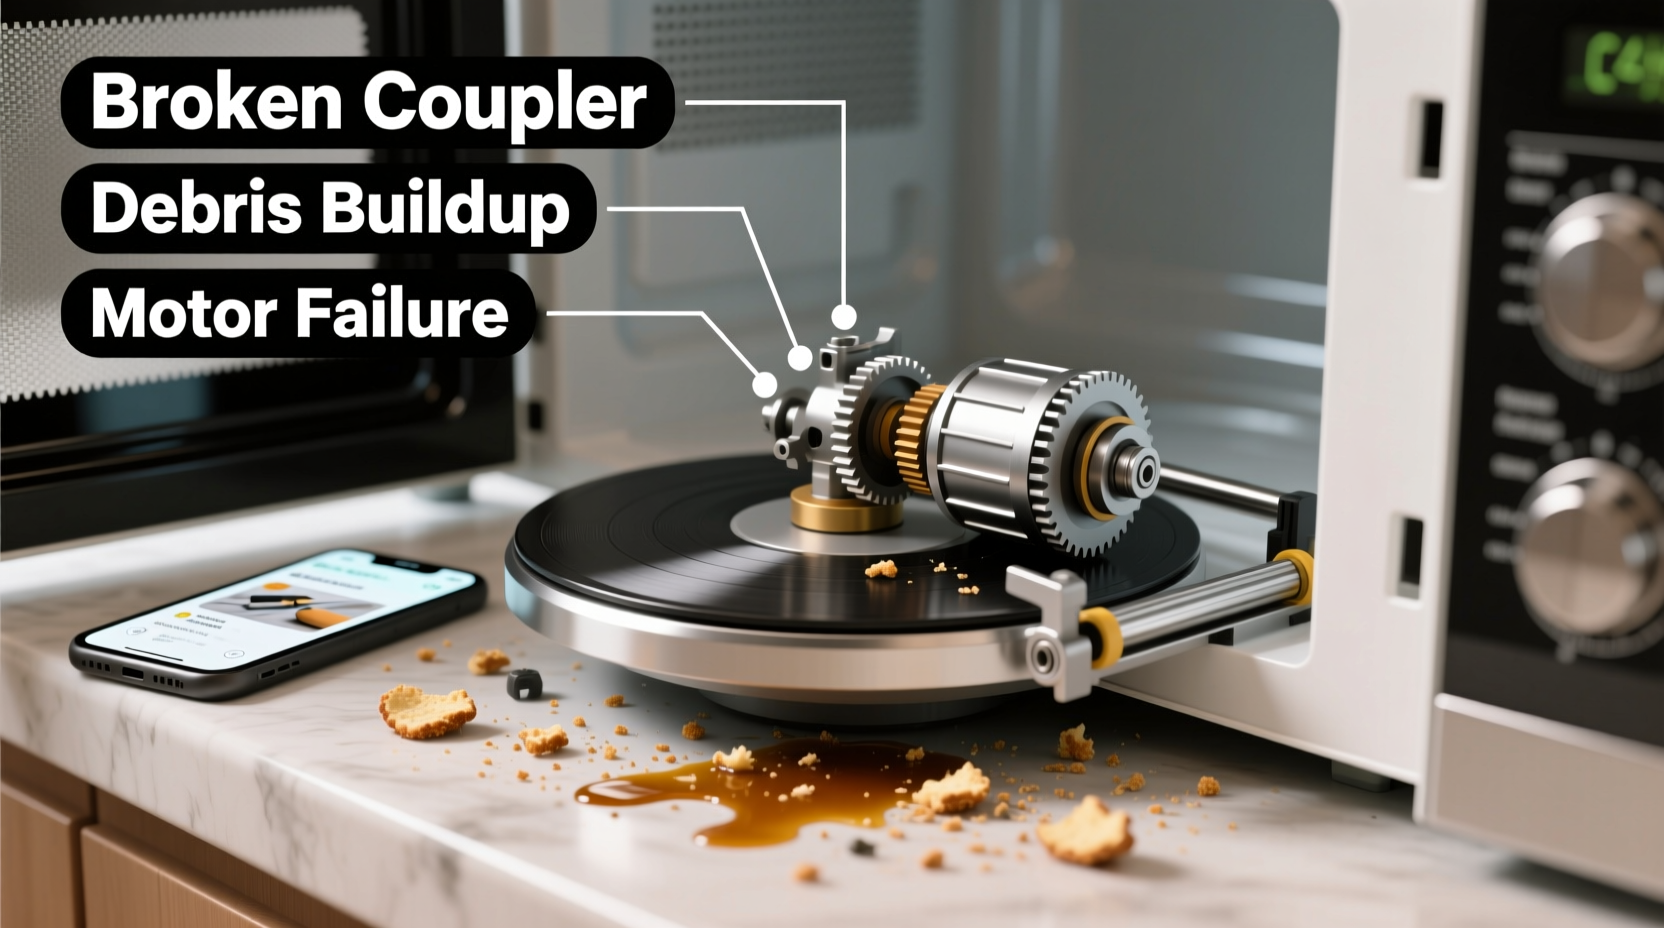
- Damaged or dirty drive coupler: The plastic or rubber component connecting the motor to the turntable is worn or clogged.
- Faulty turntable motor: The small motor responsible for rotation has failed.
- Cracked or warped glass tray: Physical damage prevents smooth movement.
- Control board issues: Rarely, a malfunctioning control panel fails to signal the motor.
Most of these problems can be diagnosed within minutes using basic inspection techniques.
Step-by-Step Diagnosis and Repair Guide
Follow this logical sequence to pinpoint and resolve the issue safely and effectively.
- Remove the glass tray and roller ring. Carefully lift them out and inspect for cracks, warping, or debris buildup.
- Check for obstructions. Look under the cavity floor for food spills, grease, or foreign objects jamming the mechanism.
- Clean all components. Wash the tray and roller ring in warm soapy water. Dry thoroughly before reassembling.
- Reinstall the parts correctly. Ensure the roller ring sits flat and aligns with the center hub. Place the tray gently on top, making sure it rests evenly.
- Test rotation manually. Gently push the edge of the tray. It should move smoothly without resistance. If it sticks, double-check alignment.
- Power on and observe. Plug in the microwave and run it for 10–15 seconds. Watch whether the tray begins to rotate.
If the turntable still doesn’t spin after these steps, proceed to deeper inspection.
Inspecting the Drive Coupler
Beneath the glass tray lies a small cylindrical piece called the drive coupler. It connects the motor shaft to the turntable and transfers rotational force. Over time, high heat and food residue can degrade this part.
To access it:
- Remove the roller ring and glass tray.
- Look at the center of the microwave’s base cavity. You should see a raised plastic or rubber hub.
- Examine its condition: Is it melted? Cracked? Loose?
If damaged, replacement is usually necessary. Most manufacturers sell couplers as standalone parts. Search your model number online to find the correct match.
Testing the Turntable Motor
The motor is located directly beneath the cavity floor, typically accessible from the bottom or rear of the unit. This step requires caution and basic tool use.
- Unplug the microwave and move it to a stable workspace.
- Flip it over (if safe) or remove the outer casing using a screwdriver.
- Locate the small motor near the center of the base. It will have two wires connected to it.
- Visually inspect for signs of burning, melting, or corrosion.
- If no visible damage exists, use a multimeter set to continuity mode. Disconnect the wires and test across the terminals.
No continuity means the motor is dead and needs replacement. If continuity is present, the issue might lie elsewhere—possibly in the control board or wiring harness.
Do’s and Don’ts: Turntable Maintenance Table
| Do’s | Don’ts |
|---|---|
| Wash the glass tray and roller ring monthly | Use abrasive cleaners that scratch surfaces |
| Align the tray carefully during reinstallation | Force the tray if it doesn’t sit flush |
| Keep the cavity floor clean and dry | Allow spills to harden underneath the turntable |
| Replace cracked trays immediately | Continue using a warped or broken turntable |
| Check for smooth rotation every few weeks | Ignore unusual grinding or clicking noises |
Mini Case Study: Sarah’s Spaghetti Night Fix
Sarah noticed her microwave was reheating leftovers unevenly. One side of her spaghetti would be scalding hot while the other remained cold. She initially assumed the microwave was failing. After reading about turntable issues online, she unplugged the unit and removed the glass tray. To her surprise, a small piece of carrot had fallen into the gap between the roller ring and the cavity wall, jamming the rotation.
She cleaned the area thoroughly, realigned the components, and tested the microwave. The tray spun smoothly again. Within minutes, her food heated evenly. No parts were replaced—just careful cleaning and reassembly saved her from unnecessary repair costs.
This example illustrates how everyday debris can disrupt operation. Regular maintenance prevents such issues from escalating.
DIY Checklist: Restore Your Microwave Turntable in 7 Steps
Use this checklist to systematically troubleshoot and fix your microwave:
- ✅ Unplug the microwave from power
- ✅ Remove the glass turntable and roller ring
- ✅ Inspect for physical obstructions or debris
- ✅ Clean the tray, ring, and cavity floor with mild detergent
- ✅ Reinstall components ensuring proper alignment
- ✅ Test rotation manually and then with power
- ✅ If still not spinning, inspect the drive coupler and motor
Completing each item reduces guesswork and increases your chances of a quick resolution.
When to Call a Professional
While most turntable issues are user-fixable, some situations require expert help:
- You smell burning when operating the microwave.
- The motor shows visible damage or emits smoke.
- The control panel behaves erratically or won’t start the turntable function.
- You’re uncomfortable accessing internal components.
In these cases, attempting repairs could lead to further damage or safety hazards. Certified technicians have the tools and knowledge to handle electrical systems safely.
“About 70% of service calls for ‘broken microwaves’ involve simple cleaning or part replacements users could do themselves.” — Mark Tran, Home Appliance Technician with 12 years of experience
Frequently Asked Questions
Can I use my microwave if the turntable isn’t spinning?
You can, but it’s not recommended for regular use. Food will heat unevenly, increasing the risk of undercooked portions. Prolonged use may also strain the magnetron due to reflected energy patterns. Fix the turntable issue promptly for optimal performance and safety.
How much does a replacement turntable motor cost?
Prices vary by brand and model, but most turntable motors range from $20 to $40. Drive couplers are cheaper—typically $10–$15. Compare prices from authorized parts suppliers like Sears PartsDirect, AppliancePartsPros, or manufacturer websites.
Is it worth repairing an older microwave?
That depends on age and overall condition. If your microwave is over 8–10 years old and frequently develops issues, replacement may be more economical. However, if only one component is faulty and the rest functions well, repair is often the smarter choice both financially and environmentally.
Conclusion: Take Control of Your Kitchen Efficiency
A non-spinning microwave turntable isn’t a sentence to takeout dinners or cold leftovers. With a methodical approach, most problems can be resolved in under an hour using basic tools and household cleaners. From checking for simple blockages to replacing a worn drive coupler, these DIY fixes empower you to maintain your appliances confidently and independently.
Regular inspection and cleaning go a long way in preventing future breakdowns. By staying proactive, you extend the life of your microwave and ensure every meal heats evenly and safely. Don’t let a small mechanical hiccup disrupt your routine—diagnose, fix, and enjoy reliable kitchen performance once again.


 浙公网安备
33010002000092号
浙公网安备
33010002000092号 浙B2-20120091-4
Comments
No comments yet. Why don't you start the discussion?