
Lighting transforms spaces, especially when it’s applied thoughtfully to architectural features like window frames. Whether you're enhancing curb appeal, creating ambiance indoors, or preparing for seasonal decor, choosing the right lighting system matters. Two popular options—modular light panels and string lights—offer distinct advantages, but one clearly stands out when it comes to flexibility and ease of repositioning: modular light panels.
This comparison dives deep into both systems, evaluating their design, installation process, adaptability, durability, and long-term usability. If you value control over your lighting layout and want a solution that evolves with your needs, understanding the differences is essential.
Understanding Modular Light Panels
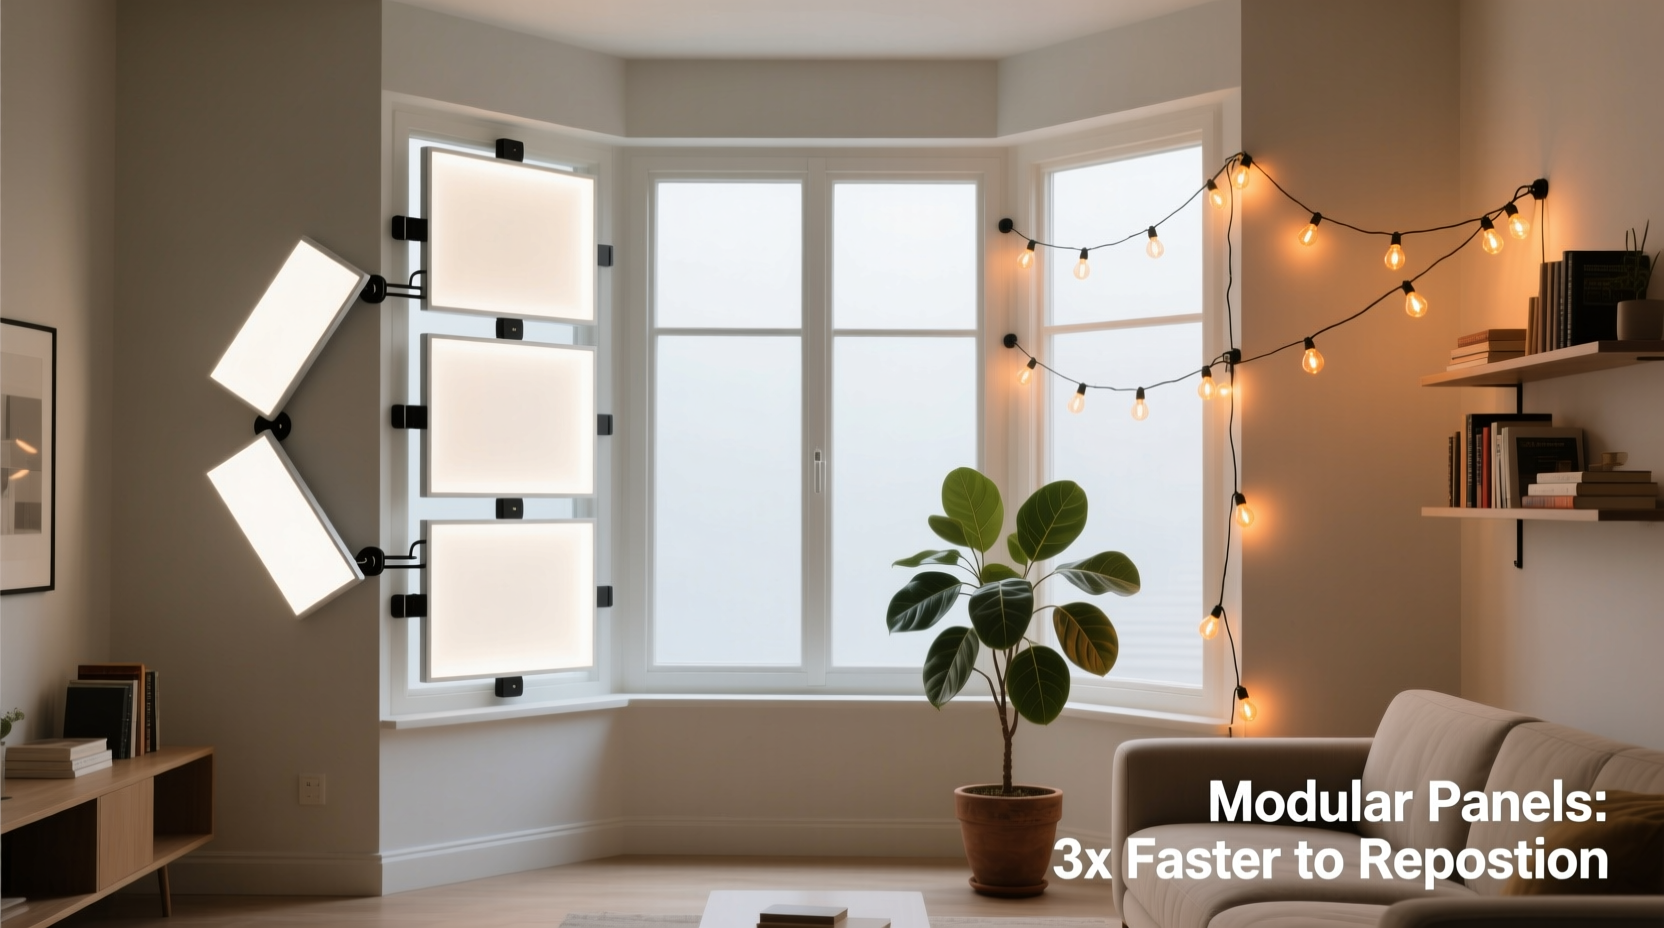
Modular light panels are rigid or semi-rigid lighting units designed to connect seamlessly with one another. Each panel typically contains integrated LEDs and standardized connectors, allowing them to snap or magnetically attach to adjacent units. They’re commonly used in commercial displays, under-cabinet lighting, and increasingly in residential decorative applications such as framing windows.
These panels offer precise illumination with uniform brightness and minimal glare. Their structure supports clean lines and geometric patterns, making them ideal for modern interiors or minimalist holiday displays. Because they are built on a grid-like logic, users can expand or reduce coverage simply by adding or removing segments.
Key Advantages of Modular Panels
- Precision alignment: Panels lock into place, maintaining consistent spacing and orientation.
- Ease of expansion: Add more sections without rewiring or complex modifications.
- Reusability: Designed for repeated assembly and disassembly with minimal wear.
- Weather resistance: Many outdoor-rated models feature IP65+ sealing for all-season use.
The Role of String Lights in Window Frame Lighting
String lights—also known as fairy lights, twinkle lights, or rope lights—have long been a favorite for decorative lighting. Composed of small bulbs spaced evenly along a flexible wire, they drape easily over surfaces and create a soft, scattered glow. For decades, homeowners have wrapped them around window trims, hung them from sills, or taped them along edges to mimic framed outlines.
While charming and widely available, string lights come with inherent limitations in structure and adaptability. Their flexible nature makes them prone to sagging, shifting, or becoming tangled during installation and removal. Repositioning individual bulbs isn’t possible without altering the entire strand, and gaps often appear where bends occur.
“String lights excel in whimsy but fall short in precision. If you need dynamic layouts that change frequently, they become more of a hassle than a help.” — Daniel Ruiz, Residential Lighting Designer
Common Challenges with String Lights
- Inconsistent spacing when bent around corners
- Limited ability to shorten or extend without cutting or splicing
- Bulbs may dim unevenly due to voltage drop over long runs
- Fragile wiring susceptible to damage during storage and reuse
Comparative Analysis: Repositioning Flexibility
The core of this discussion lies in how easily each lighting type can be repositioned—not just once, but repeatedly, as seasons change or aesthetic preferences evolve. Let’s break down key factors affecting repositioning capability.
| Feature | Modular Light Panels | String Lights |
|---|---|---|
| Adjustable Layout | Yes – panels can be rearranged freely; different configurations supported | No – fixed length and bulb placement limit changes |
| Corner Handling | Pre-designed corner connectors maintain alignment | Wires must be bent manually, risking misalignment |
| Expansion/Reduction | Plug-and-play additions or removals | Requires splicing or purchasing new lengths |
| Installation Speed (Repeat Use) | Fast – familiar setup with reusable mounting clips | Slow – re-taping, re-angling, untangling required |
| Durability After Multiple Moves | High – robust construction withstands frequent handling | Moderate to low – wires fray, sockets loosen over time |
| Storage Efficiency | Stackable, compact; labeled components | Tangle-prone; requires careful coiling |
The data shows a clear advantage for modular panels when repositioning is a priority. Their engineered modularity supports iterative design changes, while string lights remain static by nature.
Real-World Example: A Seasonal Decorator’s Dilemma
Sarah Thompson, a homeowner in Portland, Oregon, decorates her home extensively for holidays. Her front-facing windows are central to her display. For years, she used traditional string lights, spending hours each season untangling wires, patching broken strands, and adjusting drooping sections.
After switching to modular light panels two years ago, her setup time dropped from six hours to less than 90 minutes. “I used to dread taking down Christmas lights,” she says. “Now I unclip four panels per window, store them in custom trays, and next year I can reconfigure them differently if I want. Last month, I moved two panels to my patio—something I never could’ve done with strings.”
She recently experimented with a diagonal cross pattern instead of a rectangular frame. The modular system allowed her to achieve this with no additional tools or wiring. With string lights, such a change would have required entirely new fixtures or risky DIY modifications.
Step-by-Step Guide to Repositioning Modular Light Panels
If you're considering modular panels for your window frames, here's how to maximize their repositioning potential through a repeatable process:
- Deactivate and Disconnect: Turn off power and unplug the system. Remove end caps or disconnect junction points.
- Unclip Mounting Hardware: Release each panel from its bracket or adhesive mount. Store hardware separately.
- Inspect Connections: Check for dust, moisture, or corrosion on male/female connectors. Clean gently with a dry cloth.
- Plan New Layout: Sketch desired arrangement—consider symmetry, window dimensions, and power source location.
- Assemble Panels Off-Site: Connect modules on a flat surface before installation to verify fit and function.
- Install in Sections: Begin at one corner, securing each panel before moving to the next. Use a level for accuracy.
- Test Before Finalizing: Power on the system briefly to confirm all lights work and alignment is correct.
- Secure Permanently: Reapply weatherproof tape or tighten screws if using permanent mounts.
This process ensures minimal downtime and maximum adaptability across uses. Unlike string lights, there’s no guesswork involved in spacing or alignment.
Expert Tips for Maximizing Flexibility
Checklist: Choosing the Right System for Easy Repositioning
Use this checklist to evaluate whether modular light panels are the best choice for your needs:
- ☐ Do you plan to change the layout seasonally or annually?
- ☐ Are your window frames non-standard (arched, angled, oversized)?
- ☐ Do you prioritize clean, professional-looking lines?
- ☐ Is durability after multiple installations important?
- ☐ Do you want to repurpose lights for other areas (patio, mirror, artwork)?
- ☐ Are you willing to invest slightly more upfront for long-term savings?
- ☐ Do you need consistent brightness across the entire run?
If you answered “yes” to three or more, modular panels are likely the superior option.
Frequently Asked Questions
Can I mix modular panels with string lights?
Technically, yes—but not directly. You’d need separate power supplies and controllers. Mixing styles may also create visual inconsistency. For unified control and appearance, stick to one system.
Are modular panels more expensive than string lights?
Initially, yes. A basic modular panel kit starts at around $80–$120, compared to $20–$40 for standard string lights. However, when factoring in longevity, reduced labor, and reusability, modular systems often prove more cost-effective over 3–5 years.
Can I install modular panels myself?
Absolutely. Most kits require no special tools—just mounting clips, connectors, and a screwdriver or double-sided tape. Setup is comparable to assembling furniture from IKEA: follow the guide, connect pieces step by step, and test as you go.
Final Recommendation
When the goal is easy repositioning, modular light panels outperform string lights in nearly every category. They offer unmatched flexibility, durability, and precision. While string lights retain their charm for casual, temporary setups, they lack the structural integrity and scalability needed for evolving designs.
For anyone serious about window lighting—whether for holidays, ambiance, or architectural enhancement—modular panels represent the future of customizable illumination. They empower users to experiment, iterate, and personalize without starting from scratch each time.


 浙公网安备
33010002000092号
浙公网安备
33010002000092号 浙B2-20120091-4
Comments
No comments yet. Why don't you start the discussion?