
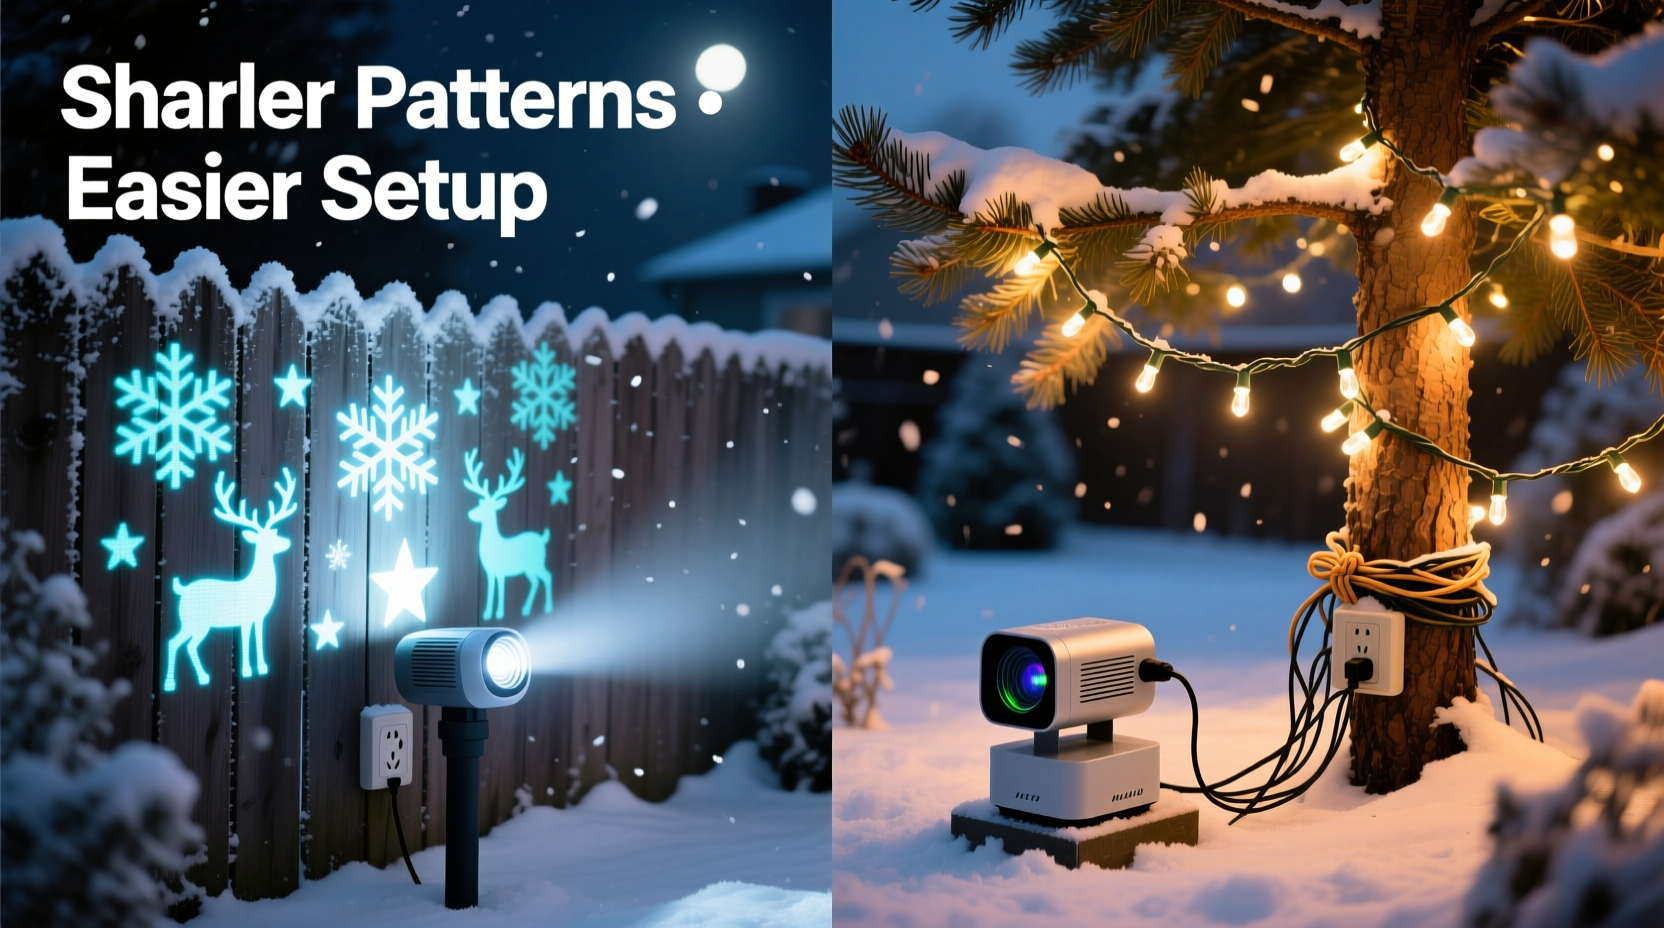
As the holiday season approaches, homeowners face a recurring decision: how to decorate their exteriors with festive lighting. Two popular options dominate the market—outdoor Christmas light projectors and traditional string lights. While both create visual appeal, they differ significantly in pattern sharpness, ease of installation, maintenance, and overall impact. For those prioritizing crisp designs and hassle-free setup, understanding these differences is essential.
The debate isn't just about brightness or color—it's about precision, convenience, and long-term usability. Projectors promise instant coverage with minimal effort, while string lights offer tactile charm and customizable placement. But when it comes to delivering sharply defined patterns across large surfaces like walls or lawns, one clearly outperforms the other under specific conditions.
Pattern Clarity: What Makes a Design \"Sharp\"?
Sharpness in holiday lighting refers to the clarity, definition, and consistency of the illuminated design. A sharp pattern maintains clean edges, distinct shapes (like stars, snowflakes, or reindeer), and minimal blurring or distortion—even at distance. Several factors influence this:
- Lens quality – High-resolution optics reduce diffusion and maintain focus.
- Distance from surface – Closer proximity generally improves sharpness but reduces coverage area.
- Ambient light interference – Urban areas with streetlights may wash out softer projections.
- Surface texture – Rough brick or stucco can scatter light, reducing perceived sharpness.
String lights inherently produce point-source illumination—each bulb emits light individually, allowing for precise manual arrangement. When hung correctly, they can form intricate outlines or mosaics. However, unless meticulously spaced, gaps between bulbs can break continuity, especially when viewed from afar.
Projectors, on the other hand, use focused lenses and internal templates (or digital files) to cast complete images. Modern LED-based models support HD-style patterns with fine detailing—snowmen with facial features, animated falling snow, or scrolling messages. The entire image appears as a single cohesive unit, eliminating the “dotted line” effect common with strings.
“Projection technology has advanced to the point where you can achieve near-laser precision on flat surfaces. If your house has smooth siding or a garage door, projectors now rival professional installations.” — Marcus Tran, Holiday Lighting Designer & Consultant
Installation Process: Time, Tools, and Effort Compared
One of the most decisive factors for consumers is installation complexity. Many people spend hours untangling wires, climbing ladders, and securing clips—only to find uneven spacing or dead sections due to faulty connections.
String lights require physical attachment along eaves, windows, trees, or fences. This means:
- Uncoiling and testing multiple strands beforehand.
- Using clips, staples, or adhesive mounts (which may damage paint or siding).
- Running extension cords safely across walkways or driveways.
- Ensuring all connections are weatherproof and grounded.
In contrast, outdoor light projectors typically involve only three steps: plug in, aim, and secure. Most units come with adjustable tripods or wall-mount brackets. There’s no need to cover every inch of the house—just place the projector on level ground or a stable platform, point it toward the desired surface, and switch it on.
A typical string-light installation for a two-story home facade takes 3–6 hours for an experienced decorator. A projector setup, by comparison, averages 10–20 minutes.
Step-by-Step: Installing Each Type
- String Lights Installation
- Measure perimeter and plan layout.
- Test all strands before mounting.
- Attach clips every 6–12 inches.
- Drape and fasten lights securely.
- Connect to power via GFCI outlet.
- Inspect for sagging or flickering.
- Light Projector Setup
- Choose location within optimal range (usually 6–20 ft).
- Mount on tripod or bracket.
- Adjust angle and focus using dial controls.
- Plug into outdoor-rated outlet.
- Rotate pattern disc or select animation mode.
Performance Comparison: Real-World Scenarios
To understand how each option performs beyond theory, consider a real example.
Mini Case Study: The Henderson Family Home
The Hendersons live in a suburban neighborhood with a two-story colonial home featuring textured vinyl siding and a detached garage. In past years, they spent nearly a full weekend installing over 1,000 mini string lights around rooflines, porch railings, and tree trunks. Despite careful planning, wind dislodged several sections, and one strand failed mid-season.
Last year, they switched to a dual-lens Christmas light projector system. They placed it on their front walkway, aimed at the garage door and part of the living room wall. Within 15 minutes, both surfaces were covered in animated snowflakes and twinkling starfields.
Neighbors commented on the crispness of the snowflake patterns—edges remained well-defined even at night when ambient light increased. During a holiday party, guests mistook the projection for professionally installed backlighting. The family saved time, avoided ladder use, and eliminated tangled cords.
However, limitations emerged. The projector couldn’t wrap around corners effectively. Side walls remained dark, and the front door lacked framing. For full-house coverage, they still needed supplemental lighting.
This illustrates a key insight: projectors excel at flat-surface impact but lack dimensional flexibility. String lights win when wrapping structures or adding depth through layered placement.
Feature Comparison Table
| Feature | Light Projector | String Lights |
|---|---|---|
| Pattern Sharpness | High (on flat, close surfaces) | Moderate (depends on bulb density) |
| Installation Time | Under 20 minutes | 2–6+ hours |
| Coverage Flexibility | Limited to line-of-sight surfaces | Full 3D adaptability |
| Maintenance Needs | Low (clean lens, check cord) | High (inspect connections, replace bulbs) |
| Weather Resistance | Generally high (IP65 rated) | Varies by product; connectors vulnerable |
| Energy Efficiency | Very high (LED + low wattage) | High (if using LED strings) |
| Reusability & Storage | Easy (compact unit) | Challenging (tangling, bulk) |
When to Choose Which Option
The choice between projectors and string lights should be driven by your priorities: speed and sharpness, or customization and coverage.
Choose a light projector if:
- You want quick, tool-free setup.
- Your primary display surface is a flat wall, garage door, or fence.
- You value animated effects (falling snow, rotating scenes).
- Safety is a concern (avoiding ladders or electrical overload).
- You have limited storage space.
Stick with string lights if:
- You’re decorating trees, railings, archways, or multi-angle facades.
- You prefer a classic, handmade aesthetic.
- You want to build custom shapes (wreaths, letters, etc.).
- You already own a collection and enjoy the ritual of hanging them.
Many professionals now recommend a hybrid approach: use a projector for dominant wall displays and supplement with string lights on architectural details. This balances efficiency with visual richness.
Frequently Asked Questions
Can I use multiple projectors for larger homes?
Yes. Using two or more projectors allows you to cover different sides of the house simultaneously. Some models offer synchronization features so animations stay coordinated. Just ensure overlapping beams don’t cause glare or distortion.
Do projectors work in snowy or rainy conditions?
Most modern outdoor projectors are rated IP65 or higher, meaning they’re protected against water jets and dust. However, heavy snow accumulation on the lens can blur or block the image. Check and wipe the lens after storms for best results.
Are replacement pattern discs easy to find?
For mechanical (disc-based) projectors, yes—many brands sell refill kits with seasonal themes. Digital models (with app control) allow unlimited downloads and updates, offering greater long-term versatility.
Action Checklist: Choosing and Setting Up Your System
- Assess your home’s exterior: Identify flat surfaces vs. complex structures.
- Determine your priority: Speed and sharpness (projector) or full coverage (strings).
- Measure distances: Ensure projector range matches your yard layout.
- Check power access: Confirm outdoor outlets are available near planned locations.
- Compare specs: Look for lumens (brightness), beam angle, and IP rating.
- Test before finalizing: Do a trial run at dusk to evaluate clarity and alignment.
- Secure cables: Use cord covers or stakes to prevent tripping hazards.
Final Verdict: Which Delivers Sharper Patterns and Easier Installation?
When judged strictly on pattern sharpness and installation ease, outdoor Christmas light projectors hold a clear advantage—provided the environment suits them. On smooth, flat surfaces within optimal range, they deliver crisper, more consistent patterns than string lights ever could. Their ability to render detailed animations without manual intervention sets a new standard for residential holiday displays.
Installation is dramatically simpler. No climbing, no clipping, no troubleshooting broken circuits. One compact device replaces hundreds of individual bulbs and dozens of mounting points. For busy families, elderly homeowners, or anyone seeking a low-effort yet high-impact solution, projectors represent a compelling upgrade.
That said, they aren’t a universal replacement. String lights remain superior for three-dimensional decoration, personalization, and nostalgic appeal. They also offer unmatched flexibility in placement and design freedom.
The future likely belongs to integration—not replacement. Smart homes will combine projectors for broad, dynamic backdrops with targeted string lighting for accent details. As projector resolution improves and costs decrease, we may see wider adoption, especially in urban and safety-conscious settings.
Conclusion
If your goal is to achieve the sharpest possible patterns with the least amount of labor, an outdoor Christmas light projector is the smarter choice—especially for flat façades and time-constrained decorators. It brings professional-grade visuals within reach of any homeowner.
But don’t abandon tradition entirely. Combine technologies thoughtfully, and you’ll create a display that’s both effortless and enchanting. Whether you're aiming for minimalist elegance or maximalist wonder, the right lighting strategy starts with understanding what each tool does best.


 浙公网安备
33010002000092号
浙公网安备
33010002000092号 浙B2-20120091-4
Comments
No comments yet. Why don't you start the discussion?