
Every holiday season, millions of homes transform into dazzling displays—strings of LEDs twinkle on eaves, garlands wrap railings, and illuminated figures glow in snowy yards. Yet behind that festive magic lies a serious electrical reality: over 3,000 home fires each year are linked to decorative lighting, with extension cord misuse among the top contributing causes (U.S. Fire Administration, 2023). Unlike indoor setups, outdoor lighting demands cords engineered for moisture, temperature swings, UV exposure, and cumulative electrical loads. When multiple light strings—especially older incandescent or high-output LED sets—are daisy-chained across porches, trees, and fences, a single overlooked detail—a worn jacket, an overloaded outlet, or a coiled cord left in the rain—can escalate from nuisance tripping to shock hazard or fire. This isn’t about limiting celebration; it’s about empowering you with precise, field-tested knowledge to illuminate safely, reliably, and confidently.
Understand Your Load: Why “Just One More String” Is Dangerous
Most consumers assume extension cords are passive conduits—“if it plugs in, it works.” But cords are rated for specific amperage and wattage capacities, and exceeding those limits generates heat at connection points, insulation breakdown, and potential arcing. Modern LED light strings draw far less power than incandescent ones, but stacking them still adds up. A single 100-light incandescent string consumes roughly 40–60 watts; a comparable LED set uses only 4–7 watts. However, many households mix both types—or use newer high-lumen commercial-grade LEDs that draw 15–25 watts per 50-foot strand. Worse, manufacturers often list “maximum sets per cord” based on ideal lab conditions—not real-world variables like ambient temperature, cord age, or voltage drop over distance.
Here’s how to calculate your actual load:
- Determine the wattage of each light string (check the UL label or packaging—don’t rely on marketing claims).
- Add the wattages of all strings connected to one outlet or one cord segment.
- Divide total watts by your circuit’s voltage (standard U.S. outdoor outlets are 120V) to get amps: Amps = Total Watts ÷ 120.
- Compare that number to your cord’s amp rating (printed on the jacket near the plug or listed in specs).
For example: Five 50-light LED strings (6W each) = 30W total → 0.25A. That’s trivial. But three 200-light incandescent strings (50W each) = 150W → 1.25A. Add a 100W animated projector and a 60W pathway light: total load jumps to 310W → 2.58A. Now consider that a standard 16-gauge outdoor cord is rated for just 13A—but only at 100 feet or less. At 50 feet, voltage drop may reduce effective capacity by 15%. And if that cord feeds into a power strip or multi-outlet adapter? You’ve introduced two more failure points.
Select the Right Cord: Gauge, Rating, and Real-World Durability
Not all “outdoor” cords are created equal. The critical differentiators are wire gauge (thickness), UL listing type, and jacket material. Wire gauge is inverse: lower numbers mean thicker, safer wires. Using too thin a cord for the load or distance is the most common—and preventable—mistake.
| Gauge | Max Amps (100 ft) | Recommended Use Case | Risk If Misused |
|---|---|---|---|
| 16 AWG | 13A | Short runs (≤ 50 ft); low-wattage LED strings only (≤ 10 total strings) | Overheating, melted plugs, fire when used beyond 50 ft or with incandescents |
| 14 AWG | 15A | Medium runs (50–100 ft); mixed LED/incandescent setups (up to 15 strings) | Voltage drop causing dimming/flickering; reduced lifespan of lights and cord |
| 12 AWG | 20A | Long runs (100–150 ft); heavy-duty displays (projectors, inflatables, >20 strings) | Unnecessary cost/weight if over-specified—but safest for complex setups |
| 10 AWG | 30A | Professional/commercial installations; multiple circuits feeding separate zones | Excessive rigidity; impractical for residential use |
Crucially, verify the UL listing: look for “UL Listed — Portable Power Cable — For Outdoor Use” (not just “approved for outdoor use”). Only UL 817-certified cords meet rigorous abrasion, crush, and cold-bend testing. Avoid “temporary use” cords labeled “Type S” unless they’re explicitly marked “WT” (Weather/Tough) or “W” (Weather-resistant). Jackets matter too: thermoplastic elastomer (TPE) resists cracking in sub-zero temps better than PVC, while oil-resistant jackets prevent degradation from lawn chemicals or salt spray.
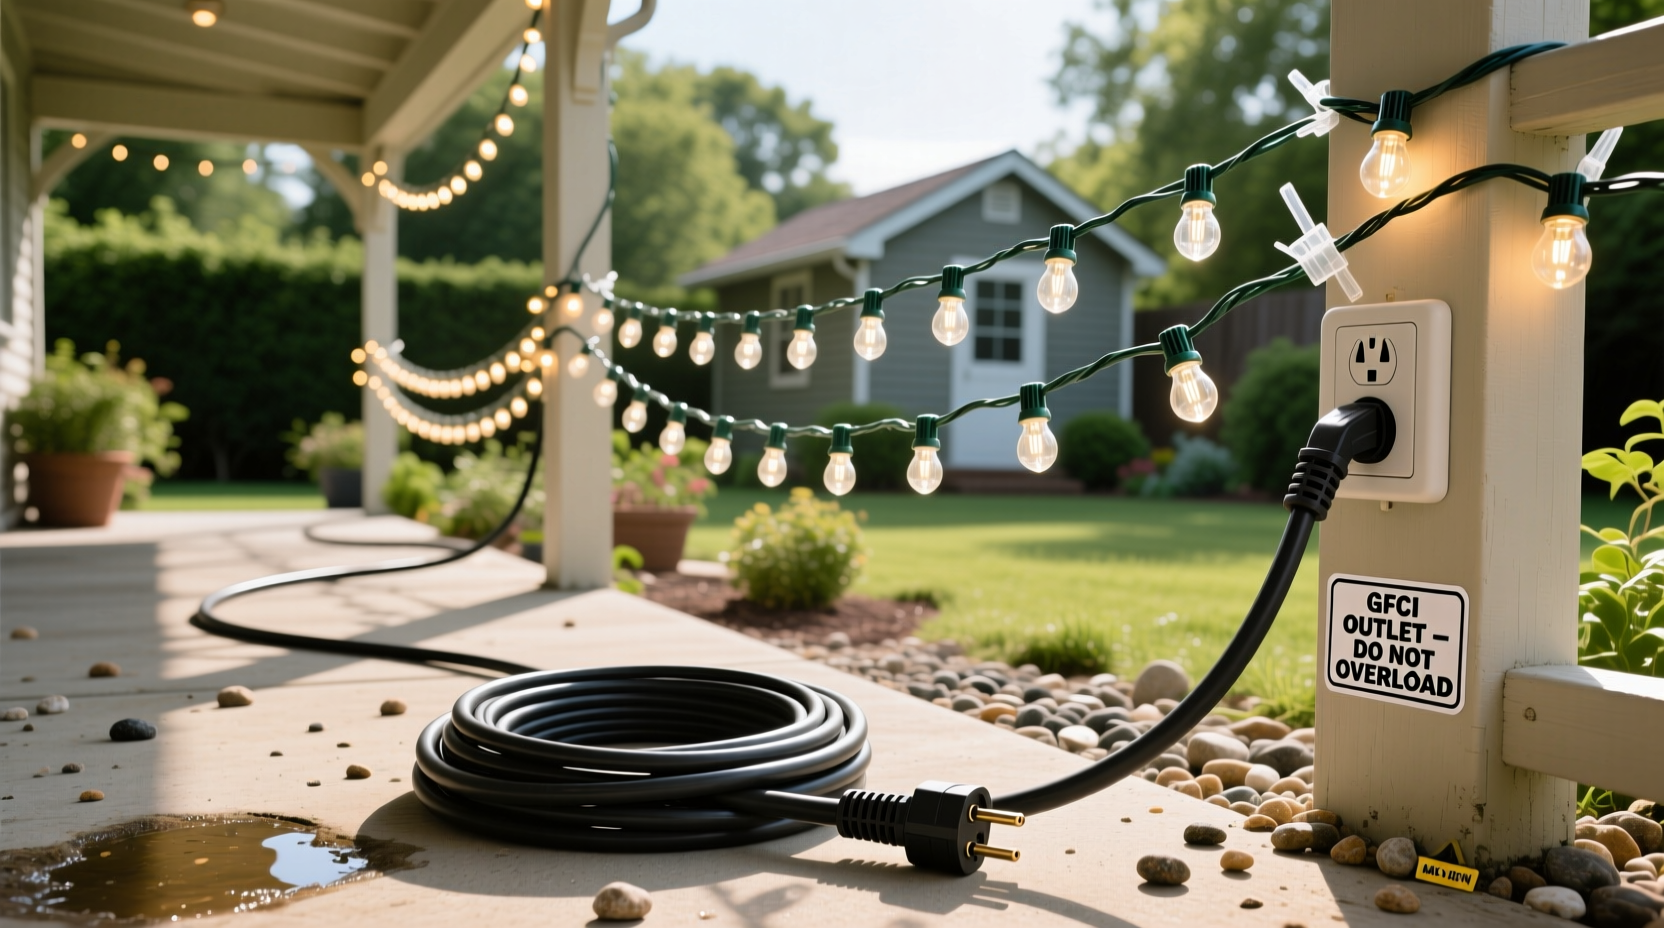
Installation Best Practices: Beyond Just Plugging In
Safety begins before the first light is hung. How you route, secure, and terminate cords determines long-term reliability and immediate risk.
- Never run cords through doors, windows, or under carpets. Compression damages insulation; trapped moisture creates shock paths.
- Elevate cords off wet ground. Use cord hangers, gutter hooks, or insulated cable ties—not staples or nails. Even a pinprick puncture compromises waterproofing.
- Uncoil completely before use. Coiling energized cords traps heat. A 100-ft cord coiled tightly can reach 140°F internally—enough to soften insulation and accelerate aging.
- Use GFCI-protected outlets exclusively. Ground Fault Circuit Interrupters cut power within 1/40th of a second if as little as 5mA of current leaks to ground—preventing electrocution in damp conditions. Test GFCIs monthly using the “TEST” button.
- Anchor connections securely. Plug cords into outlets firmly, then use outdoor-rated cord locks or zip-ties to prevent accidental disconnection. Never rely on friction alone.
One often-overlooked step: inspect every cord end before plugging in. Look for cracked, brittle, or discolored plastic around the plug—signs of past overheating. Check for bent or corroded prongs. If the cord feels stiff or makes a crackling sound when flexed, retire it immediately. Heat damage is cumulative and irreversible.
Real-World Scenario: The Overlooked Porch Display
In December 2022, a homeowner in Portland, Oregon, installed 22 light strings across his front porch, entryway, and side fence. He used three 100-ft, 16-gauge “outdoor” cords purchased from a discount retailer. Two cords fed into a single GFCI outlet via a 4-outlet power strip rated for indoor use. On a rainy night, after 14 hours of continuous operation, the main cord near the outlet began emitting a faint acrid odor. The homeowner dismissed it as “new-cord smell.” By morning, the plug housing had warped, the power strip’s casing was blistered, and two light strings were dark. An electrician later found 120°F surface temperatures at the cord-to-strip junction and confirmed the power strip lacked outdoor UL certification. The load? 1,420W (11.8A)—within the cord’s 13A rating, but exceeding the strip’s 10A limit and operating at 92% capacity in 40°F, 90% humidity. The moisture accelerated corrosion at weak solder joints inside the strip, creating resistance hotspots. No fire occurred—but it was a near-miss requiring $320 in repairs and replacement gear.
“People treat extension cords like garden hoses—‘as long as water flows, it’s fine.’ Electricity doesn’t flow; it’s pushed under pressure. Resistance anywhere—corrosion, poor contact, undersized wire—converts that pressure into dangerous heat. There are no ‘minor’ overloads outdoors.” — Carlos Mendez, Senior Electrical Inspector, National Fire Protection Association (NFPA)
Step-by-Step: Building a Safe, Scalable Outdoor Lighting Circuit
Follow this sequence for any display, large or small:
- Map your layout. Sketch outlets, light locations, and cord paths. Note distances between each connection point.
- Calculate total wattage for all lights on each planned circuit. Group lights by proximity to minimize cord length.
- Select cord gauge using the table above—base choice on longest single run and highest load, not average.
- Choose GFCI-protected outlets only. If none exist, install a GFCI breaker or use a portable GFCI adapter (UL 943 Class A certified).
- Plug directly—no daisy-chaining cords. If you need more outlets, use a single, outdoor-rated power distribution box (e.g., “lighting hub”) with built-in surge protection and individual circuit breakers.
- Test everything before final mounting. Turn on all lights for 15 minutes. Feel plugs, connections, and cord midpoints for warmth. Any warmth above ambient air temperature means re-evaluate load or cord size.
- Label cords clearly with tape and marker: “Front Porch – Max 8 Strings,” “Tree Lights – 12AWG Only.” Prevents future misuse.
FAQ: Addressing Common Concerns
Can I use indoor extension cords outside if I cover them with a tarp?
No. Indoor cords lack UV-stabilized jackets and moisture-resistant insulation. Tarps trap condensation, accelerating corrosion and creating slip hazards. UL explicitly prohibits this—even temporarily. Outdoor-rated cords cost slightly more but prevent catastrophic failure.
How many light strings can I plug into one outlet?
It depends entirely on your circuit’s capacity and cord specs—not a fixed number. Most residential outdoor circuits are 15A or 20A. Subtract 20% for safety margin (e.g., 12A max on a 15A circuit). Then divide by the wattage of your strings. Example: 12A × 120V = 1,440W max. At 7W per LED string, that’s 205 strings—but only if using appropriate 12AWG cord and no voltage drop. In practice, limit to 12–15 strings per circuit to ensure reliability.
My cord feels warm during use—is that normal?
No. A properly sized, undamaged cord should feel no warmer than ambient air. Warmth indicates excessive resistance—caused by overload, damaged conductors, loose connections, or poor-quality materials. Unplug immediately, inspect all connections, and replace the cord if warmth persists after load reduction.
Conclusion: Illuminate with Confidence, Not Compromise
Safety with outdoor lighting isn’t about fear—it’s about respect for physics, precision in planning, and disciplined execution. Every cord you choose, every connection you secure, and every watt you calculate contributes to a display that delights without endangering. You don’t need professional certification to make smart choices: start by auditing your current cords tonight—check gauges, inspect for cracks, verify UL labels. Replace anything questionable. Next season, invest in 14AWG or 12AWG cords with TPE jackets and buy fewer, higher-quality light strings instead of maximizing quantity. Teach your family why the GFCI test button matters. These aren’t restrictions; they’re the quiet infrastructure of joy—reliable, resilient, and rooted in care.


 浙公网安备
33010002000092号
浙公网安备
33010002000092号 浙B2-20120091-4
Comments
No comments yet. Why don't you start the discussion?