
In the era of remote work, video conferencing has become a daily ritual. Whether you're pitching to clients, leading team meetings, or attending job interviews, your appearance on screen matters. Lighting is the most critical factor in how professional you look—far more than your background or wardrobe. Two popular lighting tools dominate home office setups: ring lights and softboxes. But which one truly elevates your image on Zoom?
The answer isn’t as simple as “one is better.” Each has strengths and limitations depending on your environment, skin tone, camera quality, and personal goals. Understanding the technical and aesthetic differences between ring lights and softboxes can help you make an informed decision—and avoid looking washed out, overly shadowed, or like a beauty influencer in a skincare ad.
Understanding the Core Differences
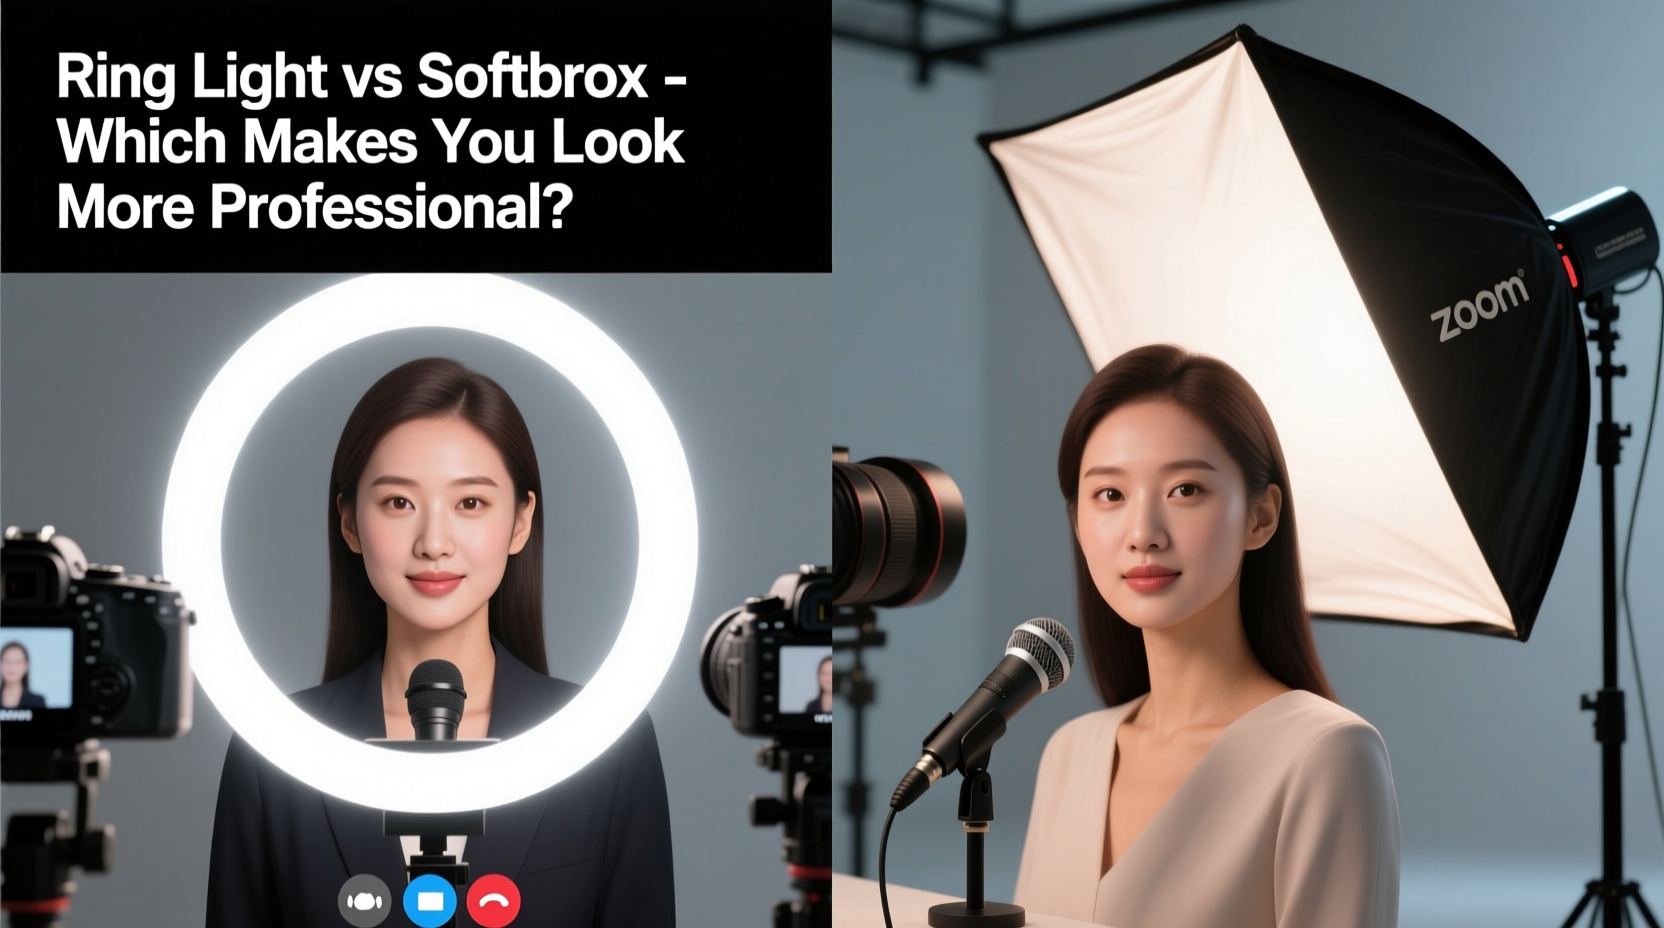
At first glance, both ring lights and softboxes aim to improve facial illumination. However, their design, light diffusion, and resulting effect on your appearance vary significantly.
A **ring light** is a circular LED panel that typically surrounds your webcam or phone. It emits direct, even light from a single source directly in front of your face. Most models offer adjustable color temperatures (warm to cool) and brightness levels. Because of its compact size and plug-and-play nature, it’s widely used by streamers, influencers, and remote workers.
A **softbox**, on the other hand, is a rectangular or octagonal lighting fixture that uses a diffuser panel to scatter light over a broader area. It usually requires a stand, external power source, and sometimes multiple units for balanced coverage. Softboxes are staples in professional photography studios due to their ability to produce soft, flattering, three-dimensional lighting.
The key distinction lies in light quality: ring lights deliver focused, frontal illumination, while softboxes create diffuse, directional light that mimics natural window lighting.
Light Quality and Shadow Control
One of the biggest issues with poor lighting on Zoom is harsh shadows—especially under the eyes, nose, and chin. These shadows can make you appear tired or unapproachable.
Ring lights minimize shadows because they emit light from a 360-degree arc around the lens, wrapping light evenly across your face. This produces a distinctive catchlight in the eyes—a bright, circular reflection that many associate with polished online content. However, this same feature can flatten facial features, removing depth and dimension. The result? A two-dimensional, almost surreal look that works well for makeup tutorials but may seem unnatural in corporate settings.
Softboxes, especially when positioned at a 45-degree angle to your face (a technique known as \"three-point lighting\"), create subtle gradients and gentle shadows. This adds volume and realism to your appearance. With proper placement, softboxes highlight bone structure without creating dark pits or glare. They also allow for greater control—you can adjust height, distance, and angle to sculpt light precisely.
Color Accuracy and Skin Tone Rendering
Accurate skin tone reproduction is essential for appearing natural on camera. Poor color temperature can cast a sickly yellow, blue, or green tint on your complexion.
Ring lights often come with preset color temperatures (usually 3200K to 5600K). While convenient, cheaper models struggle with consistency, producing uneven hues across the face or flickering under certain camera frame rates. Some users report a “glow-up” effect that smooths skin too much, inadvertently making them look airbrushed or artificial.
High-quality softboxes use daylight-balanced fluorescent or LED bulbs with high CRI (Color Rendering Index)—often above 95. CRI measures how accurately a light source reveals colors compared to natural sunlight. A higher CRI means truer skin tones and more realistic fabric colors. This is crucial if you’re presenting visual materials on screen or want colleagues to perceive your expressions clearly.
“Natural-looking skin tones build trust in virtual communication. Overly processed or flat lighting undermines credibility.” — Dr. Lena Park, Visual Perception Researcher, MIT Media Lab
Practical Setup and Space Requirements
Your workspace size and layout play a major role in determining which lighting solution fits best.
Ring lights win in convenience. They attach directly to laptops or stands, require minimal adjustment, and consume little desk space. Many operate via USB, drawing power from your computer. For someone working from a small apartment or shared table, a ring light offers a quick upgrade with no assembly needed.
Softboxes demand more commitment. You’ll need floor space for light stands, cables, and possibly a backdrop. Setting up a basic two-light system (key light and fill light) takes time and some technical understanding. However, once configured, the results are consistently superior—especially in rooms with poor ambient light or mixed lighting sources (e.g., overhead LEDs and natural daylight).
| Feature | Ring Light | Softbox |
|---|---|---|
| Setup Time | 1–2 minutes | 10–20 minutes |
| Footprint | Minimal (desk-mounted) | Moderate (floor stands) |
| Portability | High | Low to moderate |
| Light Control | Basic (brightness/color temp) | Advanced (angle, diffusion, intensity) |
| Best For | Quick calls, limited space | Professional presentations, streaming |
Real-World Example: Sarah’s Client Presentation Upgrade
Sarah, a financial consultant based in Denver, relied on a $40 ring light for her Zoom meetings. Her clients complimented her energy but often remarked she looked “tired” despite getting enough sleep. After recording a test call, she noticed a flat, shadowless face with a slight orange tint under her eyes.
She invested in a dual softbox kit with grids and diffusers. By placing one softbox at a 45-degree angle as her key light and a second, dimmer unit on the opposite side as a fill light, she achieved balanced, dimensional lighting. She also added a white foam board reflector below her face to lift shadows gently.
The change was immediate. In her next client pitch, the feedback shifted: “You look so clear and composed.” One client even asked if she had upgraded her camera. The truth? Same laptop webcam—only the lighting had changed.
When to Choose a Ring Light (and When Not To)
Ring lights are ideal for specific scenarios:
- You need a fast, portable solution for travel or co-working spaces.
- You’re using a smartphone or tablet for video calls.
- You have naturally dull or uneven skin tone and want a smoothing effect.
- You’re filming short-form content where aesthetic polish is prioritized over realism.
However, avoid relying solely on a ring light if:
- You frequently host formal meetings or client presentations.
- Your room has strong backlighting (e.g., large windows behind you).
- You wear glasses—the circular reflection in lenses can be distracting.
- You’re concerned about looking “too glam” in a professional context.
Building a Professional Zoom Lighting Setup: Step-by-Step
Whether you choose softboxes, a ring light, or a hybrid approach, follow this sequence to optimize your appearance:
- Assess your current lighting. Turn off all lights and observe how natural light enters your room throughout the day. Note where shadows fall on your face.
- Position your camera at eye level. Use books or a stand to raise your laptop. Never angle the camera upward—it distorts facial proportions.
- Choose your primary light source. For softboxes, place the key light 4–6 feet away at a 45-degree angle from your face and 1–2 feet above eye level.
- Add a fill light or reflector. Place a secondary softbox or white board on the opposite side to reduce shadows without eliminating depth.
- Eliminate background distractions. Ensure your wall isn’t darker than your face. Use a secondary light or lamp to brighten the area behind you slightly.
- Test and adjust. Record a 30-second Zoom test call. Play it back and check for hotspots, color casts, or unnatural reflections.
- Refine over time. Lighting needs change with seasons and schedules. Re-evaluate monthly.
Hybrid Approach: Combining Ring Light and Softbox
You don’t have to pick one or the other. Many professionals use both strategically. For example:
- Use a softbox as your main key light for depth and realism.
- Mount a low-intensity ring light behind the camera to add catchlights to your eyes without overpowering the scene.
- Dim the ring light to 30–40% brightness so it complements rather than dominates.
This combination delivers the dimensional quality of studio lighting with the engaging eye sparkle viewers subconsciously associate with confidence and attentiveness.
Frequently Asked Questions
Can I look professional on Zoom without spending money on lighting?
Yes. Position yourself facing a large window during daylight hours. Avoid sitting with the window behind you. Use a white poster board or foam board as a DIY reflector under your face to bounce light upward. This mimics softbox lighting at zero cost.
Do I need a diffuser for my ring light?
If your ring light doesn’t have a built-in diffuser, adding a sheer white fabric or diffusion panel between the light and your face can reduce harshness. However, most ring lights are already relatively soft due to their shape. Diffusion is more critical for bare-bulb softboxes.
Is a ring light bad for professional settings?
Not inherently. A well-adjusted ring light with neutral color temperature (around 5000K) and moderate brightness can work for everyday meetings. However, for high-stakes presentations or leadership roles, softboxes provide a more authoritative and credible appearance.
Final Recommendation: Match Your Lighting to Your Goals
If your goal is speed, simplicity, and consistent selfie-style lighting, a ring light is a solid entry-level choice. It’s particularly effective for those new to video conferencing or working in tight spaces.
But if you want to project authority, clarity, and visual professionalism—especially in client-facing or executive roles—a softbox setup is worth the investment. The dimensional lighting it provides conveys seriousness, attention to detail, and respect for your audience.
Ultimately, the best lighting doesn’t draw attention to itself. It makes you look like the best version of you—alert, composed, and fully present. That impression lasts long after the Zoom call ends.


 浙公网安备
33010002000092号
浙公网安备
33010002000092号 浙B2-20120091-4
Comments
No comments yet. Why don't you start the discussion?