
The human ear is a self-regulating organ designed to manage wax buildup naturally. Yet, many people still feel the need to clean their ears regularly, often using methods that can do more harm than good. Improper cleaning can lead to impaction, infection, or even hearing loss. Understanding safe and effective techniques is essential for maintaining ear health without risking injury.
Ears produce cerumen (earwax) as a protective mechanism—it traps dust, repels insects, and lubricates the ear canal. In most cases, jaw movement during talking and chewing helps push excess wax out of the ear, where it dries and flakes off. Intervention is rarely needed. However, when symptoms like fullness, muffled hearing, or discomfort arise, gentle and medically approved cleaning methods can be used safely.
Why You Should Avoid Cotton Swabs
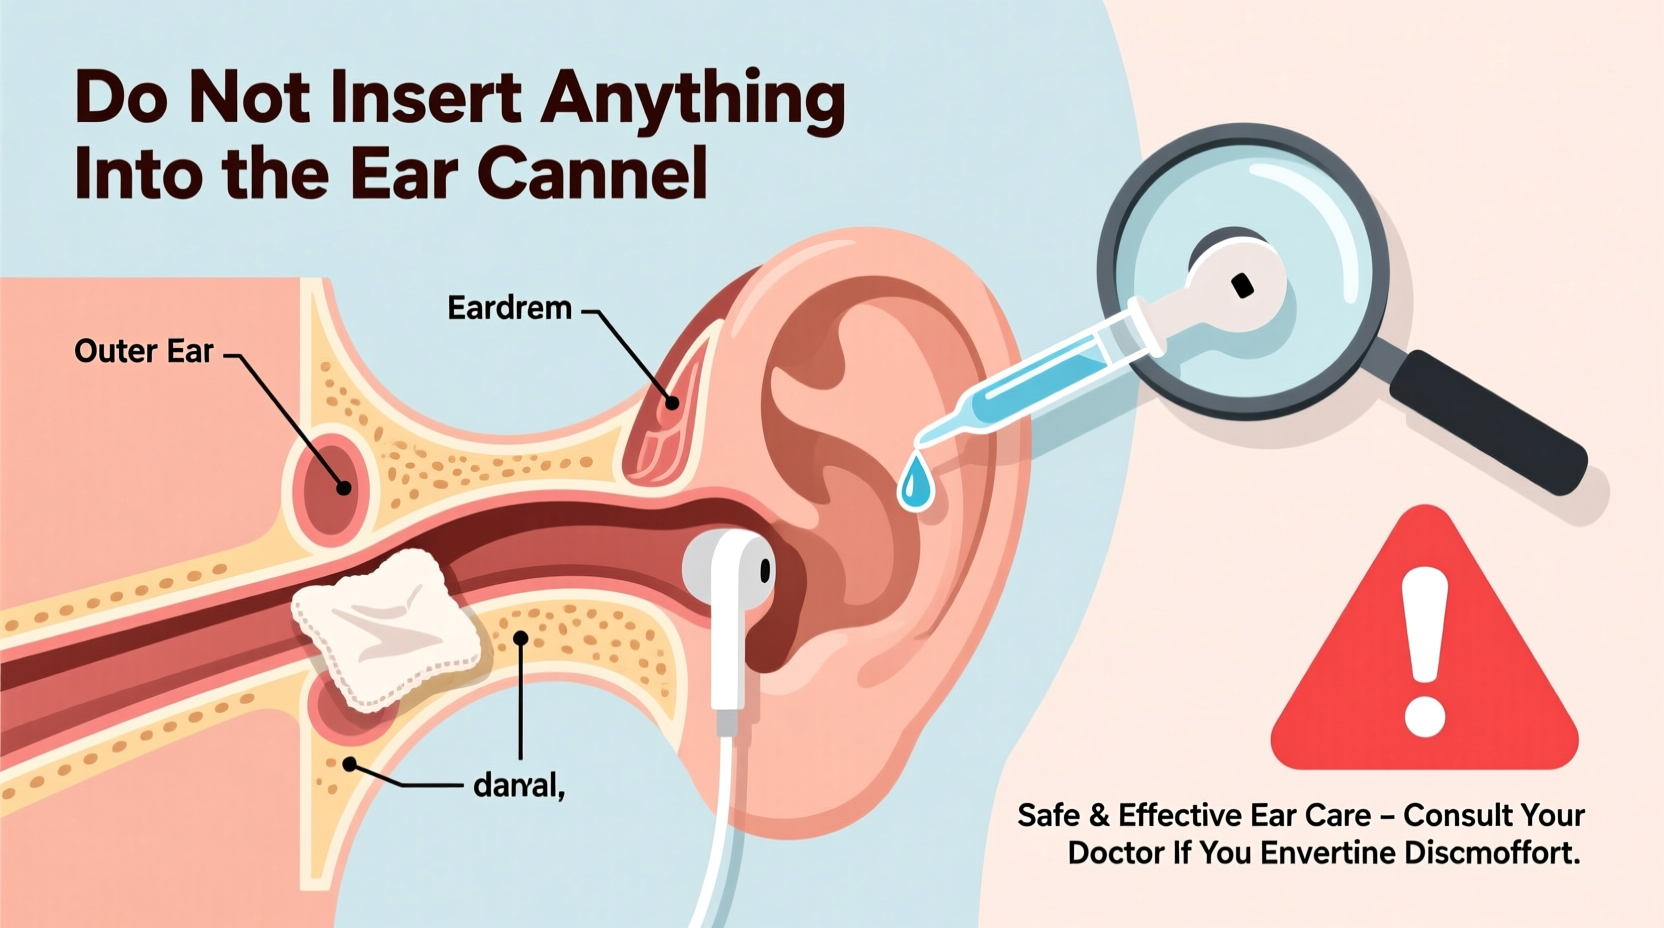
Despite their widespread use, cotton-tipped swabs are among the most common causes of ear injuries related to cleaning. The temptation to insert them into the ear canal is strong, but doing so pushes wax deeper, potentially leading to impaction or eardrum perforation.
“Cotton swabs are too big, too rough, and go too far. They disrupt the ear’s natural cleaning process and increase the risk of trauma.” — Dr. Linda Thompson, Otolaryngologist at Boston Ear Institute
The ear canal is narrow and delicate. Inserting any object risks scratching the skin, introducing bacteria, or damaging sensitive structures. The U.S. Food and Drug Administration (FDA) has issued warnings against using cotton swabs for ear cleaning, noting thousands of emergency room visits annually due to misuse.
Safe and Effective Cleaning Methods
Cleaning your ears doesn’t require aggressive tools or deep insertion. The goal is to assist the ear’s natural process, not override it. Below are proven, low-risk methods recommended by healthcare professionals.
1. Warm Water Flush During Showering
Allow warm water to flow into your ear while showering. Tilt your head to one side, let water enter gently, then tilt the other way to drain. This softens and loosens wax near the opening without pressure.
2. Use of Ear Drops
Over-the-counter ear drops containing carbamide peroxide, mineral oil, or saline can soften wax. Apply 2–3 drops into the affected ear twice daily for up to four days. These solutions break down hardened wax, allowing it to exit naturally.
3. Bulb Syringe Irrigation
After softening wax with drops, gentle irrigation with lukewarm water using a bulb syringe can help flush it out. Fill the syringe, tilt your head, pull the outer ear upward, and gently squirt water into the canal. Tilt to drain afterward.
“Warm water irrigation is effective and safe when done correctly—never use high-pressure devices or hot water, which can cause dizziness or burns.” — Dr. Alan Perez, Primary Care Physician
Do’s and Don’ts of Ear Cleaning
| Do’s | Don’ts |
|---|---|
| Use ear drops to soften wax if buildup is suspected | Insert cotton swabs, fingers, or sharp objects into the ear canal |
| Let warm water run into ears during showers | Use ear candles—they are ineffective and dangerous |
| Seek professional help if you experience pain or hearing loss | Attempt irrigation if you have a history of eardrum perforation |
| Dry ears gently with a towel after exposure to water | Use high-pressure water devices like jet irrigators |
| Monitor symptoms and act early if hearing is affected | Ignore persistent fullness or ringing in the ears |
When to See a Healthcare Professional
Some individuals are more prone to wax buildup due to anatomy, excessive production, or hearing aid use. If home methods don’t relieve symptoms within a few days, or if you experience:
- Persistent ear fullness
- Muffled or decreased hearing
- Tinnitus (ringing in the ear)
- Dizziness or ear pain
…it’s time to consult a doctor. Professionals can perform safe removal using specialized tools such as micro-suction or curettes under direct visualization. These procedures are quick, painless, and highly effective.
Patients with diabetes, compromised immune systems, or a history of ear surgery should avoid at-home irrigation and seek clinical care instead.
Real-Life Example: A Preventable Injury
Mark, a 34-year-old teacher, began experiencing muffled hearing in his left ear after using cotton swabs for years. Believing he was “cleaning deeply,” he pushed wax further inward. Over time, the blockage caused discomfort and mild tinnitus. When he finally visited an ENT specialist, imaging revealed a complete canal obstruction and a minor scratch on the ear canal wall from repeated scraping.
After two weeks of prescribed drops and professional irrigation, Mark’s hearing returned to normal. The doctor emphasized that regular swabbing disrupted his ear’s natural balance. Mark now cleans only the outer ear with a damp cloth and avoids insertion entirely.
Step-by-Step Guide to At-Home Ear Wax Softening
- Assess symptoms: Determine if you have signs of wax buildup—fullness, mild hearing loss, or crackling sounds.
- Choose a softening agent: Use over-the-counter drops (e.g., Debrox, Murine) or plain mineral oil.
- Apply drops: Lie on your side and place 2–3 drops into the ear. Stay in position for 5–10 minutes.
- Repeat: Do this twice daily for 3–5 days.
- Irrigate gently (optional): After softening, use a bulb syringe with lukewarm water to flush the ear.
- Dry thoroughly: Tilt your head and gently dry the outer ear with a towel or hairdryer on low, held at arm’s length.
- Stop and consult a doctor: If pain, dizziness, or no improvement occurs after a week.
Frequently Asked Questions
Can I use hydrogen peroxide to clean my ears?
Yes, but only in diluted form and for short-term use. Full-strength hydrogen peroxide can irritate the sensitive skin of the ear canal. Most commercial ear drops contain a controlled concentration of carbamide peroxide, which is safer and more effective.
How often should I clean my ears?
Never force-clean your ears. Clean only the outer portion during regular bathing. If you’re prone to wax buildup, softening treatments every few months may help—but only when symptoms appear. Routine cleaning is unnecessary and counterproductive.
Are ear candles safe?
No. Ear candling involves placing a lit, hollow candle into the ear, claiming to draw out wax through suction. Scientific studies show no evidence of effectiveness, and the practice carries serious risks, including burns, ear canal occlusion from wax drippings, and eardrum damage. The FDA has banned several ear candle products due to safety concerns.
Final Thoughts and Call to Action
Your ears are built to take care of themselves. Interfering with their natural process often does more harm than good. By understanding safe practices—like using drops, gentle irrigation, and avoiding insertion—you protect your hearing and prevent avoidable injuries.
If you’ve been using cotton swabs or other risky methods, now is the time to change. Start by simply wiping the outer ear with a damp cloth. Monitor how your ears feel. When in doubt, consult a healthcare provider instead of experimenting at home.


 浙公网安备
33010002000092号
浙公网安备
33010002000092号 浙B2-20120091-4
Comments
No comments yet. Why don't you start the discussion?