
Purchasing clothing or accessories from major retailers like Target often means dealing with security tags—small but stubborn devices designed to prevent theft. While these tags are essential in-store, they can be frustrating to remove at home, especially if the sales associate forgets to take them off. Attempting removal incorrectly can damage fabric, leave residue, or even trigger alarms unintentionally. Fortunately, there are safe, proven techniques to remove these tags effectively without harming your items or breaking any laws.
This guide focuses exclusively on removing security tags from legitimately purchased merchandise. It does not support or encourage shoplifting, tampering with active anti-theft systems, or any illegal activity. The methods below are intended for consumers who have already paid for their items and simply need help finishing the unboxing process at home.
Understanding Security Tag Types
Before attempting removal, it's important to identify the type of security tag attached to your item. Target uses several common styles, each requiring a slightly different approach:
- RF (Radio Frequency) Tags: Flat, rectangular stickers usually found on clothing labels. These deactivate at checkout but may still need physical removal.
- AM (Acousto-Magnetic) Tags: Rigid plastic tags clipped through seams or tags. Often used on higher-value apparel.
- Spider Wrap Tags: Bulky plastic casings wrapped around shoes or boxed goods. Contain ink vials that can stain if broken improperly.
- Electronic Article Surveillance (EAS) Tags: Small hard tags that require a strong magnetic release tool to open.
Misidentifying the tag type can lead to mistakes—like cracking an ink capsule or tearing fabric. Always inspect the tag closely before proceeding.
“Most consumer issues arise from using force instead of finesse. These tags are engineered for quick release with the right method.” — David Lin, Retail Loss Prevention Consultant
Step-by-Step Guide to Safe Removal
Follow this logical sequence to remove most common Target security tags safely and efficiently at home.
- Inspect the Tag: Determine its type and how it’s attached. Look for seams, clips, or visible locking mechanisms.
- Gather Tools: Use only non-damaging tools such as a flat-head screwdriver, pliers with padding, or a strong neodymium magnet.
- Stabilize the Item: Place the garment or product on a flat surface. Hold the fabric taut around the tag to prevent pulling.
- Apply the Correct Method: Choose the technique based on tag type (detailed in next section).
- Clean Residue (if needed): Some adhesive-backed tags leave sticky marks. Use rubbing alcohol and a cotton pad to gently wipe clean.
- Dispose Properly: Recycle plastic components when possible and discard metal parts responsibly.
Effective Methods by Tag Type
Different tags respond best to specific approaches. Using the wrong method increases risk of damage.
| Tag Type | Recommended Method | Risk Level |
|---|---|---|
| RF Sticker Tags | Peel slowly; use alcohol to remove adhesive | Low |
| AM Clip Tags | Press down on center pin while twisting | Medium |
| Spider Wrap (Shoes) | Use flat tool to slide under locking tab | High (ink risk) |
| EAS Hard Tags | Strong magnet placed on back releases pin | Low–Medium |
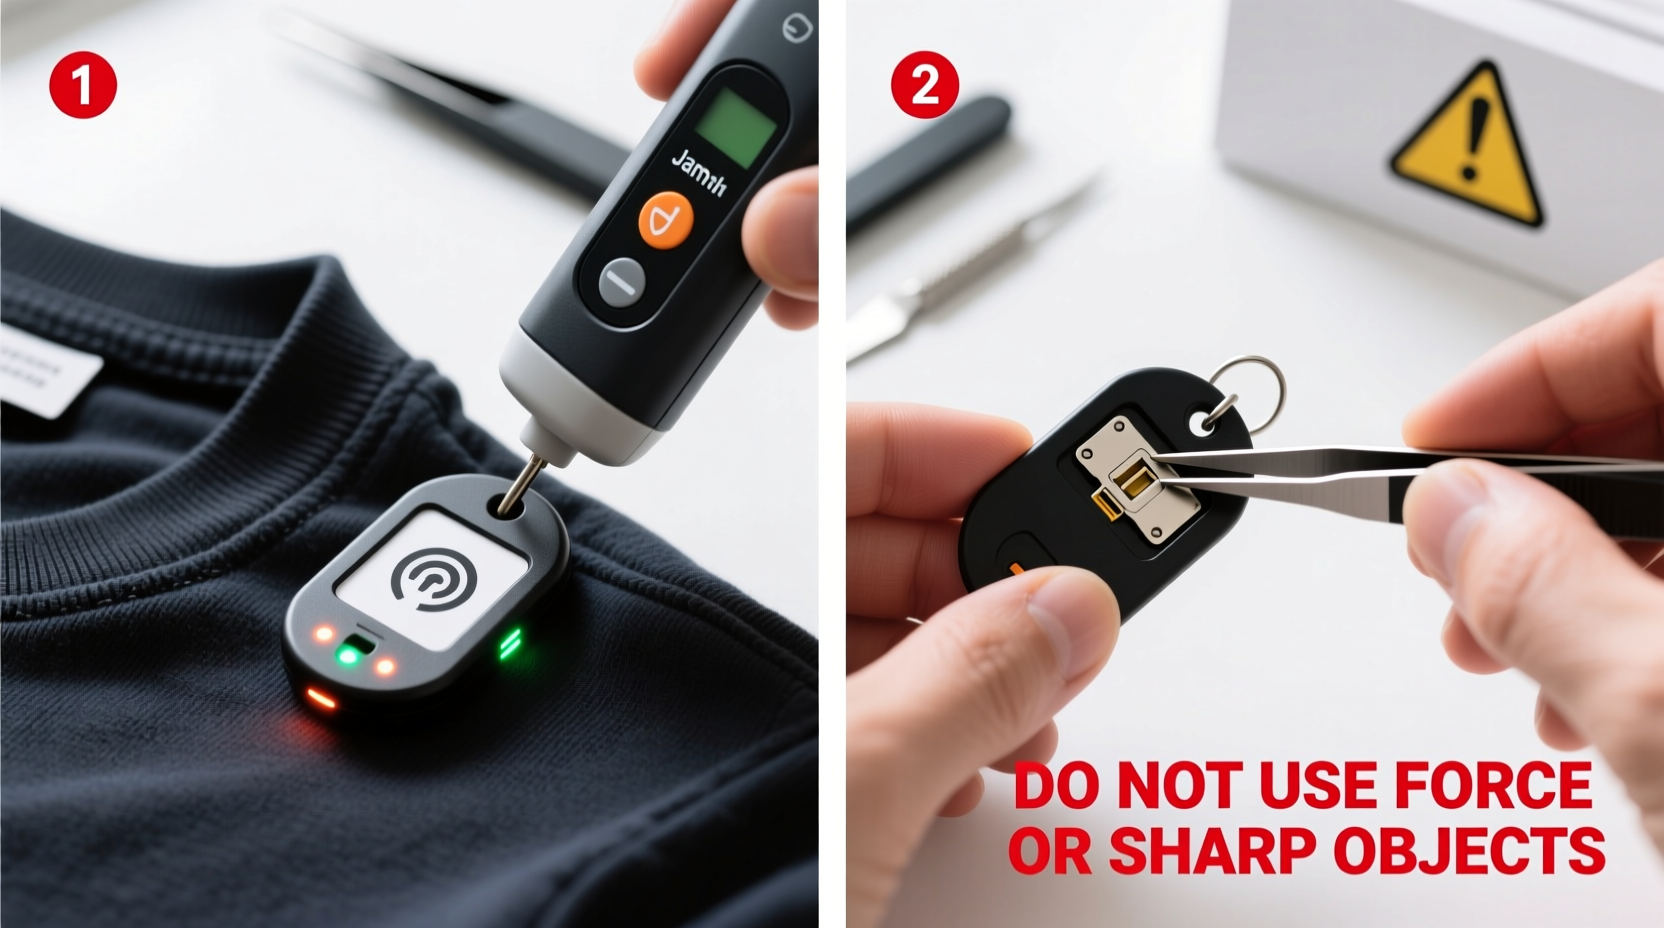
Using a Magnet for EAS Tags
Many EAS tags contain a magnetic locking pin. A powerful neodymium magnet (available online or from hardware stores) can unlock it silently.
Place the magnet flat against the side of the tag opposite the pin. You should hear a soft click as the internal locking mechanism releases. Gently pull the pin out or allow the two halves to separate. This method works on over 70% of standard hard tags and avoids scratching or tearing.
Manual Release for Clip-On Tags
For AM-style clip tags, locate the central pin. Press it firmly downward while rotating the outer casing counterclockwise. With steady pressure, the pin should depress and release. If resistance is high, wrap a rubber band around the handle of pliers for better grip—but never crush the tag.
Checklist: What to Do (and Not Do)
- Identify the tag type first
- Use gentle, controlled force
- Try the magnet method before cutting
- Test adhesive removers on hidden fabric areas
- Contact Target customer service if unsure
- Use excessive force or sharp blades near ink tags
- Attempt removal on worn garments
- Keep activated tags after purchase
- Modify or resell items with intact security devices
Real Example: Removing a Shoe Security Tag
Sarah bought a pair of athletic shoes from Target and noticed the spider-wrap security tag was still attached when she got home. Knowing it contained ink, she hesitated to cut it off.
She researched the model and learned that sliding a butter knife under the locking tab could release it without triggering the dye. She placed the shoe on a towel, inserted the knife beneath the lower edge of the plastic clamp, and applied upward pressure. With a soft snap, the lock disengaged cleanly. Sarah removed the tag intact, preserving both the box and the shoes, and later returned the tag to Target for recycling.
This example shows how patience and proper knowledge prevent costly mistakes—even with high-risk tags.
Frequently Asked Questions
Can I return a security tag to Target?
Yes. Target encourages customers to return detached security tags to any store. They recycle or reuse components, supporting sustainability efforts. Simply hand them to customer service or place them in designated bins.
Is it legal to remove security tags from my own purchases?
Yes, as long as the item has been lawfully purchased and paid for. Removing tags from unpaid merchandise is illegal. Always keep your receipt until the tag is gone, just in case verification is needed.
What should I do if ink spills on my clothing?
If an ink tag ruptures, act quickly. Blot (don’t rub) the area with a clean cloth. Apply isopropyl alcohol to a cotton ball and dab around the stain. Launder immediately using cold water and a stain remover. Success depends on fabric type and response time.
Final Tips for Long-Term Confidence
Security tags exist to protect retailers, not inconvenience buyers. With the right knowledge, removal becomes a simple part of the shopping experience. Always prioritize safety and preservation of your new items.
Investing in a small toolkit—a precision screwdriver, padded pliers, and a strong magnet—can save you time and stress across multiple purchases. Keep it in your closet or near your returns station at home.
“The best practice isn’t speed—it’s precision. One careful minute now prevents ruined garments later.” — Maria Tran, Consumer Safety Advocate
Take Action Today
You don’t need special training or expensive tools to handle security tags responsibly. Whether you’re unpacking a last-minute gift or organizing a wardrobe refresh, knowing how to remove these tags safely empowers you as a smart, informed shopper.


 浙公网安备
33010002000092号
浙公网安备
33010002000092号 浙B2-20120091-4
Comments
No comments yet. Why don't you start the discussion?