
In today’s digital world, signing documents or personalizing images no longer requires a printer or scanner. Whether you're finalizing a contract, marking ownership of a creative work, or adding a personal touch to a gift photo, your smartphone can handle the task quickly and professionally. With built-in tools and accessible apps, adding your signature to photos has never been simpler. This guide walks through practical, tested methods that deliver clean, legible results—no technical expertise required.
Why Add Your Signature Digitally?
Digital signatures on photos serve multiple purposes. Artists use them to protect their intellectual property. Freelancers and professionals sign client deliverables directly from their phones. Real estate agents, contractors, and educators often annotate agreements or approval forms in real time. A visible signature adds authenticity and legal weight when needed, while also streamlining workflows by eliminating paper-based processes.
According to a 2023 report by Adobe, over 75% of business transactions now begin or end digitally. Mobile signing is not just convenient—it's becoming standard practice across industries.
“Digital signatures are legally binding in most countries and offer traceability, security, and efficiency.” — Dr. Lena Patel, Digital Compliance Analyst
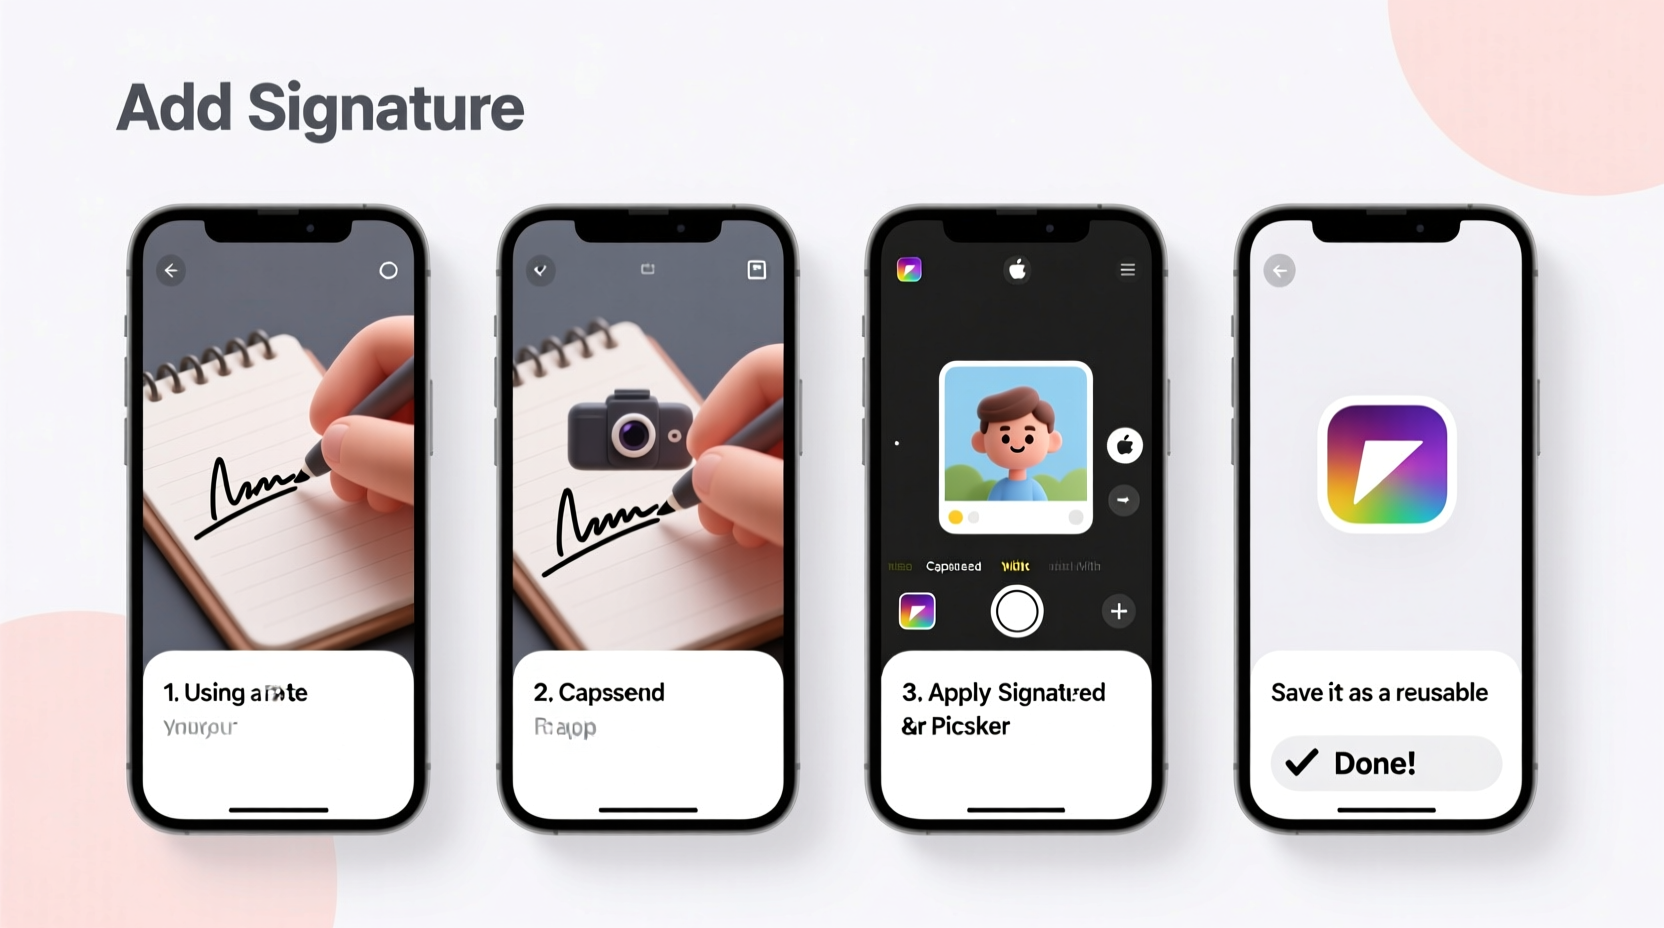
Step-by-Step: How to Create and Apply a Signature on iPhone
iOS offers native support for digital signatures through the Markup tool, available in the Photos app and Files app. Here’s how to use it effectively:
- Capture or select your photo: Open the photo in the Photos app where you want to add your signature.
- Tap “Edit” then “Markup”: Look for the three-dot icon (…) and choose “Markup.”
- Add a signature: Tap the plus (+) icon, select “Signature,” then tap “Create New.”
- Draw your signature: Use your finger or an Apple Pencil on the screen. Keep it smooth and consistent.
- Save and place: After saving, drag the signature onto your photo. Resize or reposition as needed.
- Finalize: Tap “Done,” then “Done” again to save the edited image.
The Markup feature preserves image quality and integrates seamlessly with iCloud, making it ideal for frequent use. Once saved, your signature is stored securely on your device and can be reused across future projects.
How to Add a Signature on Android Devices
Android doesn’t have a universal built-in markup tool like iOS, but several reliable options exist. The Google Photos app and third-party editors like Adobe Fill & Sign or Xodo PDF provide excellent alternatives.
Using Google Photos (Limited Markup)
While Google Photos lacks a dedicated signature tool, you can still annotate:
- Open the photo and tap “Edit” > “Markup.”
- Select the pen tool and manually draw your signature.
- Adjust color and thickness for better visibility.
- Save the changes once complete.
Using Third-Party Apps (Recommended)
For more control, install a trusted app such as Xodo PDF or Adobe Fill & Sign. These allow you to:
- Create a reusable signature.
- Apply it to multiple photos or documents.
- Export in high resolution with transparency support.
“Android users benefit from app flexibility—choose tools that sync across devices and support cloud backup.” — Marcus Tran, Mobile App Developer
Best Practices for Clear, Professional Signatures
A poorly placed or pixelated signature can undermine professionalism. Follow these guidelines to ensure your signature appears crisp and intentional:
| Do | Don't |
|---|---|
| Use a dark ink color (black or deep blue) for contrast | Sign in light gray or red, which may look unprofessional |
| Place signature in a corner, away from key visual elements | Overlay text or faces with your signature |
| Maintain consistent size relative to the image | Scale too large or too small |
| Save original file before editing | Overwrite the only copy of your photo |
Pro Tip: Create a Transparent Signature PNG
To reuse your signature across platforms without redrawing each time:
- Sign a blank white sheet of paper with a bold pen.
- Photograph it under bright, even lighting.
- Use a background remover app (like Remove.bg) to isolate the signature.
- Save as a PNG with transparent background.
- Import into any photo editor and overlay as needed.
Mini Case Study: Freelance Photographer Protects Portfolio
Sophia Reyes, a travel photographer based in Costa Rica, began watermarking her social media previews after noticing unauthorized use of her images. She used her iPhone’s Markup tool to create a clean signature, placing it discreetly in the bottom right corner of each exported photo.
Within two months, she received three licensing inquiries directly citing her visible signature. More importantly, uncredited reposts dropped by over 60%. “It took less than a minute per image,” Sophia said, “but it made my work look professional and protected.”
She now uses a transparent PNG version across her desktop and mobile workflows, syncing files via Google Drive. Her process takes under 10 seconds per image at scale.
Quick Checklist: Adding a Signature in Under 5 Minutes
- Open the target photo on your phone.
- Access the edit or markup function.
- Choose the signature or drawing tool.
- Draw or insert your pre-saved signature.
- Adjust size, position, and opacity.
- Save or export the updated image.
- Back up the signed version if needed.
Frequently Asked Questions
Is a handwritten signature on a photo legally valid?
Yes, when applied in a secure context (such as within a verified document workflow), a scanned or drawn signature holds legal weight in most jurisdictions under laws like the U.S. ESIGN Act or the EU’s eIDAS regulation. However, for contracts, consider using dedicated e-signature services like DocuSign for full audit trails.
Can I make my signature transparent on a photo?
Absolutely. By creating a PNG file with a transparent background (using apps like Photopea or Canva), you can overlay your signature cleanly without a white box around it. This method is especially useful for branding or watermarking creative work.
Will adding a signature reduce my photo quality?
No—if done correctly. Editing within high-quality apps and avoiding repeated compression (e.g., sharing via messaging apps multiple times) preserves resolution. Always export in the highest available quality setting.
Conclusion: Take Control of Your Digital Identity
Your signature is more than a scribble—it’s a mark of identity, approval, and ownership. With just a few taps, you can apply it to any photo directly from your phone, whether you’re closing a deal, protecting your art, or personalizing a keepsake. Modern tools make the process fast, repeatable, and professional. The key is consistency: use the same clear signature format across all your materials to build recognition and trust.


 浙公网安备
33010002000092号
浙公网安备
33010002000092号 浙B2-20120091-4
Comments
No comments yet. Why don't you start the discussion?