
Minimalist bracelets have become a staple in modern accessory collections—clean, elegant, and versatile. Whether made from leather, metal links, woven threads, or adjustable cords, their appeal lies in simplicity. But even the most thoughtfully designed piece may not fit perfectly out of the box. Instead of setting it aside or rushing to a jeweler, many sizing adjustments can be made safely at home with minimal tools. With a bit of patience and the right approach, you can customize your bracelet’s fit for comfort and style without professional help.
Understanding Your Bracelet Type
Before attempting any adjustment, identify the material and construction of your bracelet. The method you use depends heavily on whether it's made of leather, metal, paracord, or features sliding knots. Misjudging the type can lead to irreversible damage.
- Leather straps: Often secured with a buckle or snap closure; require hole punching or cutting.
- Metal link bracelets: Composed of interlocking segments; resizing involves removing or adding links.
- Sliding knot bracelets (e.g., macramé or silk): Adjustable by tightening or loosening knots.
- Stretchy bead bracelets: Rely on elastic cord; resizing means restringing.
- Braided or woven cords: Can be trimmed and re-knotted if excess length exists.
Step-by-Step Guide to Adjusting Common Minimalist Bracelets
1. For Sliding Knot Bracelets (Cord or Silk)
These are among the easiest to resize. They typically feature two sliding knots that allow infinite adjustability within a range.
- Lay the bracelet flat on a surface.
- Gently pull the cords extending from the knot to loosen it.
- Slide both knots closer together to shorten the loop.
- Test the fit on your wrist, ensuring it’s snug but not tight.
- Once satisfied, tug lightly on all four ends to secure the knots.
- Trim excess cord carefully with sharp scissors, leaving about 2–3mm.
“With sliding knot designs, precision matters more than force. A steady hand ensures symmetry and durability.” — Lena Torres, Jewelry Designer & Craft Instructor
2. Resizing Leather Wrap Bracelets
If your leather bracelet is too long, especially those with a single-prong buckle, you can create a new hole for a tighter fit.
- Put on the bracelet and fasten it at the current tightest hole.
- Mark where a new hole should go using a fine-tip marker or awl.
- Use a leather hole punch tool (available at craft stores) to pierce a new hole.
- Smooth any rough edges with fine-grit sandpaper.
- Reattach the buckle and test the fit.
If the strap is excessively long, consider trimming it. Cut straight across after the last hole, then seal the edge with a drop of clear nail polish or leather finisher to prevent fraying.
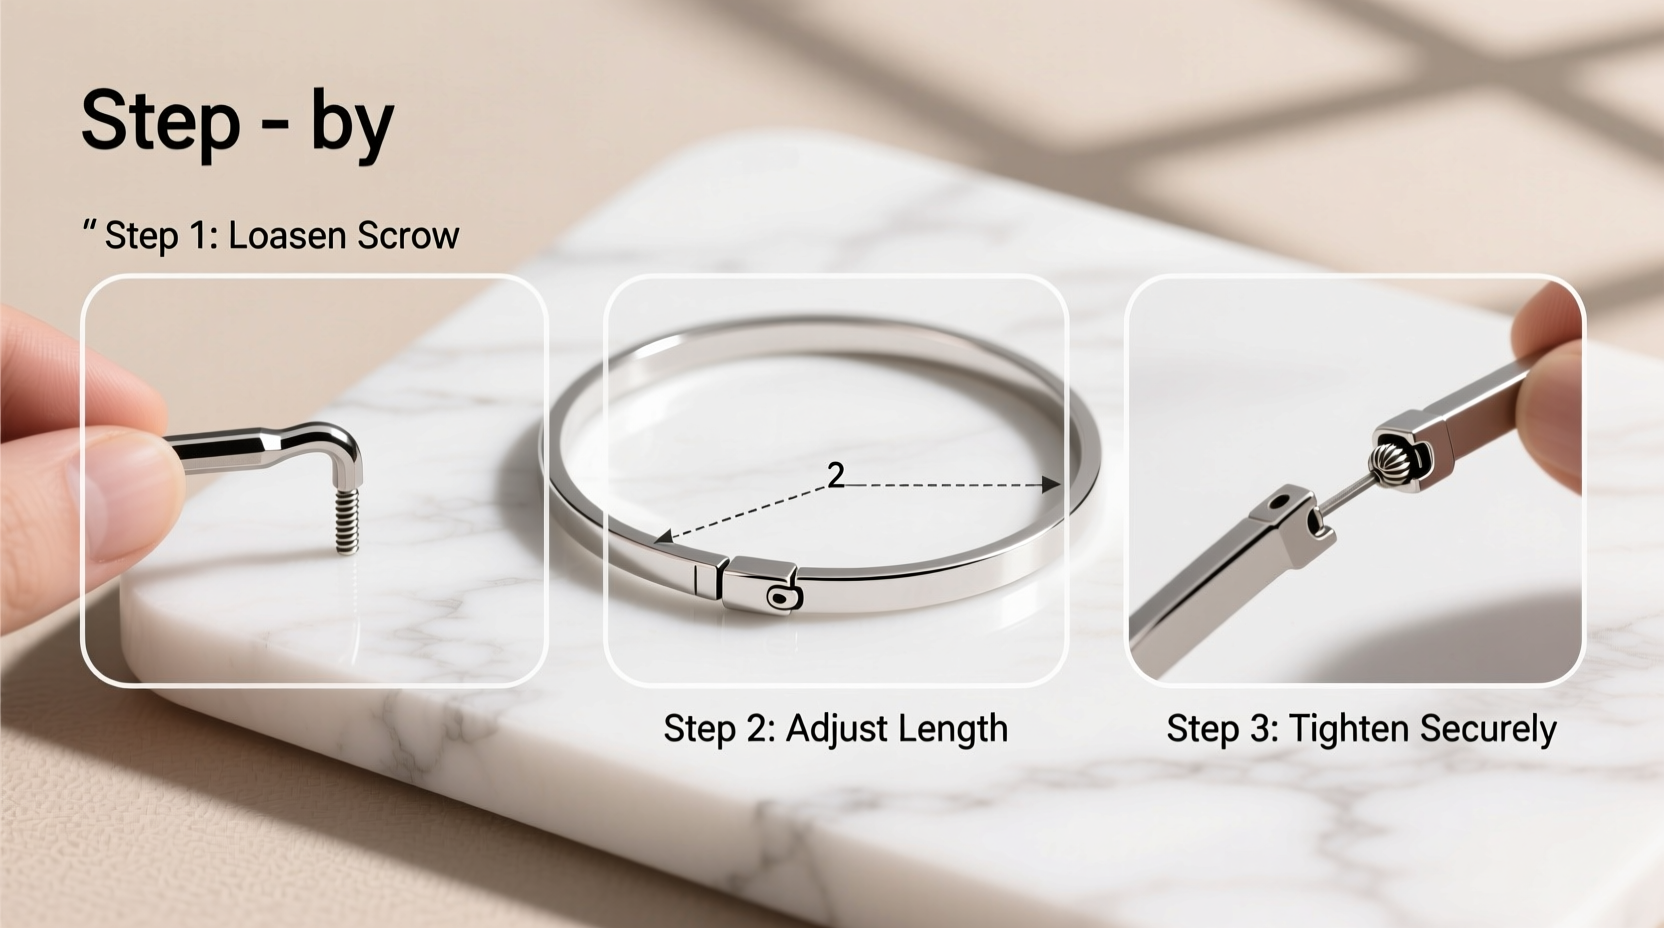
3. Shortening Metal Link Bracelets
Solid metal bracelets often come with extra links for later removal. You may find small screws or pins holding them together.
- Check if your bracelet has removable links. Look for tiny arrows etched near certain links.
- Use a pin pusher tool (inexpensive and widely available online) to gently push out the connecting pins.
- Remove one or two links as needed.
- Reconnect the remaining links by aligning the pin holes and pressing the pin back in.
- Ensure all links move freely and the clasp functions smoothly.
Note: Stainless steel and titanium models are generally easier to adjust than gold or plated versions, which can scratch or weaken under pressure.
Do’s and Don’ts When Adjusting Bracelet Size
| Do | Don't |
|---|---|
| Measure your wrist accurately before adjusting. | Remove too many links or cut too much material at once. |
| Use proper tools like micro screwdrivers or pin pushers. | Use pliers aggressively on delicate components. |
| Secure loose ends after trimming cords or leather. | Leave sharp or frayed edges exposed. |
| Test the fit multiple times during adjustment. | Force parts that don’t align easily—this may indicate incorrect assembly. |
| Store removed links or extra pieces in case of future expansion. | Discard hardware like pins or screws immediately. |
Real-Life Example: Sarah’s Weekend Fix
Sarah received a minimalist braided hemp bracelet as a gift, but found it slipped off her narrow wrist. Rather than returning it, she spent 15 minutes adjusting it at home. She laid the bracelet flat, pulled the side cords to tighten the sliding knots evenly, and trimmed the excess ends close to the knot. After sealing the tips with clear glue from an old eyeliner tube, she had a perfectly fitted accessory ready for daily wear. “I didn’t realize how easy it was,” she said. “Now I’ve adjusted three others in my collection.”
This example shows that even someone without prior experience can achieve professional-looking results with attention to detail and basic household tools.
Essential Checklist for Home Sizing Success
- ✅ Measure your wrist circumference accurately.
- ✅ Identify the bracelet type and mechanism.
- ✅ Gather necessary tools: scissors, ruler, hole punch, pin pusher, etc.
- ✅ Work in a clean, well-lit area to avoid losing small parts.
- ✅ Make gradual changes—better slightly loose than too tight.
- ✅ Secure and finish cut ends to prevent unraveling.
- ✅ Test the fit and function of the clasp after adjustment.
- ✅ Store original hardware and extra pieces safely.
Frequently Asked Questions
Can I resize a stretchy bead bracelet at home?
Yes, but it requires restringing. Carefully cut the old elastic, thread the beads onto new elastic cord (preferably 1mm thickness), tie a surgeon’s knot, and add a drop of jewelry glue for security. Let it dry fully before wearing.
What if I make my bracelet too small?
Some styles can be reversed: sliding knot bracelets can be loosened again, and leather straps with multiple holes can revert to earlier settings. For metal links, keep saved components so you can reattach them later. Prevention is key—always err on the side of caution when removing material.
Are there risks to adjusting jewelry myself?
There are minor risks, including scratching surfaces, misaligning links, or weakening structural integrity if excessive force is used. However, following manufacturer guidelines and using appropriate tools minimizes these dangers significantly.
Final Thoughts and Encouragement
Adjusting the size of your minimalist bracelet doesn’t require a trip to the store or costly repairs. Most designs are built with user customization in mind, especially those labeled “one size fits most.” By understanding your bracelet’s structure and applying careful technique, you can tailor its fit precisely to your wrist—enhancing both comfort and aesthetic harmony.
These methods empower you to take ownership of your accessories, turning overlooked pieces into perfect companions for everyday wear. Whether you're refining a gift, reviving an old favorite, or curating a capsule collection, the ability to resize at home adds lasting value to your style routine.


 浙公网安备
33010002000092号
浙公网安备
33010002000092号 浙B2-20120091-4
Comments
No comments yet. Why don't you start the discussion?