
Recording your screen on a Mac doesn’t have to involve third-party software, complicated setups, or confusing interfaces. Apple has quietly built one of the most efficient screen recording solutions directly into macOS—one that’s fast, free, and fully integrated. Whether you're capturing a tutorial, saving a video call, or creating content for social media, the simplest path often lies in what's already available on your machine.
The key is knowing where to look, how to use it effectively, and avoiding common pitfalls that lead to poor quality or missing audio. With just a few clicks, you can start and stop recordings, capture specific windows or regions, and even include microphone input—all without downloading another app.
Why Built-In Screen Recording Is the Smart Choice
Many users immediately turn to external tools like OBS Studio or Camtasia when they need to record their screen. While these are powerful options, they come with learning curves, system resource demands, and sometimes subscription costs. For most everyday tasks, they’re overkill.
macOS has included native screen recording since Mojave (2018), and each update has refined it further. The feature works seamlessly across MacBook, iMac, and Mac mini devices, requires no installation, and respects system privacy—no permissions beyond basic access needed.
“Most people don’t realize they already have a professional-grade screen recorder. It’s not about adding tools—it’s about mastering the ones you already own.” — Jordan Lee, Digital Workflow Consultant
This reliability makes the built-in recorder ideal for educators, remote workers, tech support agents, and content creators who value consistency over complexity.
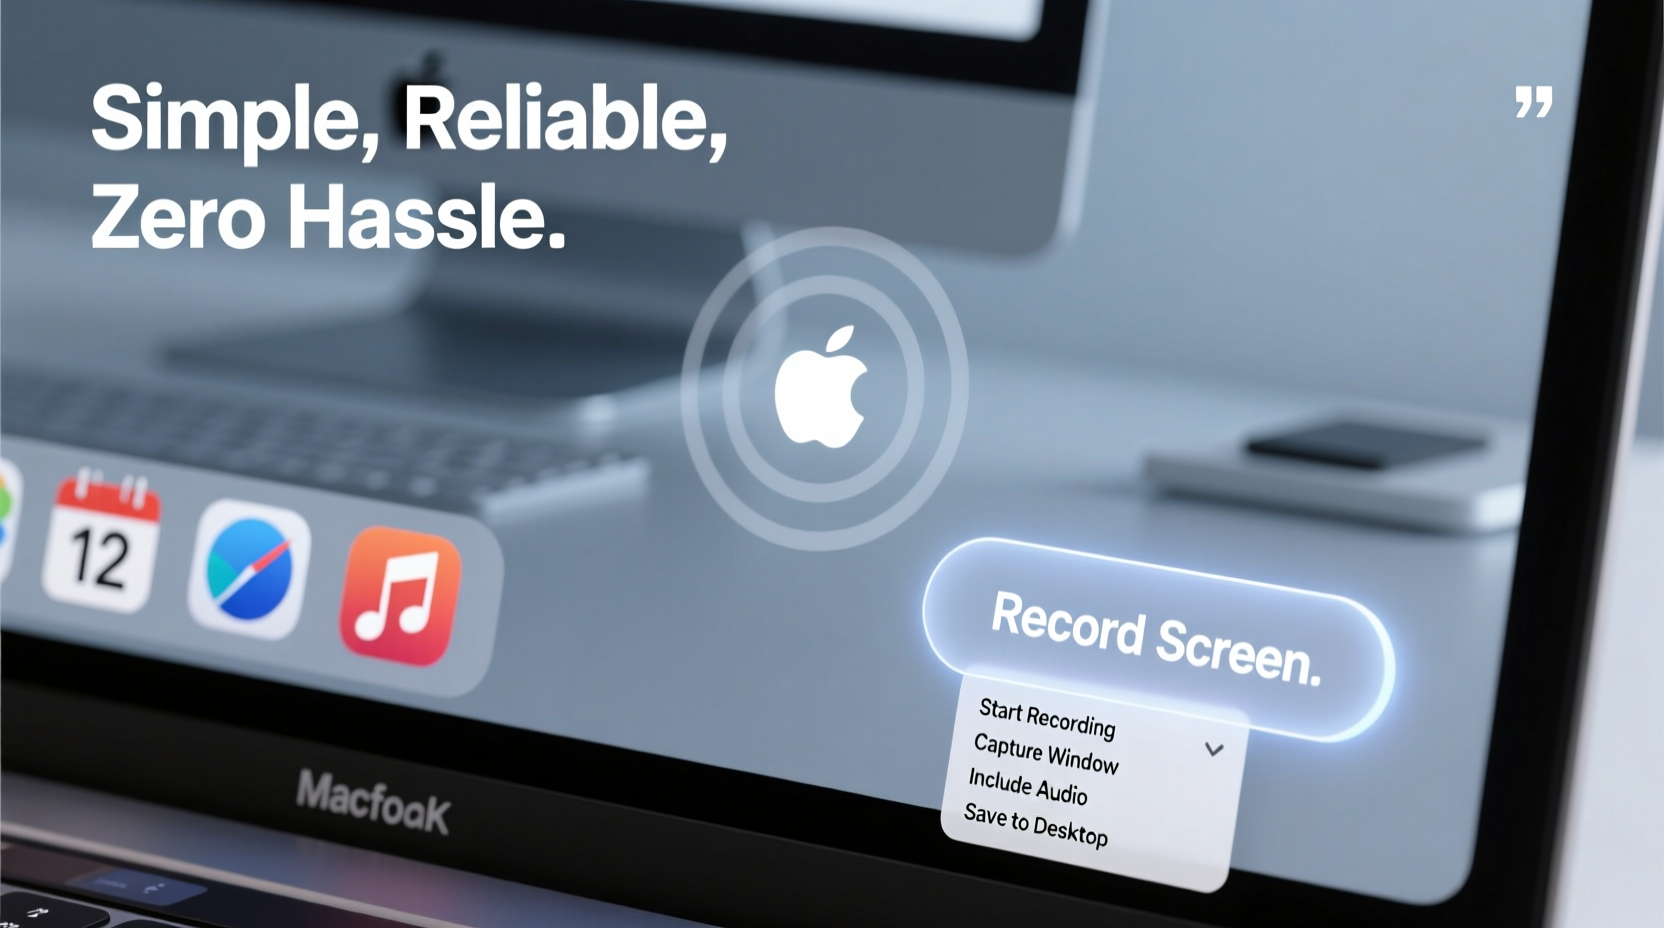
How to Record Your Screen Using macOS Built-In Tool
The process is straightforward once you know the shortcut. Here's how to do it step by step:
Step-by-Step Guide: Start Recording in Under 60 Seconds
- Press Command (⌘) + Shift + 5 on your keyboard. This opens the screenshot and screen recording control panel at the bottom of your screen.
- Choose your recording mode:
- Record Entire Screen: Click the first icon to capture everything visible.
- Record Selected Portion: Drag to select a custom area—perfect for focusing on one app or browser window.
- Record a Window: Hover over any open window and click to lock it in—ideal for clean captures without distractions.
- Click the “Options” button to set:
- Where to save the recording (Desktop, Documents, etc.)
- Whether to show mouse clicks (useful for tutorials)
- Which microphone to use (internal or external)
- If you want to record the cursor
- Click “Record” or press Enter. A three-second countdown begins.
- To stop, click the stop button in the menu bar or press Command (⌘) + Control + Esc.
- Your video saves automatically as an .mp4 file, ready to share or edit.
Common Issues and How to Avoid Them
Even the simplest tools can trip you up if used incorrectly. Below are frequent problems users face—and how to fix them before they happen.
| Issue | Cause | Solution |
|---|---|---|
| No audio in recording | Microphone not selected or muted | Go to Options > Microphone and choose \"Built-in Microphone\" |
| Blurry or low-quality output | Recording too large an area or exporting from compressed apps | Record only necessary portion; avoid Zoom/Teams virtual backgrounds |
| Recording won’t stop | Menu bar hidden or unresponsive | Use keyboard shortcut: Command + Control + Escape |
| Cursor not visible | \"Show Floating Thumbnail\" disabled or cursor tracking off | Enable \"Show Mouse Clicks\" in Options for visual feedback |
When You Might Need More Than the Default Tool
The built-in recorder excels at simplicity, but there are scenarios where advanced features become necessary:
- Editing during recording: If you need to annotate, highlight, or add overlays live, consider QuickTime Player (also pre-installed).
- Long-form or scheduled recordings: For automated or multi-hour sessions, third-party tools may offer better stability.
- Multiple audio sources: Separating system audio from mic input isn't supported natively—OBS allows this with setup.
But for 90% of use cases—quick demos, bug reports, class presentations, or personal reference—the default tool is more than sufficient.
Real Example: A Teacher’s Daily Workflow
Sarah Kim teaches high school math remotely two days a week. Every Monday, she records a 10-minute walkthrough of the week’s problem set using only her MacBook Air.
She uses Command + Shift + 5 to select her browser window where Desmos graphs are displayed. In Options, she enables her external USB microphone for clearer voice clarity and checks “Show Mouse Clicks” so students can follow along. After pressing Record, she walks through three example problems, pauses briefly between steps, then stops the recording.
The file saves directly to her Desktop, and she uploads it to Google Classroom within seconds. No extra software, no rendering delays, no login walls. Her students consistently report that the videos are clear and easy to follow.
Sarah’s approach proves that reliability beats complexity. She’s never had a failed recording, and because the tool is consistent across all school-issued MacBooks, her colleagues adopted the same method.
Pro Tips for Flawless Recordings Every Time
Follow this checklist before hitting record to ensure smooth results:
- ✅ Close unnecessary apps to reduce background noise and clutter
- ✅ Test microphone levels in System Settings > Sound
- ✅ Disable notifications (turn on Do Not Disturb mode)
- ✅ Position your cursor at the starting point before recording begins
- ✅ Speak clearly and pause slightly between concepts
- ✅ Save recordings with descriptive names (e.g., “Budget_Tutorial_Final.mp4”)
“Clarity starts before you press record. The fewer variables, the more reliable your output.” — Lena Patel, UX Educator & Screencast Trainer
Frequently Asked Questions
Can I record system audio on Mac without third-party tools?
No, macOS does not allow direct system audio capture through the built-in screen recorder due to privacy restrictions. What you hear from YouTube, Spotify, or meetings won’t be recorded unless you use workarounds like audio loopback (with apps like BlackHole) or external recording methods. However, microphone input is fully supported.
Where do screen recordings save by default?
By default, recordings save to your Desktop unless you change the location in the Options menu (accessed via Command + Shift + 5). You can set it to Documents, a folder of your choice, or even an external drive for large files.
Is there a time limit for screen recordings on Mac?
No, there is no hard time limit. Recordings can continue until you run out of storage space or manually stop them. Users have successfully recorded sessions lasting several hours using only the built-in tool, especially when saving to high-capacity SSDs.
Final Thoughts: Simplicity Wins
The best screen recording solution isn’t always the most feature-rich. On a Mac, the simplest method—using Command + Shift + 5—is also the most reliable. It boots instantly, integrates with your OS, produces high-quality MP4s, and avoids the bloat of unnecessary extras.
You don’t need to master complex timelines or learn new interfaces. Just focus on preparation: set your options, manage your environment, and speak with intention. Over time, screen recording becomes second nature—just another part of your digital workflow.


 浙公网安备
33010002000092号
浙公网安备
33010002000092号 浙B2-20120091-4
Comments
No comments yet. Why don't you start the discussion?