
Creating homemade slime doesn’t have to involve complicated ingredients or questionable chemicals. With just two common household items—dish soap and baking soda—you can make a satisfying, stretchy slime that’s both safe and easy to produce. This method is ideal for families with young children, classrooms, or anyone looking for a quick sensory activity without the mess or risk of harsh substances. Unlike traditional recipes that use borax or laundry starch, this version eliminates potential irritants while still delivering that perfect gooey texture kids love.
The Science Behind Slime: Why Dish Soap and Baking Soda Work
Slime is a polymer—a substance made of long chains of molecules that slide past one another but remain connected. When you combine dish soap with baking soda, a subtle chemical interaction occurs. Dish soap contains surfactants, which are compounds that reduce surface tension in liquids. These surfactants begin to thicken when exposed to certain ions, such as those released by baking soda (sodium bicarbonate).
While this reaction isn’t as dramatic as with borax-based activators, it’s enough to slightly cross-link the soap molecules, transforming the liquid into a semi-solid, moldable gel. The result is a soft, squishy slime that holds shape briefly but slowly flows like a liquid over time. This makes it ideal for tactile play without being overly sticky or difficult to clean.
“Non-borax slime options like the dish soap and baking soda method offer a safer alternative for younger children and sensitive skin.” — Dr. Lila Nguyen, Pediatric Dermatologist
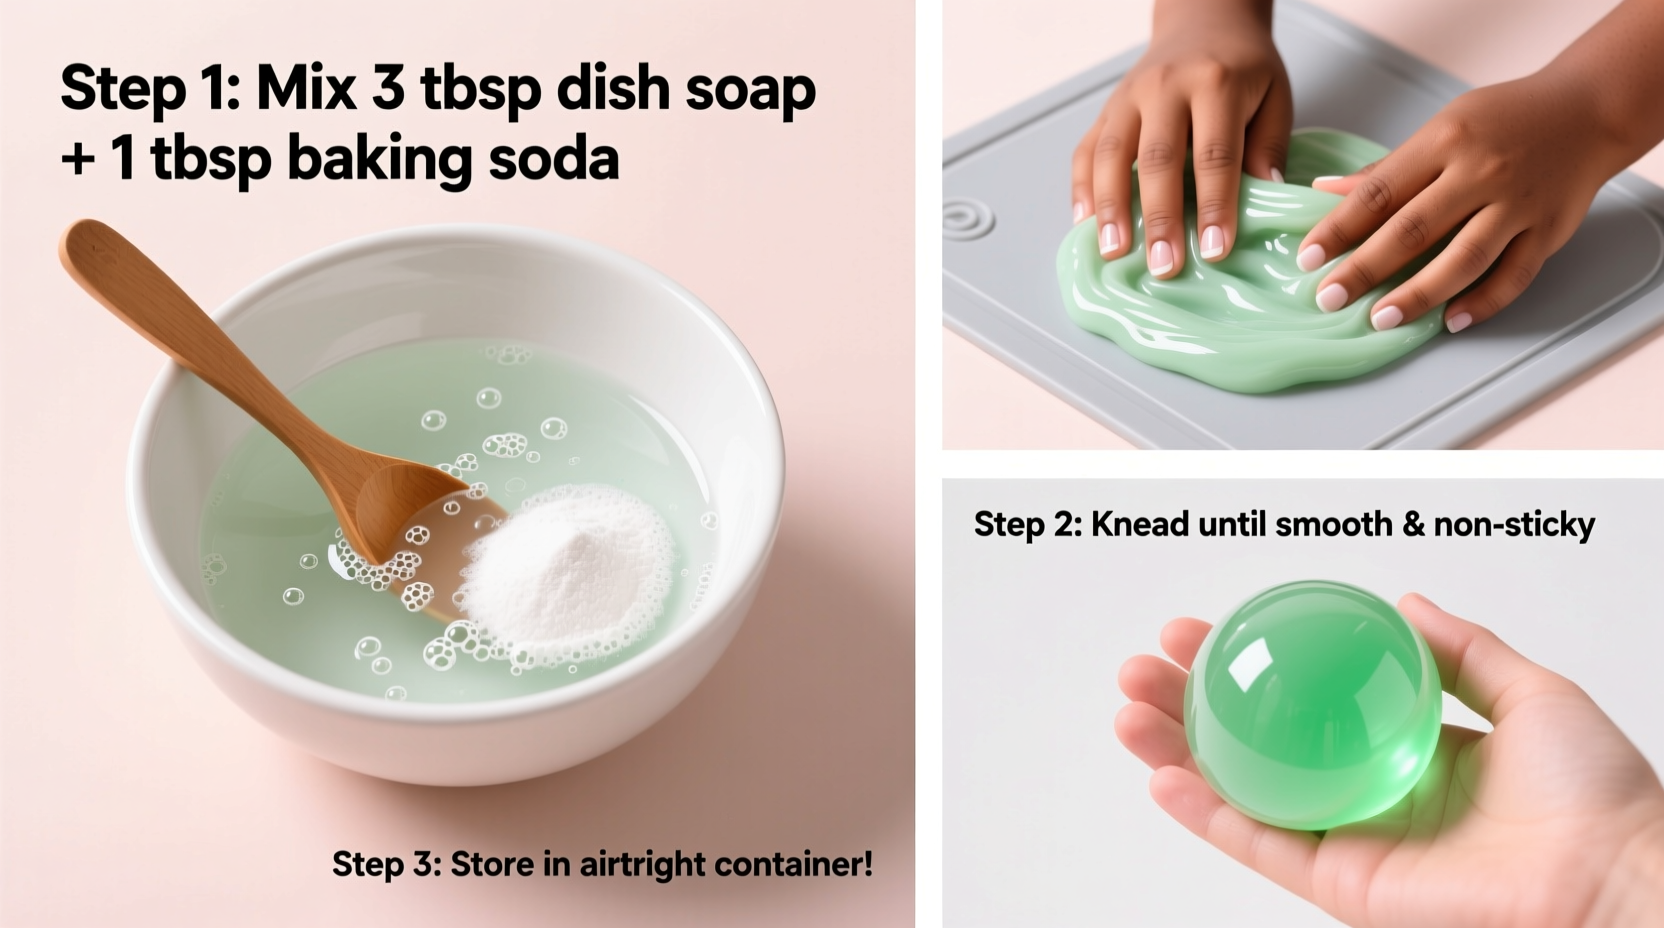
Step-by-Step Guide: Making Slime in 5 Minutes
This method requires minimal supplies and cleanup. Follow these steps carefully for best results:
- Gather your materials: You’ll need clear dish soap (like Dawn or Palmolive), baking soda, a mixing bowl, a spoon, and optional food coloring or glitter.
- Pour 1/2 cup of dish soap into the bowl. Choose a gentle, fragrance-free version if skin sensitivity is a concern.
- Add 1/4 teaspoon of baking soda to the soap. Start with less—you can always add more if needed.
- Mix thoroughly with a spoon or spatula. At first, it will look like soapy water.
- Wait 1–2 minutes for the mixture to begin thickening. You’ll notice it starts pulling away from the sides of the bowl.
- Knead gently with your hands once it forms a cohesive mass. If too sticky, add a tiny bit more baking soda (a pinch at a time).
- Optional: Add a drop of food coloring or a pinch of glitter before mixing for visual appeal.
Tips for Perfect, Long-Lasting Slime
Even with a simple recipe, small adjustments can improve texture and shelf life. Consider these practical suggestions:
- Use fresh baking soda: Old or clumpy baking soda may not activate properly. Replace your box every 3 months for optimal performance.
- Avoid excess water: Don’t rinse your tools before use. Even a few drops of water can thin the mixture too much.
- Store in an airtight container: A small plastic jar or ziplock bag keeps slime from drying out. It can last 3–5 days when sealed and kept cool.
- Don’t overmix: Over-kneading can break down the polymer structure, leading to a runny consistency.
- Keep away from fabric: While non-toxic, colored slime can stain clothes. Play on hard surfaces like tables or trays.
Do’s and Don’ts of Homemade Slime
| Do’s | Don’ts |
|---|---|
| Use fragrance-free dish soap for sensitive skin | Use hot or warm water near the mixture (can destabilize it) |
| Supervise young children during play | Leave slime unattended where pets can access it |
| Add cornstarch if you want a firmer texture | Mix in unknown household cleaners (risk of harmful reactions) |
| Wash hands after play | Eat or put slime in mouth (even if non-toxic) |
| Dispose of slime in trash, not drains | Flush slime down the toilet (can cause clogs) |
Real Example: A Teacher’s Experience in the Classroom
Ms. Rachel Tran, a third-grade teacher in Portland, introduced the dish soap and baking soda slime recipe during her science unit on states of matter. She wanted a hands-on activity that was safe for all students, including those with allergies.
“We used clear Palmolive and blue food coloring,” she explained. “I pre-measured the ingredients into small cups. Within ten minutes, every student had their own batch. They loved describing how it felt—‘slimy but not wet,’ ‘like jelly that stretches.’ We even timed how long it took for a blob to ooze off a spoon. It sparked real curiosity.”
She emphasized supervision and handwashing but found the cleanup effortless—just wipe with a damp cloth. “It was the most engaged I’ve seen them all semester,” she added. “And no one had red hands or complaints afterward.”
Frequently Asked Questions
Is this slime safe for toddlers?
Yes, with adult supervision. While the ingredients are non-toxic, slime is not edible. Toddlers should only play under close watch and avoid putting it near their mouths. For extra safety, use dye-free soap and skip food coloring.
Why is my slime too runny?
This usually happens if too much soap is used or the baking soda is expired. Try adding a tiny pinch more baking soda and kneading for 30 seconds. If it remains liquid, start over with fresh ingredients.
Can I fix dried-out slime?
Somewhat. If your slime has hardened, try placing a damp paper towel in the container with it and sealing it overnight. The moisture may revive some elasticity. However, this method has limited success—fresh batches are more reliable.
Customizing Your Slime: Safe Add-Ins
Once you’ve mastered the basic recipe, you can experiment with safe enhancements:
- Glitter: Adds sparkle without affecting texture. Use cosmetic-grade, fine glitter to avoid sharp edges.
- Soft beads: Tiny foam balls or biodegradable confetti can create a crunchy sensation (great for sensory seekers).
- Food coloring: One drop goes a long way. Gel colors work better than liquid, which adds extra moisture.
- Cornstarch (optional): A 1/2 teaspoon can make the slime firmer and less sticky, especially in humid environments.
Avoid adding lotions, oils, or conditioners—they can break down the polymer bonds and turn your slime into a greasy mess.
Conclusion: Make Slime That’s Fun, Not Frightening
Homemade slime should be enjoyable, not stressful. With dish soap and baking soda, you get a safe, accessible, and effective recipe that works without risky ingredients. Whether you’re a parent looking for a weekend project, a teacher planning a classroom experiment, or just someone who enjoys tactile play, this method delivers consistent results with minimal effort.


 浙公网安备
33010002000092号
浙公网安备
33010002000092号 浙B2-20120091-4
Comments
No comments yet. Why don't you start the discussion?