
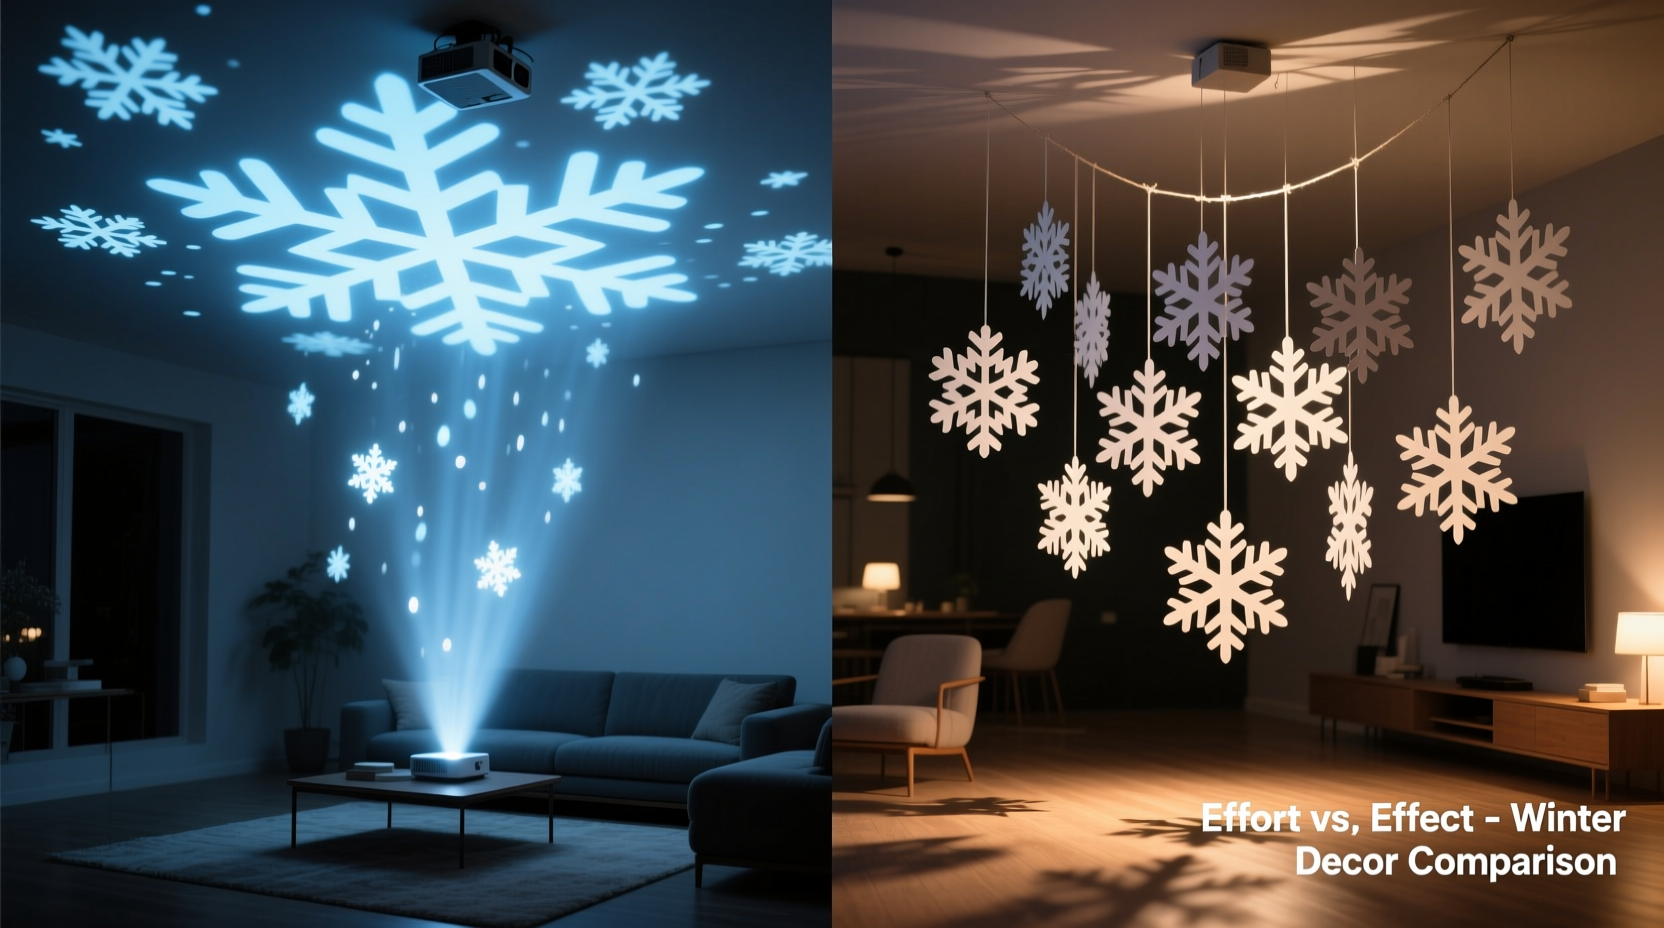
When designing winter-themed spaces—whether for a cozy home holiday setup, a boutique retail display, or a community center event—the snowflake motif remains perennially evocative. Yet the execution path splits decisively: invest in a digital projection system that casts animated snowflakes across ceilings and walls, or handcraft and suspend delicate paper cutouts. The choice isn’t merely aesthetic—it’s a calculus of labor, scalability, durability, sensory engagement, and long-term value. Many decorators default to one method without weighing trade-offs, only to discover mid-installation that the “easier” option demands more patience—or that the “flashier” one delivers less emotional resonance than expected. This article dissects both approaches with granular realism: not as abstract concepts, but as lived experiences grounded in hours logged, budgets stretched, and guest reactions observed.
Time Investment: Setup, Maintenance, and Takedown
Projection systems promise speed—but only after a steep initial learning curve. A typical 3000-lumen RGB LED projector with built-in snowflake animations requires precise placement (usually 8–12 feet from the ceiling), lens alignment, focus calibration, and ambient light management. First-time users average 90–150 minutes just to achieve even coverage without hotspots or edge distortion. Once configured, daily operation takes under 60 seconds: power on, press play. But maintenance adds hidden time: cleaning the lens weekly (to prevent dust halos), updating firmware quarterly, and recalibrating after any bump or temperature shift.
Hanging paper cutouts follow a different temporal rhythm. A single 12-inch intricate snowflake—cut by hand with an X-Acto knife and fine-grit cutting mat—takes 22–35 minutes. Laser-cut kits reduce this to 3–5 minutes per piece, but assembly (folding, gluing tabs, attaching fishing line) still consumes 4–7 minutes each. For a modest 100-piece installation covering a 12×15 ft living room ceiling, expect 12–18 hours total across three days: cutting (Day 1), assembling and labeling (Day 2), and installing with step-ladder choreography (Day 3). Takedown is slower: each cutout must be carefully unhooked, flattened, and stored flat to avoid warping. No recalibration—but significant physical labor and spatial planning.
Material & Financial Cost Breakdown
The financial divergence is stark—and rarely linear. Entry-level snowflake projectors start at $249 (e.g., Govee Glide Pro with 32 preloaded winter animations). Mid-tier units ($399–$649) add features like motorized focus, Bluetooth app control, and customizable timing schedules. High-end commercial-grade projectors ($1,200+) support multi-projector sync and real-time weather-responsive effects (e.g., snowfall intensity increasing with outdoor temperature drops). Add-ons—a dedicated mounting bracket ($45), UV-filtering lens protector ($29), and a surge-protected power strip ($32)—push first-year costs toward $400–$800.
Paper cutouts appear economical until volume scales. Bulk-packaged laser-cut birch plywood snowflakes (100 pieces, 8–14 inch range) cost $139–$219. Premium archival paper kits (acid-free, hand-embossed, 200 gsm) run $89 for 30 pieces—meaning 100 pieces would cost $297. Factor in consumables: 100 yards of clear monofilament ($14), double-sided tape rolls ($12), and a heavy-duty staple gun ($42) for ceiling joist anchoring. Total material outlay: $220–$370. However, paper has near-zero resale or reuse value. Projectors retain 65–75% resale value after two seasons; paper is discarded or archived in boxes that gather dust.
| Cost Category | Snowflake Projection Ceiling | Hanging Paper Cutouts |
|---|---|---|
| Upfront Equipment/Materials | $249–$1,200+ | $220–$370 |
| Annual Electricity (est. 4 hrs/day × 60 days) | $1.80 (LED projector) | $0.00 |
| Labor Value (3–18 hrs @ $35/hr) | $105–$630 (setup + recalibration) | $420–$630 (cutting + assembly + hang) |
| Reusability (3+ seasons) | High (with proper care) | Low (paper yellows, edges curl) |
| Storage Footprint | One compact box (12×8×4 in) | Two flat storage crates (24×18×4 in each) |
Visual Impact & Sensory Experience
Projection excels in dynamism and atmosphere—but falters in tactile authenticity. Modern projectors render snowflakes with subtle rotation, gentle drift, and layered depth (foreground flakes larger/more defined; background smaller/softer). Some models simulate parallax movement when viewers walk beneath them. Yet they remain fundamentally flat light patterns: no cast shadow variation, no textural nuance, no response to air currents. In rooms with ambient light (e.g., street-facing windows or recessed LEDs), contrast diminishes sharply, muting the effect. Guests often describe projections as “beautiful but distant”—a spectacle observed, not inhabited.
Paper cutouts deliver embodied presence. Light passes *through* translucent vellum or reflects *off* metallic foil surfaces, creating shifting highlights as air moves. When hung at staggered heights (some 6 inches below the ceiling, others 24 inches), they generate genuine volumetric depth—viewers instinctively tilt their heads to trace layers. A breeze from an HVAC vent makes them sway and shimmer; guests reach up instinctively (though gently) to feel the crisp paper edge. In low-light settings, backlighting with warm LED puck lights transforms them into glowing lanterns. As interior stylist Lena Ruiz notes after styling 17 holiday pop-ups:
“Projection sets the mood. Paper cutouts make people pause, breathe deeper, and say ‘How did you *make* that?’ That human connection—rooted in visible craft—is irreplaceable in experiential design.”
A Real-World Installation Comparison: The Community Library Winter Reading Room
In November 2023, the Oakwood Public Library renovated its children’s reading nook for its annual “Winter Story Hour” program. Budget: $500. Timeline: 10 days. Goal: enchanting yet safe (no ladders near toddlers, no heat-generating equipment).
The team tested both methods. They purchased a $329 Govee Glide Pro projector and mounted it securely in an overhead cabinet, projecting onto a matte-white acoustic ceiling tile. Initial tests thrilled staff—the slow-drifting snowflakes created instant ambiance. But during story hour, parents reported glare on picture books, and children pointed not at the ceiling, but at the projector’s faint hum and visible lens glow. The effect felt “behind glass.”
They pivoted. With $412 remaining, they ordered 85 laser-cut birch snowflakes (varied sizes: 6”, 9”, 12”) and 100 ft of museum-grade monofilament. Volunteers—including teens from the library’s art club—spent two Saturday mornings cutting, assembling, and labeling. Installation used adhesive-backed ceiling hooks (no drilling), placed precisely along joists. Each snowflake hung at unique heights using knotted lines of varying lengths. On opening day, children didn’t just look up—they traced falling paths with fingers, whispered about “real snow,” and asked to help rearrange them. Attendance rose 34% over last year. The librarian noted: “The paper didn’t just decorate space. It invited participation.”
Step-by-Step Decision Framework: Which Method Suits Your Context?
Don’t choose based on trend or convenience. Use this evidence-based sequence:
- Assess your ceiling surface: Matte white drywall or acoustic tile? Projection works well. Textured plaster, popcorn ceilings, or dark paint? Paper avoids uneven light absorption.
- Map ambient light sources: Count windows, recessed lights, and LED signage within 10 feet. If >3 active sources, projection contrast will suffer—paper gains advantage.
- Calculate available labor hours: Do you have 2–3 consecutive days for focused assembly? Or only 30-minute evening windows? Projection favors fragmented time; paper demands sustained blocks.
- Evaluate safety constraints: Are ladders prohibited? Is heat generation restricted? Projection requires minimal ceiling contact; paper needs secure anchoring but zero electricity near installation zone.
- Define longevity needs: One-time event? Paper suffices. Multi-season use (e.g., retail store decor)? Projection’s reusability offsets higher upfront cost.
FAQ: Practical Questions Answered
Can I combine both methods for layered impact?
Yes—and it’s increasingly common in high-end hospitality. Use projection for broad atmospheric drift (background layer), then hang 20–30 large-scale paper cutouts (18–24 inches) at key focal points: above seating areas, flanking entryways, or clustered around a central chandelier. The projection provides motion and scale; the paper delivers texture and intimacy. Just ensure projector brightness doesn’t wash out paper details—dim projection to 60–70% output when using reflective paper.
How do I prevent paper cutouts from yellowing or curling over time?
Use acid-free, lignin-free paper (e.g., Neenah Classic Crest or Strathmore 400 Series) and store flat in archival boxes with silica gel packs. Avoid direct sunlight during display—UV exposure accelerates yellowing faster than humidity. For humid climates, seal cutout edges with a thin coat of matte acrylic medium (diluted 1:1 with water) to inhibit moisture absorption.
Do projection snowflakes work on vaulted or angled ceilings?
Yes—with caveats. Most consumer projectors assume flat, horizontal surfaces. For vaulted ceilings, mount the projector at the highest point and use keystone correction (digital or optical). Optical correction preserves resolution; digital correction softens edges. Test coverage before final mounting: project onto newspaper first, trace the outer boundary, and verify no critical areas (e.g., reading nooks) fall outside the ellipse. Angled ceilings may require two projectors synced via HDMI splitter for full coverage—adding $300–$500 to budget.
Conclusion: Prioritize Human Experience Over Technical Flash
The snowflake projection ceiling and hanging paper cutouts aren’t rivals—they’re complementary tools serving distinct human needs. Projection answers the question *“How can we fill space with wonder quickly?”* Paper cutouts answer *“How can we invite presence, memory, and quiet reverence?”* Your choice should reflect not just square footage or budget, but the emotional contract you’re making with those who inhabit the space. A child tracing a paper snowflake’s edge remembers the feeling of crisp paper and gentle sway. An elder gazing at drifting light patterns feels soothed by rhythmic motion. Neither is superior—only more appropriate for the moment, the people, and the meaning you intend to hold.
Start small: next season, install five paper snowflakes above your reading chair—not for spectacle, but for slowness. Or project a single animation onto your bedroom wall for 20 minutes before sleep—not for dazzle, but for breathwork. Mastery lies not in choosing one method forever, but in understanding when each serves the deeper purpose of making space feel sacred, intentional, and alive.


 浙公网安备
33010002000092号
浙公网安备
33010002000092号 浙B2-20120091-4
Comments
No comments yet. Why don't you start the discussion?