
If you've ever taken a sip from your Stanley tumbler only to feel cold liquid trickling down your hand, you're not alone. Despite their reputation for durability and insulation, some users report their Stanley cups leaking from the top—especially around the lid seal or straw opening. This issue can be frustrating, especially when you're relying on your cup during commutes, workouts, or outdoor adventures. The good news? Most leaks are preventable or fixable with simple troubleshooting and maintenance.
This guide dives into the common causes of top leakage in Stanley cups, provides step-by-step fixes, and shares expert-backed tips to keep your drink contained where it belongs—inside the cup.
Why Does My Stanley Cup Leak from the Top?
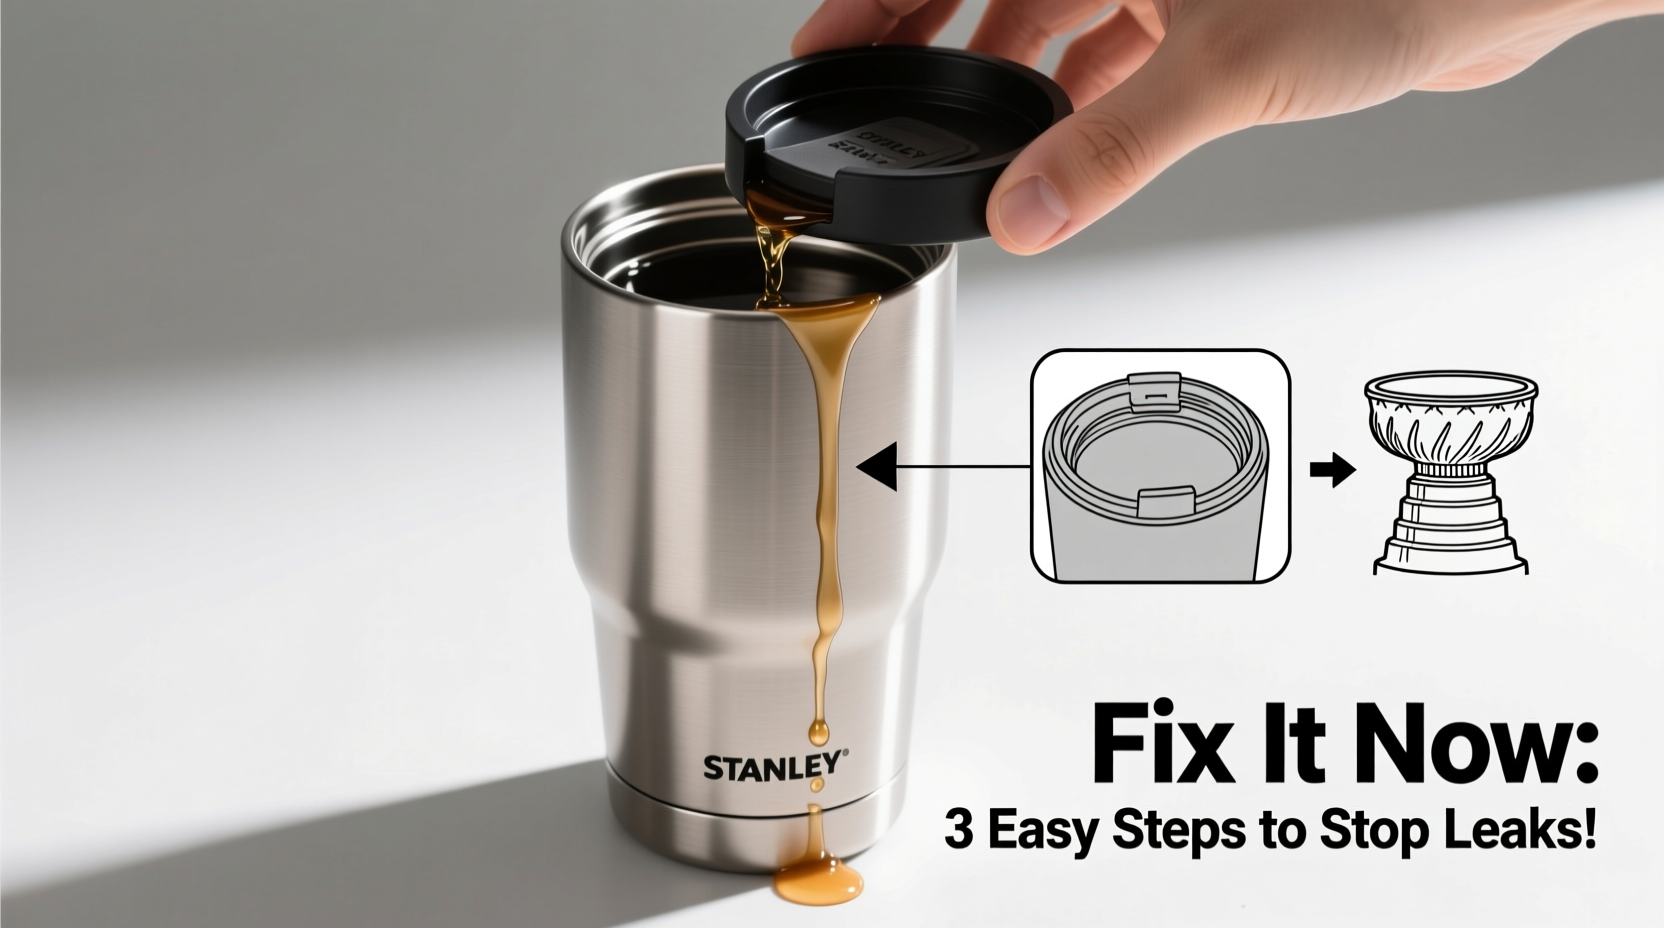
Leakage from the top of a Stanley cup typically stems from issues related to the lid assembly, seal integrity, or user handling. While the vacuum-insulated body rarely fails, the lid is the most vulnerable component due to frequent opening, closing, and cleaning.
Common culprits include:
- Damaged or misaligned silicone gasket – The small rubber ring inside the lid creates the primary seal. If it's cracked, warped, or not seated properly, liquid escapes easily.
- Loose lid closure – Not tightening the lid fully or uneven threading can leave gaps.
- Overfilling past the max line – Thermal expansion and pressure buildup can force liquid out when the cup heats up or is shaken.
- Worn or defective straw cover – On models with flip lids and straws, the silicone flap over the drinking hole may degrade over time.
- Improper cleaning methods – Harsh scrubbing or dishwasher use (on non-dishwasher-safe parts) can distort seals.
“Most ‘leaky’ tumblers aren’t faulty—they’re just improperly maintained. A clean, well-fitted seal stops 95% of top leaks.” — Jordan Lee, Product Engineer at Outdoor Gear Lab
Step-by-Step Guide to Fix a Leaking Stanley Cup
Follow this detailed process to diagnose and resolve the source of your leak. Each step targets a specific potential failure point.
- Disassemble the Lid Completely
Remove the lid from the tumbler. Unscrew or pop apart all components, including the outer lid shell, inner gasket, straw mechanism (if applicable), and any snap-on covers. Refer to your model’s manual if unsure about disassembly. - Inspect the Silicone Gasket
Locate the thin rubber ring (usually black or gray) inside the lid. Check for cracks, warping, or missing sections. Run your finger along its edge—it should be smooth and continuous. If damaged, replacement is necessary. - Clean All Parts Thoroughly
Use a soft brush (an old toothbrush works well) and mild dish soap to scrub every crevice. Pay special attention to grooves where the gasket sits and around the straw opening. Residue buildup can prevent proper sealing. - Rinse and Dry Completely
Rinse all components under lukewarm water. Allow them to air dry fully before reassembling. Moisture trapped under the gasket can mimic a leak. - Reinstall the Gasket Correctly
Ensure the silicone ring is seated evenly in its groove. It should sit flush without twisting or bulging. Press gently around the entire circumference to confirm it’s locked in place. - Reassemble the Lid
Reattach all parts in the correct order. For push-button lids, make sure the slider mechanism moves freely and closes tightly. For twist lids, align threads properly before tightening. - Perform a Leak Test
Fill the tumbler with water (not above the max fill line), secure the lid, and turn it upside down over the sink. Wait 30 seconds. If no water escapes, the fix worked. If it still leaks, repeat inspection focusing on alignment and gasket condition.
Do’s and Don’ts for Preventing Future Leaks
Maintaining your Stanley cup properly prevents recurring leaks and extends its lifespan. Use this reference table to optimize your care routine.
| Do’s | Don’ts |
|---|---|
| Hand wash the lid with a soft brush | Use abrasive sponges or steel wool |
| Tighten the lid firmly until it clicks or seals | Force-thread the lid if it feels stuck |
| Store with the lid off to prevent odor buildup | Leave liquids inside for more than 24 hours |
| Replace worn gaskets every 6–12 months | Use the cup for carbonated drinks unless specified as safe |
| Check seal alignment after each wash | Dishwasher-clean non-dishwasher-safe lids |
Real-World Example: How Sarah Fixed Her Daily Commute Spills
Sarah, a nurse from Portland, relied on her 40-oz Stanley Quencher to stay hydrated during 12-hour shifts. After three months, she noticed cold coffee seeping through the lid onto her car console every morning. Frustrated, she almost replaced the cup—until she found a YouTube tutorial demonstrating gasket reseating.
She disassembled the lid, discovered the silicone ring had shifted near the straw port, cleaned both pieces, and reinstalled the seal correctly. After drying and reassembling, she tested it with water. No leaks. Six weeks later, her cup remains spill-free, even when tossed into her bag between rounds.
Her takeaway: “I was washing it weekly in the dishwasher. That probably warped the seal. Now I hand-wash it, and I check the gasket monthly.”
When to Replace Parts or the Entire Cup
Sometimes, fixes don’t last. Knowing when to replace components—or the whole tumbler—saves time and mess.
Replace the gasket if it shows visible cracks, permanent deformation, or fails to create a seal after multiple cleaning attempts. Stanley sells official replacement gaskets for $3–$6 depending on model.
Replace the lid if internal mechanisms (like push-button levers or rotating covers) are broken, or if threading is stripped. A new lid costs $15–$25 and often restores full function.
Replace the entire cup only if the vacuum seal is compromised (evidenced by condensation outside the body or rapid temperature loss), or if the base is dented. These structural issues cannot be repaired.
Before purchasing replacements, verify compatibility using your cup’s model number—typically printed near the bottom. For example, the H2.0 FlowState Tumbler uses a different lid than the Quencher H2.0 Flip Straw Lid model.
FAQ: Common Questions About Stanley Cup Leaks
Can I use my Stanley cup for hot liquids if it’s leaking?
Only if the leak is resolved. A compromised seal with hot liquids increases burn risk. Fix the issue first. Once sealed, Stanley cups are designed for both hot and cold beverages safely.
Are all Stanley lids interchangeable?
No. Stanley designs lids specifically for each product line. While some older models share similarities, newer innovations like the FlowState lid are not compatible across all tumblers. Always match the lid to your exact model.
How often should I replace the silicone gasket?
Every 6 to 12 months with regular use. Frequent exposure to heat, detergents, and physical stress degrades elasticity over time. Inspect it monthly for early signs of wear.
Conclusion: Stop the Spills for Good
A leaking Stanley cup doesn’t mean the end of its life. In most cases, the problem lies in simple maintenance oversights—a misaligned gasket, improper cleaning, or loose assembly. With careful inspection, proper reassembly, and consistent care, you can eliminate top leaks and continue enjoying reliable performance from your favorite tumbler.
The key is proactive maintenance: clean regularly, inspect seals, and replace worn parts before they fail. Treat your Stanley cup not just as a container, but as a reusable system that depends on each component working in harmony.


 浙公网安备
33010002000092号
浙公网安备
33010002000092号 浙B2-20120091-4
Comments
No comments yet. Why don't you start the discussion?