
Transforming a simple wristlet into a chic, functional accessory doesn’t require professional tailoring or expensive modifications. One of the most effective ways to elevate both style and utility is by attaching a decorative chain. Whether you’re customizing a clutch, revamping an old wristlet, or crafting a new piece from scratch, adding a chain strap introduces versatility—allowing it to be worn on the wrist, draped over the shoulder, or carried as a crossbody. This guide walks you through the entire process with precision, offering practical advice, tools needed, and design considerations that ensure a polished result.
Why Add a Chain to a Wristlet?
A wristlet is compact and convenient, ideal for nights out or minimalist days. However, its functionality can feel limited when hands-free carrying isn't possible. By integrating a detachable or permanent chain, you gain multiple wearing options without sacrificing elegance. Chains add visual interest, complement metallic accents in outfits, and bridge the gap between casual and formal aesthetics.
Fashion designers have long used chains to enhance handbags—from Chanel’s iconic quilted bags to modern micro-bags with gold-link straps. Replicating this detail at home allows personalization while keeping costs low and creativity high.
“Hardware details like chains are small changes that deliver maximum impact. They redefine how a bag moves with the body and interacts with an outfit.” — Lila Monroe, Accessory Designer & Educator
Tools and Materials You’ll Need
Before beginning, gather all necessary supplies. Having everything ready ensures a smooth workflow and prevents interruptions mid-project.
| Item | Purpose | Recommended Type |
|---|---|---|
| Bag chain | Main strap component | Stainless steel or brass; 20–24 inches total length |
| Spring rings or lobster clasps (x2) | Secure chain ends to wristlet | Size #3 or #4 for lightweight bags |
| Jump rings (x2) | Connect chain to attachment points | 6mm diameter, closed type preferred |
| Chain nose pliers or flat-nose pliers | Open and close jump rings safely | Non-slip grip recommended |
| Leather punch or awl (if no existing holes) | Create anchor points on leather/fabric | Rotary hole punch for clean edges |
| D-rings or O-rings (optional) | Reinforce attachment zones | Brass or nickel-plated, 12–15mm |
| Ruler or measuring tape | Ensure even chain length | Metal ruler for accuracy |
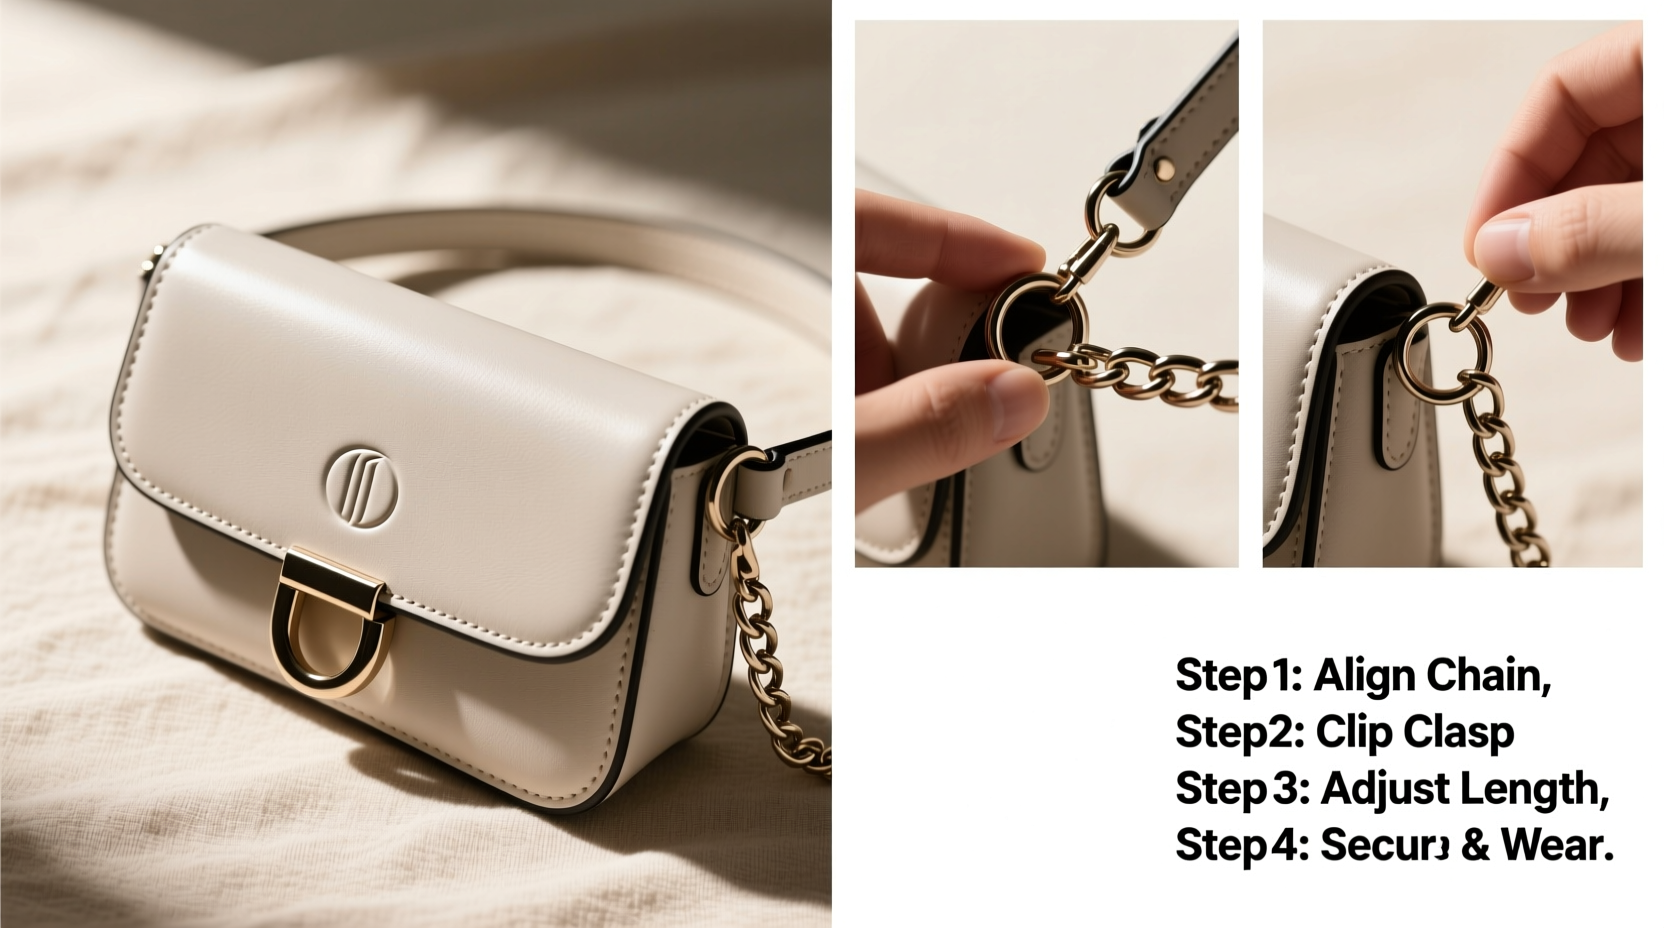
Step-by-Step Guide to Attaching the Chain
- Evaluate the Wristlet’s Structure
Inspect where the chain will attach. Most wristlets have built-in loops, D-rings, or reinforced fabric tabs. If none exist, plan where to add them—typically near the zipper ends or corners of the exterior. - Measure and Cut the Chain (If Needed)
Lay the chain flat and measure your desired length. For wrist-to-shoulder wear, aim for 20–22 inches total. Use a jeweler’s saw or heavy-duty wire cutters to slice through a link. File any sharp edges afterward. - Attach Spring Rings to Chain Ends
Open a jump ring using pliers by twisting sideways (do not pull apart). Slide one end of the chain and a spring ring onto the jump ring. Close securely. Repeat on the opposite side. - Reinforce Attachment Points (If Necessary)
If your wristlet lacks strong anchor points, install D-rings. Punch two small holes on either side of the zipper closure. Thread each D-ring through the holes and secure with rivets or stitching. This distributes weight and prevents tearing. - Connect the Chain to the Wristlet
Hook each spring ring to the D-ring, loop, or fabric tab on the wristlet. Ensure both sides are level and the chain hangs evenly. Close the clasps to confirm stability. - Test Functionality and Comfort
Wear the wristlet in different ways—on the wrist, over the shoulder, tucked under the arm. Check that the chain doesn’t snag fabric and that the weight feels balanced. Adjust length if needed.
Design Considerations for Maximum Style Impact
The right chain can make or break the aesthetic. Consider these factors when selecting hardware:
- Finish: Match the chain color to other metal elements (zippers, studs, logos). Gold-tone pairs well with warm palettes; silver suits cool tones and minimalist designs.
- Link Style: Curb, Figaro, or ball chains offer different textures. Thinner chains (2–3mm) suit delicate clutches; chunkier links work for structured mini-bags.
- Weight: Heavy chains may overwhelm lightweight materials. Balance form and function—especially if the wristlet carries keys or cards.
- Detachable Option: Use larger lobster clasps to allow removal. This lets you switch between a classic wrist carry and a glamorous chain look depending on the occasion.
“Versatility is the future of accessories. The same bag should transition from daytime errands to evening drinks seamlessly.” — Marcus Tran, Fashion Stylist
Mini Case Study: Upgrading a Minimalist Clutch
Sophie, a graphic designer in Portland, owned a sleek black vegan leather wristlet she loved but rarely used because it was awkward to carry during gallery openings. She purchased a 22-inch gunmetal curb chain with spring rings and spent 20 minutes attaching it using jump rings and her existing D-rings. Afterward, she could drape it across her body or fold it into wrist mode when greeting clients. “It went from being just a wallet to my go-to event bag,” she said. The upgrade cost less than $15 and extended the accessory’s use across seasons.
Common Mistakes to Avoid
| Do | Don’t |
|---|---|
| Use closed jump rings for durability | Leave jump rings open or improperly twisted |
| Match chain weight to bag structure | Add heavy chains to flimsy fabric without reinforcement |
| Check clasp security regularly | Assume once attached, it’s maintenance-free |
| Keep extra jump rings and clasps for repairs | Discard packaging and extras immediately |
FAQ
Can I attach a chain to a fabric-only wristlet without damaging it?
Yes, but reinforcement is key. Use double-layered stitching around attachment points or install metal grommets. Avoid relying solely on thin fabric, which can tear under tension.
How do I clean a chain without removing it?
Use a soft cloth dampened with mild soapy water. Gently wipe each link, then dry thoroughly. For tarnished metal, apply a jewelry polishing cloth. Avoid submerging the wristlet, especially if lined with suede or paperboard.
Is it possible to make the chain adjustable?
Absolutely. Install multiple D-rings along the side of the wristlet or use a sliding knot mechanism with a leather insert. Alternatively, choose a chain with a built-in extender loop.
Final Checklist Before Wearing
- ✅ Are both chain ends securely fastened?
- Double-check jump rings and clasps.
- ✅ Does the chain hang evenly?
- Adjust length if one side sags.
- ✅ Can the wristlet still close properly?
- Ensure the chain doesn’t interfere with the zipper or flap.
- ✅ Is the overall weight comfortable?
- Try wearing it for 10 minutes to assess balance.
- ✅ Have you tested the clasp strength?
- Gently tug to simulate accidental pulls.
Conclusion
Attaching a chain to a wristlet is more than a DIY fix—it’s a deliberate act of personal styling. With minimal tools and attention to detail, you can transform a basic accessory into a statement piece that reflects your taste and meets real-world needs. Whether you're enhancing a gift, repairing a favorite bag, or experimenting with fashion hacks, this upgrade proves that elegance often lies in the smallest details.


 浙公网安备
33010002000092号
浙公网安备
33010002000092号 浙B2-20120091-4
Comments
No comments yet. Why don't you start the discussion?