
Replacing or enhancing the audio in a video is a common need for content creators, educators, marketers, and even casual users. Whether you're removing background noise, adding voiceovers, syncing music, or dubbing dialogue, changing audio can dramatically improve your video’s impact. The good news: it doesn’t require expensive software or advanced skills. With the right tools and approach, anyone can swap or edit audio efficiently. This guide walks you through every stage—from choosing software to exporting your final product—so you can achieve clean, professional results without frustration.
Why Change Video Audio?
There are many reasons to replace or modify a video’s original sound. Poor recording quality, unwanted background noise, or mismatched dialogue often make audio replacement necessary. For example, vloggers may re-record narration for clarity, while filmmakers might dub scenes in different languages. Marketers use custom music to match brand tone, and educators replace muffled lecture audio with crisp narration. In all cases, high-quality audio increases viewer engagement and professionalism.
“Audio is responsible for up to 50% of the viewing experience. A well-mixed soundtrack can elevate even modest visuals.” — Daniel Park, Audio Post-Production Specialist
Essential Tools and Software Options
You don’t need a full studio setup to change video audio. Modern tools range from beginner-friendly apps to advanced digital audio workstations (DAWs). Here's a breakdown of popular options:
| Software | Skill Level | Best For | Platform |
|---|---|---|---|
| iMovie | Beginner | Quick edits, Mac users | macOS, iOS |
| Clipchamp (Free) | Beginner | Online editing with templates | Web, Windows |
| DaVinci Resolve | Intermediate | Professional-grade editing & audio mixing | Windows, macOS, Linux |
| Adobe Premiere Pro | Intermediate/Advanced | Precise timeline control, industry standard | Windows, macOS |
| Shotcut | Beginner/Intermediate | Open-source, no cost, cross-platform | All platforms |
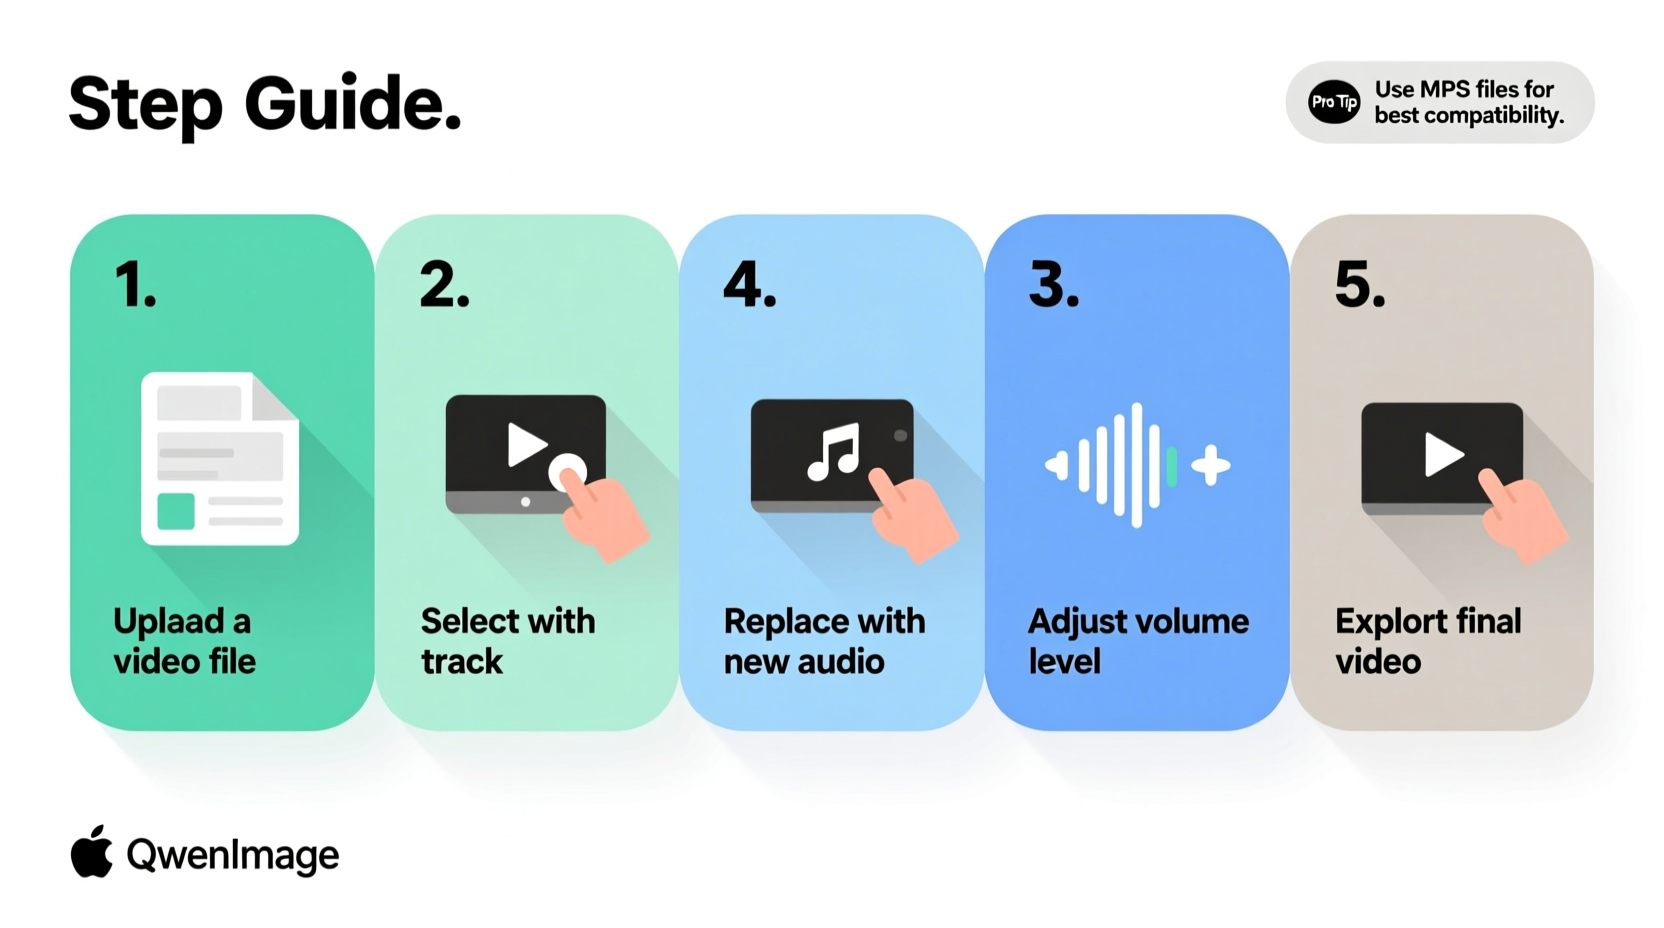
Step-by-Step Guide to Changing Video Audio
Follow this proven workflow to seamlessly replace or enhance your video’s audio. These steps apply across most editing platforms, with minor interface differences.
- Import Your Video File
Select your video and import it into your chosen editing software. Most programs support MP4, MOV, AVI, and similar formats. - Separate Audio from Video
Right-click the video clip on the timeline and select “Detach Audio” or “Unlink.” This creates two separate tracks: one for video, one for original sound. - Delete or Mute Original Audio
Select the detached audio track and press Delete or mute it. Be cautious not to delete the video track accidentally. - Prepare Replacement Audio
Have your new audio file ready—this could be a voiceover, music track, or ambient sound. Ensure it’s in a compatible format like WAV or MP3. - Add New Audio to Timeline
Drag and drop the replacement audio onto the audio timeline. Align it with the video as needed. Use zoom controls for frame-level precision. - Adjust Timing and Sync
If lip-sync matters (e.g., interviews), shift the audio left or right until speech matches mouth movements. Play back slowly to verify alignment. - Balance Volume Levels
Use volume sliders or keyframes to avoid sudden loudness. Aim for consistent levels—typically between -6 dB and -3 dB peak. - Add Fades and Transitions
Apply fade-in at the start and fade-out at the end to prevent jarring cuts. Crossfades help when layering multiple audio clips. - Export Final Video
Go to Export > Media, choose resolution (1080p recommended), codec (H.264), and ensure audio is included. Test playback before sharing.
Common Mistakes and How to Avoid Them
- Ignoring audio format compatibility: Some editors struggle with FLAC or AIFF files. Convert to WAV or MP3 first using free tools like Audacity or Online-Audio-Converter.com.
- Mismatched aspect ratios or frame rates: While not directly audio-related, mismatched settings can cause sync drift during export.
- Overlooking background noise: Even new voiceovers can have hums or room echo. Use noise reduction filters available in most software.
- Skipping headphones during editing: Computer speakers often mask timing issues. Always monitor audio with quality headphones.
Mini Case Study: Upgrading a YouTube Tutorial
Alex, a DIY woodworking YouTuber, filmed a workshop session outdoors. While the visuals were clear, wind noise drowned out his explanations. Instead of reshooting, he used DaVinci Resolve to remove the original audio and recorded a clean voiceover in a quiet room using his smartphone. He imported the new audio, synced it manually, added soft background music at 20% volume, and applied a low-pass filter to reduce residual hiss. After exporting, viewer comments noted the improved clarity, and watch time increased by 35% compared to previous videos.
This shows that even basic audio fixes can significantly boost audience retention and satisfaction.
Checklist: Pre-Export Audio Review
Before publishing, run through this checklist to ensure professional quality:
- ✅ Original audio successfully removed or muted
- ✅ Replacement audio properly aligned with video action
- ✅ No abrupt volume spikes or silent gaps
- ✅ Fade transitions applied at beginning and end
- ✅ Background music doesn’t overpower speech
- ✅ Final export includes both video and audio streams
- ✅ File tested on mobile and desktop devices
Frequently Asked Questions
Can I change audio on a phone or tablet?
Yes. Apps like CapCut (iOS/Android), iMovie (Apple), and VN Video Editor offer intuitive interfaces for detaching and replacing audio. They’re ideal for social media content and quick edits.
How do I record high-quality voiceover at home?
Use a quiet room with minimal echo. Speak clearly into a smartphone or USB microphone, keeping it 6–8 inches from your mouth. Record in WAV format if possible, and avoid clothing rustle or plosive sounds (like \"p\" bursts) by angling the mic slightly off-axis.
Is it legal to replace audio with copyrighted music?
No. Using copyrighted music without permission violates terms of service on platforms like YouTube and can lead to takedowns or monetization blocks. Use royalty-free libraries such as YouTube Audio Library, Free Music Archive, or Epidemic Sound with proper licensing.
Conclusion: Take Control of Your Video’s Sound
Changing the audio of a video is no longer a technical hurdle reserved for experts. With accessible software and a methodical approach, you can transform poorly recorded sound into a polished, engaging experience. The key is preparation—know your tools, organize your files, and always preview before exporting. Whether you're creating tutorials, marketing clips, or personal memories, great audio ensures your message lands clearly and professionally.


 浙公网安备
33010002000092号
浙公网安备
33010002000092号 浙B2-20120091-4
Comments
No comments yet. Why don't you start the discussion?