
An equilateral triangle—where all three sides are equal and each angle measures exactly 60 degrees—is one of the most fundamental shapes in geometry. Its symmetry and uniformity make it essential in design, architecture, engineering, and mathematical proofs. Constructing one accurately doesn’t require advanced tools or calculations. With just a compass and a straightedge, you can create a perfect equilateral triangle through classical geometric construction. This method has been used for centuries and remains a cornerstone of Euclidean geometry.
Whether you're a student learning geometric principles, a hobbyist exploring drafting techniques, or a professional needing precise forms, mastering this construction builds confidence and accuracy. The process is elegant in its simplicity and relies solely on logical steps grounded in geometric truth.
Gathering the Right Tools
To begin, ensure you have the proper instruments. Unlike modern drawing methods that depend on rulers with measurements, traditional geometric construction emphasizes precision without numerical reliance. Instead, use tools that allow clean arcs and straight lines:
- Compass: A reliable drawing compass with a locking mechanism to maintain radius stability.
- Straightedge: A ruler without measurement markings (or simply use the edge to draw lines, ignoring numbers).
- Pencil: Sharpened for fine lines; consider using a mechanical pencil for consistency.
- Eraser: For cleaning up auxiliary construction lines after completion.
- Protractor (optional): Only for verification—not used in the actual construction.
The Step-by-Step Construction Process
The method follows Proposition 1 from Book I of Euclid’s Elements, one of the oldest known geometric proofs. It demonstrates how two circles of equal radius intersect to form the vertices of an equilateral triangle. Follow these steps carefully:
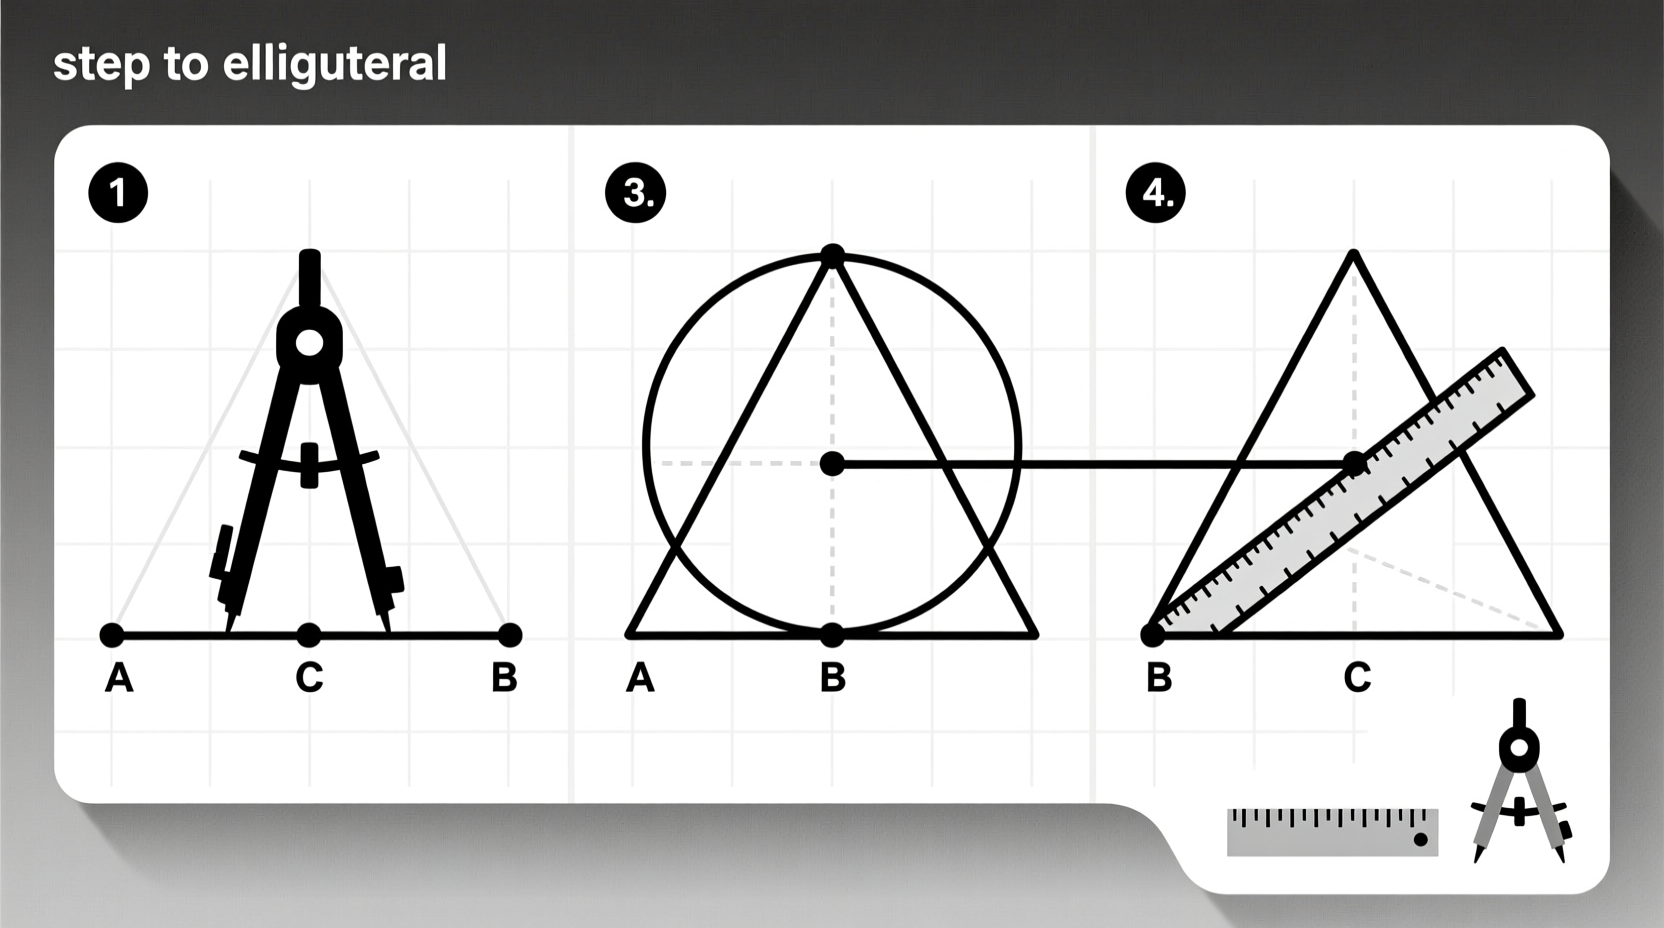
- Draw the base segment AB: Use your straightedge to draw a straight line segment of any desired length. Label the endpoints A and B. This will be one side of your triangle.
- Set the compass to length AB: Open your compass so the point is on A and the pencil tip is precisely on B. Lock the compass if possible to prevent accidental adjustment.
- Draw an arc centered at A: Keeping the same radius, place the compass point on A and draw an arc above the segment AB. Aim to sweep at least 60 degrees upward.
- Draw an arc centered at B: Without changing the compass width, move the point to B and draw a second arc that intersects the first. Label the intersection point C.
- Connect C to A and B: Using the straightedge, draw line segments from C to A and from C to B. These complete the triangle ABC.
- Clean up auxiliary lines: Lightly erase the arcs unless you’re keeping them for demonstration purposes.
You now have triangle ABC, where AB = BC = CA, and each internal angle is 60°—a true equilateral triangle constructed with geometric precision.
Why This Method Works: The Geometric Logic
The validity of this construction lies in the properties of circles and congruent triangles. Since both arcs were drawn with radius AB, the distances AC and BC are also equal to AB. Therefore:
- AC = AB (radius of circle centered at A)
- BC = AB (radius of circle centered at B)
- Hence, AB = BC = CA → all sides are equal
By definition, a triangle with three equal sides is equilateral. In Euclidean geometry, equilateral triangles are also equiangular—each angle must measure 60°. No measuring tools required; the logic ensures perfection.
“Euclid’s construction of the equilateral triangle is not merely a drawing—it is a proof made visible.” — Dr. Alan Pierce, Professor of Mathematics Education
Avoiding Common Mistakes
Even simple constructions can go wrong if attention to detail is lacking. Below are frequent errors and how to avoid them:
| Mistake | Consequence | How to Prevent |
|---|---|---|
| Changing compass width between arcs | Intersection point won’t form correct vertex | Double-check radius before drawing second arc |
| Loose compass hinge | Radius shrinks during arc drawing | Use a high-quality compass with screw lock |
| Blunt pencil tip | Inaccurate center points and fuzzy intersections | Sharpen pencil frequently |
| Slanting the compass | Uneven arc curvature | Keep compass perpendicular to paper |
| Drawing arcs too small | No intersection or unclear meeting point | Sweep arcs well beyond expected intersection |
Practical Applications and Real-World Example
This construction isn’t just theoretical. Architects and designers often use equilateral triangles as building blocks for tessellations, trusses, and decorative patterns. Consider the case of Maria Tan, a landscape designer working on a hexagonal garden layout.
Maria needed to create six equilateral triangles radiating from a central point to form a symmetrical flower bed. She began by drawing a circle and dividing its circumference into six equal parts—each separated by 60°. To do this accurately without a protractor, she used the equilateral triangle construction repeatedly, stepping the compass around the circle using the chord length equal to the radius. Each chord became a side of a new triangle, forming a perfect hexagon composed of six equilateral triangles.
“Using Euclid’s method saved me time and ensured symmetry,” Maria explained. “I didn’t need software or measuring tapes—just my compass and focus.”
Verification and Quality Check
While the construction is mathematically sound, verifying your result reinforces understanding and improves skill. Here’s how to confirm your triangle is truly equilateral:
- Measure the sides: Use a ruler to check that AB, BC, and CA are identical (within acceptable tolerance).
- Check angles: Place a protractor at each vertex. Each should read 60°.
- Reconstruct with different starting lengths: Try the process again with a longer or shorter base to see consistent results.
If discrepancies appear, review your compass control and point accuracy. Mastery comes with repetition.
Frequently Asked Questions
Can I construct an equilateral triangle without a compass?
Not using classical geometric methods. The compass is essential for maintaining equal radii. However, with a ruler and protractor, you could draw a segment, measure 60° angles at each end, and extend the lines to meet. But this relies on measurement, not pure construction.
Does the size of the triangle affect the method?
No. The process works at any scale—whether drawing a triangle 2 cm per side or 2 meters. Just ensure your tools can handle the size (e.g., a large compass for big drawings).
Why is this construction important in education?
It introduces students to axiomatic reasoning, precision, and the power of deduction. It’s the foundation for more complex constructions like regular hexagons, inscribed polygons, and geometric proofs.
Essential Checklist for Success
Before you begin your next construction, run through this checklist:
- ☐ Compass is sharp and securely locked at correct radius
- ☐ Pencil is sharpened for fine lines
- ☐ Base segment AB is straight and clearly marked
- ☐ Arcs are drawn fully enough to guarantee intersection
- ☐ Point C is precisely where arcs cross—not estimated
- ☐ Final connections (AC and BC) are straight and clean
- ☐ Auxiliary lines are erased or faded for clarity
Conclusion: Mastering Precision Through Simplicity
Constructing an equilateral triangle with precision and ease is more than a classroom exercise—it’s a gateway to deeper geometric understanding. The elegance of this method lies in its self-contained logic: no measurements, no approximations, just pure spatial reasoning. By mastering this technique, you gain not only a practical skill but also insight into the foundations of geometry itself.
Take a moment today to try the construction yourself. Start with a blank sheet, follow each step mindfully, and appreciate how centuries-old knowledge still applies with flawless accuracy. Share your results, teach someone else, or build upon this triangle to create hexagons, stars, or tiling patterns. Geometry begins with a single point—and now, you know exactly where to start.


 浙公网安备
33010002000092号
浙公网安备
33010002000092号 浙B2-20120091-4
Comments
No comments yet. Why don't you start the discussion?