
Finding the perfect image online is only half the task—getting it printed clearly and accurately requires attention to detail. Whether you're printing a photo for a school project, framing a cherished memory, or preparing visual aids for a presentation, knowing how to properly download and print images from Google can save time and prevent frustration. This guide walks through the entire process with precision, offering practical advice, formatting tips, and real-world examples to ensure your printed results match your expectations.
Understanding Image Sources and Quality
Not all images found through Google are created equal. The search engine aggregates visuals from websites across the internet, meaning resolution, licensing, and file formats vary widely. Before attempting to print, assess the image’s suitability. A low-resolution picture may look fine on screen but appear pixelated when printed.
Images are measured in pixels per inch (PPI) or dots per inch (DPI). For clear prints, aim for at least 300 DPI at the desired print size. Enlarging a small image beyond its native resolution degrades quality significantly. Always check if the original image is available in higher resolution by visiting the source website or using Google’s “Tools” filter to sort by size.
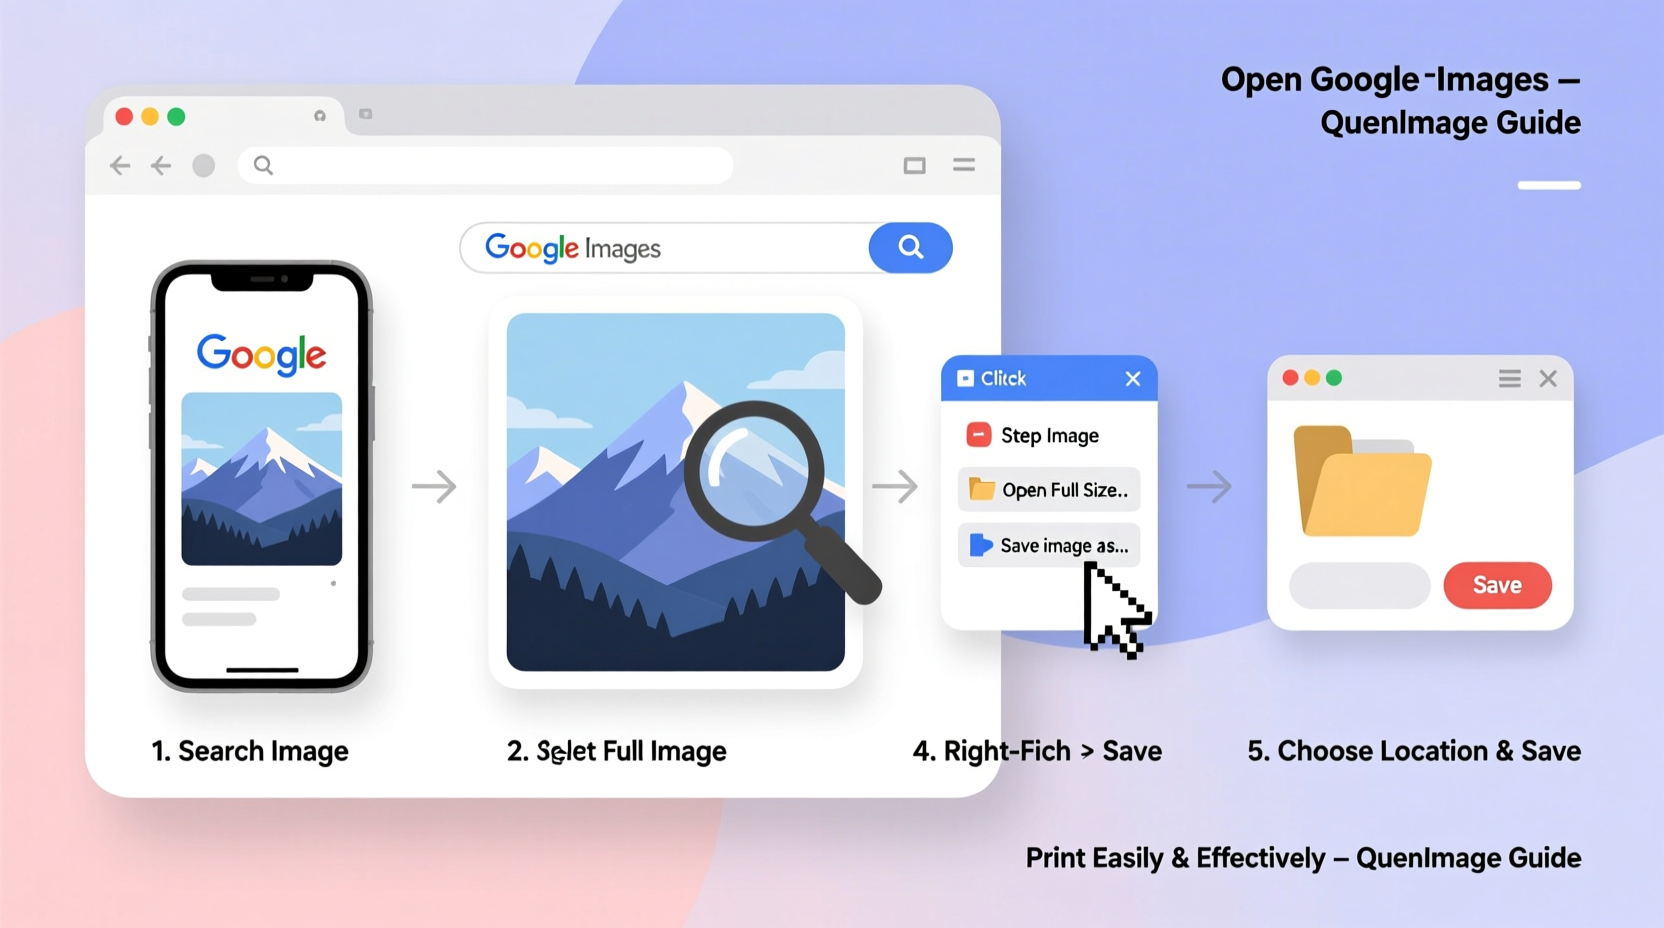
Step-by-Step Guide to Printing an Image from Google
Follow this detailed sequence to go from search result to physical print without errors or wasted materials.
- Search with intent: Enter specific keywords into Google Images (e.g., “golden retriever puppy high resolution”) to narrow results to usable images.
- Select the right image: Click on a thumbnail that appears sharp and well-lit. Avoid blurry or compressed-looking previews.
- Check image size: After clicking the image, use the “Tools” button beneath the search bar, then select “Size” → “Large” or “Larger than…” (e.g., 1920x1080).
- Open the full image: Click the image to expand it, then click “Visit page” to go to the source site. This avoids downloading watermarked or resized versions served by Google.
- Download correctly: Right-click the image on the source page and choose “Save image as…”. Save it to a known folder like “Downloads” or “Print Projects”.
- Verify file integrity: Open the saved file to confirm it loads properly and matches expectations in clarity and aspect ratio.
- Choose print settings: Open the image in a viewer (Photos app, Preview, or image editor), then go to File → Print. Select your printer, paper size (e.g., 8.5x11”), and layout (landscape/portrait).
- Adjust scaling: In the print dialog, set scaling to “Fit” or manually input 100% to maintain proportions. Avoid stretching unless necessary.
- Select paper type: Choose the correct media setting (glossy, matte, photo paper) in printer preferences for optimal ink absorption and finish.
- Print a test copy: Use plain paper first to verify alignment and size before using specialty paper.
Common Mistakes and How to Avoid Them
Even experienced users make avoidable errors when printing web images. Recognizing these pitfalls improves success rates and conserves resources.
| Mistake | Consequence | Solution |
|---|---|---|
| Printing directly from browser preview | Poor quality due to scaled-down version | Always download the full-resolution image from the source site |
| Ignoring aspect ratio | Image stretched or cropped unexpectedly | Use “Scale to Fit” or lock aspect ratio in print settings |
| Using low-DPI images | Blurry or pixelated output | Check resolution; minimum 300 DPI at print size |
| Skipping printer calibration | Color inaccuracies or misalignment | Run nozzle check and align print heads monthly |
Real Example: Printing a Family Photo Found Online
Sarah needed a replacement print of her grandmother’s portrait for a frame. She remembered seeing a similar photo online during genealogy research. Using Google Images, she searched “early 1900s woman portrait sepia high resolution.” She filtered by size (“Large”) and usage rights (“Creative Commons licenses”). One result linked to a historical archive with a downloadable TIFF file at 2400x3000 pixels—well above the threshold for an 8x10” print at 300 DPI.
She downloaded the file, opened it in Preview on her Mac, adjusted brightness slightly, and selected “Print.” She chose matte photo paper and set scaling to “Scale to Fit.” After a test print on regular paper confirmed positioning, she ran the final version. The result was crisp, true-to-tone, and fit perfectly in the vintage frame.
“Downloading from the source, not the search engine cache, is critical for preserving image fidelity.” — James Lin, Digital Archivist at National Media Preservation Center
Best Practices Checklist
Before hitting print, run through this checklist to ensure optimal results:
- ✅ Verified image is high resolution (ideally over 1500 pixels on the shortest side)
- ✅ Confirmed usage rights (not infringing copyright)
- ✅ Downloaded directly from source website, not Google’s cached version
- ✅ Saved file in original format (preferably JPEG, PNG, or TIFF)
- ✅ Selected appropriate paper type and printer settings
- ✅ Performed test print on standard paper
- ✅ Checked color accuracy and cropping preview
Frequently Asked Questions
Can I legally print any image I find on Google?
No. Most images are protected by copyright. Only print images labeled for reuse (via Google’s “Usage Rights” filter) or those in the public domain. For personal, non-commercial use, some flexibility exists under fair use, but redistribution or commercial printing requires permission.
Why does my printed image look blurry even if it looked sharp on screen?
Screens display images at 72–96 PPI, which masks low resolution. Printing typically requires 300 PPI for clarity. An image that looks fine at 800x600 pixels will appear fuzzy when printed at 4x6 inches because it lacks sufficient data. Always check pixel dimensions relative to print size.
How do I resize an image without losing quality?
Avoid enlarging beyond 10–15% of the original dimensions. Use image editing software like GIMP or Adobe Photoshop with “bicubic smoother” interpolation for minor upscaling. For significant enlargement, consider AI-based tools designed for super-resolution, though results vary.
Final Tips for Consistent Success
Consistency in printing begins with disciplined sourcing and preparation. Bookmark trusted repositories like Wikimedia Commons, Unsplash, or government archives for reliable, printable images. Maintain a dedicated folder for print projects, and label files with intended output size (e.g., “Portrait_8x10.jpg”). Regularly clean your printer nozzles and update drivers to prevent technical hiccups.
If printing frequently, invest in a color-calibrated monitor and high-quality pigment-based ink printers. These systems reproduce tones more faithfully, especially important for portraits or artwork.


 浙公网安备
33010002000092号
浙公网安备
33010002000092号 浙B2-20120091-4
Comments
No comments yet. Why don't you start the discussion?