
A hairball keychain—often made from soft, fuzzy synthetic fibers—is more than just a quirky accessory. For many, it’s a sentimental keepsake, a gift from a loved one, or a lucky charm carried daily. When the cord snaps, the clasp breaks, or the ball begins to unravel, it can feel like losing a small piece of personal history. The good news? Most damage can be repaired at home with minimal tools and no prior crafting experience. This guide walks you through every stage of restoring your hairball keychain to its former fluffiness, using accessible materials and time-tested techniques.
Understanding Common Types of Damage
Before beginning any repair, identify what part of the keychain is compromised. Hairball keychains typically fail in one of three ways:
- Cord breakage: The string or chain connecting the ball to the clasp snaps due to wear or tension.
- Clasp failure: The metal ring, lobster clasp, or split ring detaches or bends beyond function.
- Fiber deterioration: The outer layer of fibers becomes loose, matted, or torn, exposing the inner core.
Each issue requires a slightly different approach, but all are manageable with household items. The goal is not only to reattach parts but to reinforce weak points so the repair lasts.
Essential Tools and Materials
You don’t need a full craft kit to fix a hairball keychain. Most supplies can be found in a junk drawer or picked up inexpensively at a dollar store.
| Item | Purpose | Household Alternative |
|---|---|---|
| Needle-nose pliers | Opening/closing jump rings and clasps | Tweezers (for light tasks) |
| Strong thread or thin nylon cord | Reattaching the hairball to the clasp | Shoelace thread, fishing line |
| Hot glue gun or fabric glue | Securing internal knots and fiber bases | Super glue (use sparingly) |
| Small scissors | Trimming excess thread or fibers | Nail clippers |
| Replacement clasp or split ring | Replacing damaged hardware | Keyring from an old set |
Having these on hand ensures you can address multiple issues in one session. Work on a clean, flat surface with good lighting to avoid losing small parts.
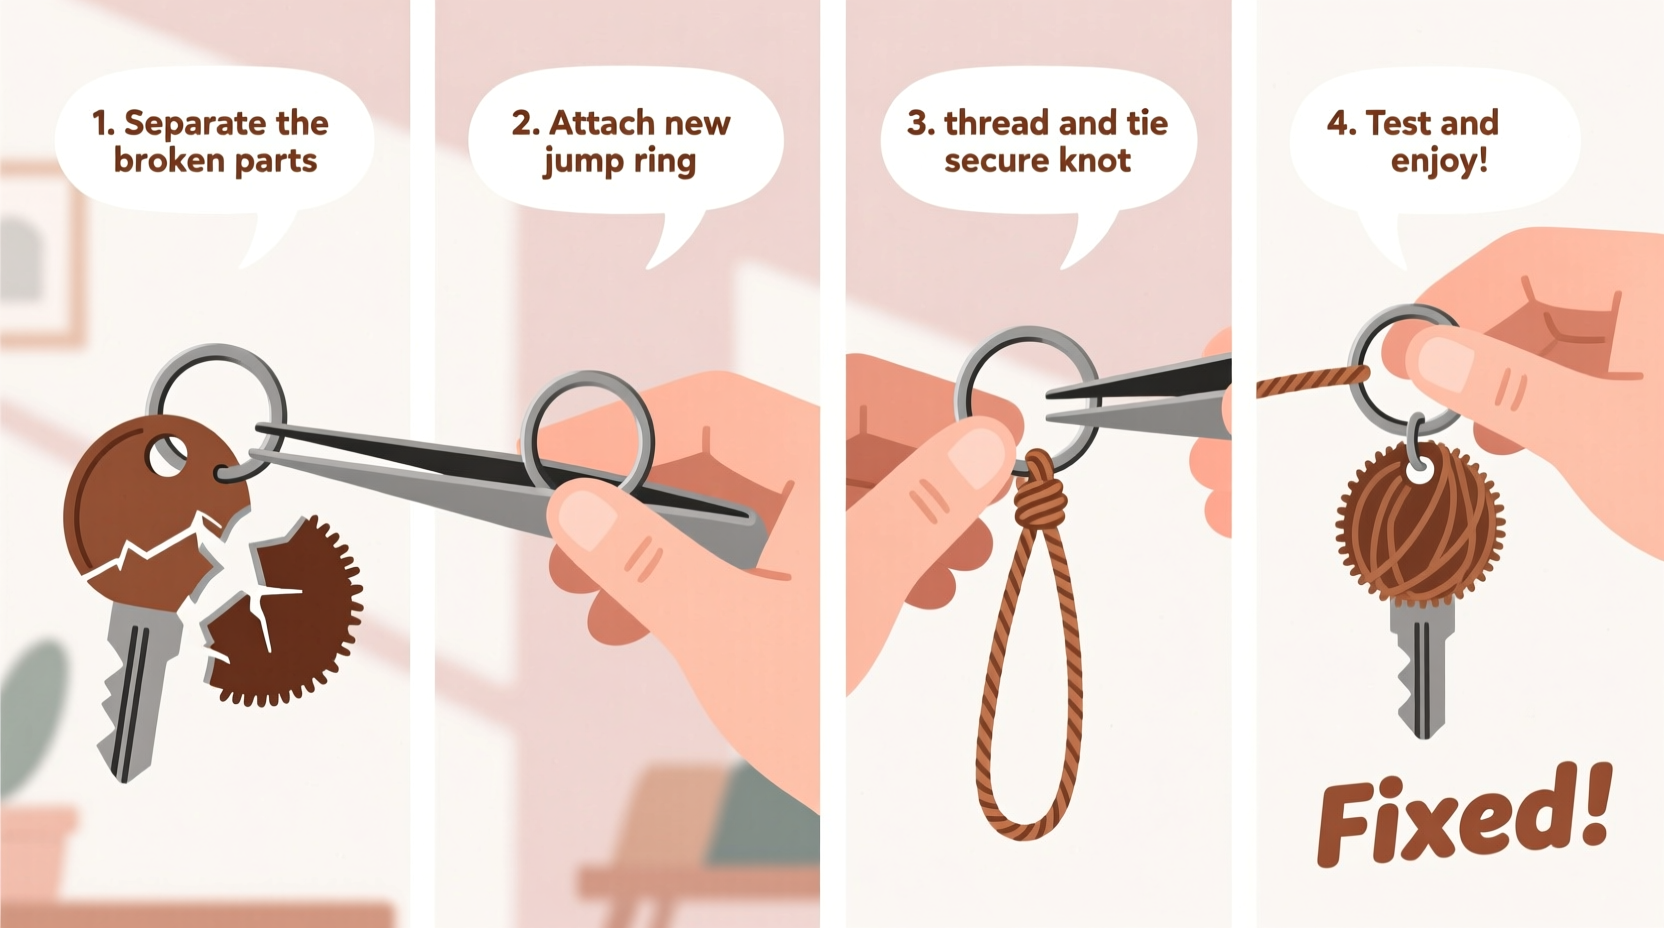
Step-by-Step Repair Process
Follow this sequence to restore both structural integrity and visual appeal.
- Disassemble Carefully: If the cord is partially attached, gently pull it free rather than cutting unless necessary. Preserve as much original material as possible.
- Inspect the Hairball Core: Look where the cord emerged from the ball. Is there a knot inside? Are fibers pulling away from a central hub? This determines whether you’re rethreading or rebuilding.
- Prepare the New Cord: Cut a 12-inch length of nylon cord or heavy-duty thread. This gives ample room for tying secure knots and threading through clasps.
- Thread and Knot: Use a needle if needed to guide the cord into the base of the hairball. Push it deep until you feel resistance—this is usually a hidden plastic disc or dense fiber core. Tie a surgeon’s knot inside to anchor it firmly.
- Reinforce with Glue: Apply a small drop of fabric glue or hot glue around the entry point. This prevents the knot from pulling through under stress. Let dry completely (5–10 minutes).
- Attach the Clasp: Loop the free end of the cord through a new split ring or lobster clasp. Burn the tip lightly with a match (if synthetic) to prevent fraying, then tie another knot. Add a dab of glue here too for durability.
- Neaten the Appearance: Gently fluff the fibers around the repair site. If needed, use a fine-tooth comb to blend the area and hide any thinning caused by removal.
This method works whether the original attachment was glued, knotted, or sewn. The dual-knot system with adhesive reinforcement mimics factory construction while improving longevity.
“Many handmade accessories fail at stress points—like where cord meets ornament. Reinforcing both ends of the connection doubles the lifespan.” — Dana Ruiz, Textile Restoration Specialist
Dealing With Fiber Damage
If the hairball itself is shedding or has bald spots, additional steps are required.
First, assess whether the damage is superficial or structural. Surface fuzz can often be restored; exposed cores may need patching.
To patch loose fibers:
- Use fabric glue to re-adhere lifted patches to the inner core.
- For holes, cut a small circle from matching-colored felt and glue it underneath the tear.
- Apply loose fibers over the patch and seal lightly with diluted white glue sprayed via mist bottle.
Let the piece sit undisturbed for at least two hours. Avoid handling until fully cured.
Mini Case Study: Reviving a Sentimental Gift
Sophie, a college student in Portland, received a pink hairball keychain from her sister before moving across the country. After six months of daily use, the cord snapped during a rainy commute. Rather than replacing it—a version was no longer sold—she followed a version of this repair process.
Using a spare paracord scrap and a lobster clasp from an old bracelet, she reattached the ball. She added a second knot and used clear nail polish as a temporary glue substitute. Two months later, the keychain remains intact and continues to serve as a comfort object during stressful exams.
Her success underscores that even makeshift solutions, when applied thoughtfully, can yield lasting results.
Do’s and Don’ts of Hairball Keychain Maintenance
| Action | Recommendation |
|---|---|
| Do handle gently | Yes – avoid tugging or snagging on rough surfaces |
| Do store flat or hanging | Yes – prevents flattening and fiber compression |
| Don’t expose to moisture | No – dampness causes mold and fiber breakdown |
| Don’t machine wash | No – agitation destroys delicate structures |
| Do inspect monthly | Yes – catch problems early |
FAQ
Can I wash my hairball keychain?
Spot cleaning only. Use a cotton swab dampened with mild soap and water to wipe dirt. Never submerge it. Allow to air-dry away from direct heat.
What if I can’t find the original entry point?
Look for subtle dimples or denser fiber clusters. You can carefully insert a pin to test firmness. Avoid drilling blindly—this risks splitting the core.
Is super glue safe to use?
In small amounts, yes—but it can stiffen fibers and yellow over time. Fabric glue or hot glue is preferable for flexibility and appearance.
Final Checklist Before Use
- Confirm all knots are tight and sealed with glue.
- Ensure the clasp opens and closes smoothly.
- Check that no sharp thread ends could snag clothing.
- Verify the hairball hangs evenly without tilting.
- Test pull strength gently—simulate normal use.
Conclusion
Repairing a broken hairball keychain isn’t just about fixing an object—it’s about preserving meaning, memory, and personal style. With patience and basic tools, what seems fragile becomes resilient. These small acts of care reflect a larger mindset: valuing what we own and extending its life through mindful maintenance.


 浙公网安备
33010002000092号
浙公网安备
33010002000092号 浙B2-20120091-4
Comments
No comments yet. Why don't you start the discussion?