
Baseball glove keychains are more than just accessories—they're keepsakes, gifts, and symbols of passion for the game. Whether handmade from genuine leather or crafted as a miniature replica, these delicate items require careful handling when adding functional elements like keyrings. Attaching a keyring improperly can lead to torn stitching, warped leather, or premature wear. This guide walks you through the correct method to secure a keyring safely and durably, preserving both the integrity and aesthetic of your baseball glove charm.
Selecting the Right Keyring and Attachment Point
The first consideration is choosing the appropriate keyring. Not all keyrings are created equal—some are too heavy, too large, or have sharp edges that can damage soft leather over time. Opt for lightweight, nickel-plated or stainless steel split rings or small lobster-claw clasps, which offer strength without excess bulk.
Equally important is identifying the ideal attachment point on the glove. Avoid threading the ring through stitched seams, finger loops, or thin leather flaps, as these areas are under structural stress and prone to tearing. Instead, look for:
- A reinforced metal grommet (if present)
- The base of the wrist strap, where layers are doubled
- A dedicated loop or bail specifically designed for hanging
Tools and Materials Checklist
Before beginning, gather the necessary tools to ensure a clean, professional result. Using the right equipment reduces the risk of accidental punctures or misalignment.
- Lightweight keyring (split ring or lobster clasp, 15–20mm diameter)
- Fine-gauge awl or needle (for piercing leather if needed)
- Leather conditioner (to prep and protect the surface)
- Small flat-nose pliers (for opening/closing jump rings)
- Brass or nickel jump ring (3–5mm inner diameter, optional)
- Leather-safe adhesive (such as Barge All-Purpose Cement)
- Cotton swabs and lint-free cloth
“Attaching hardware to leather goods isn’t just about function—it’s about longevity. A poorly placed keyring can unravel months of craftsmanship in weeks.” — Daniel Reyes, Artisan Leatherworker & Custom Keychain Designer
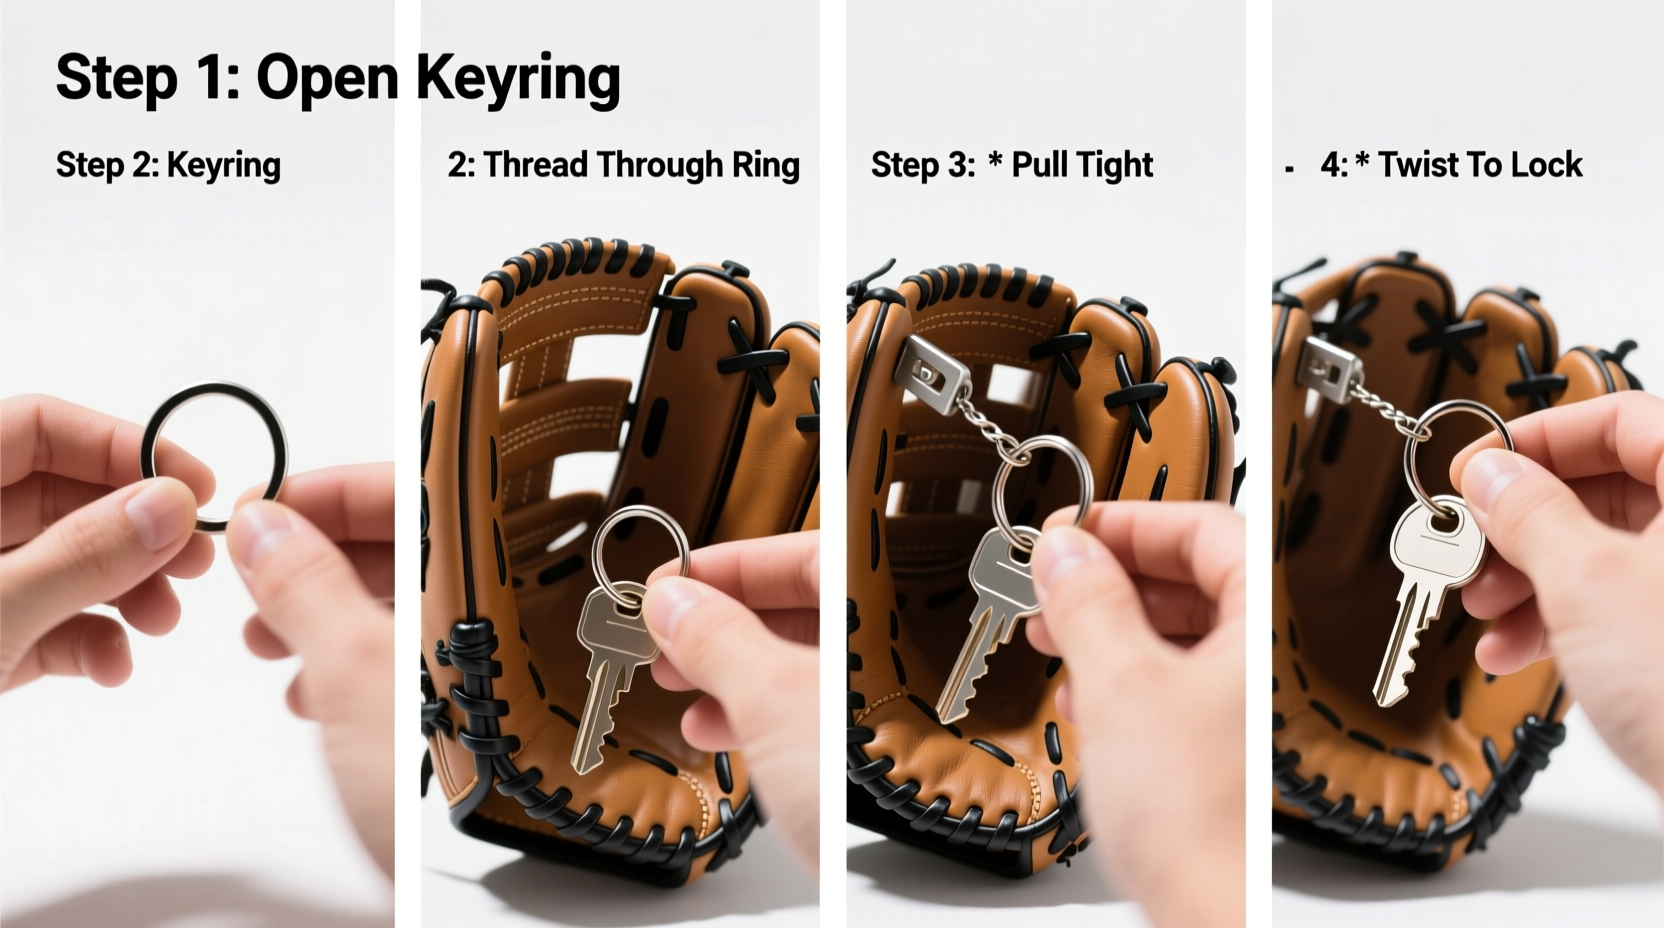
Step-by-Step Attachment Process
Follow this sequence carefully to ensure a secure, damage-free connection between your keyring and the baseball glove keychain.
- Condition the Leather: Apply a small amount of leather conditioner to the intended attachment area using a cotton swab. This prevents drying and cracking during handling. Allow it to absorb for 10 minutes.
- Locate the Anchor Point: Examine the glove for a thick, layered section near the wrist or base of the thumb. If no loop exists, decide whether to install a jump ring or use an existing seam.
- Pierce a Pilot Hole (If Necessary): Using a fine awl, gently create a pilot hole through the center of the chosen spot. Rotate the awl slowly—do not force it—to avoid splitting the leather.
- Install a Jump Ring (Optional but Recommended): Open the jump ring with pliers by twisting sideways (not pulling apart). Slide it through the hole or existing loop. Position it so it lies flat against the leather. Close securely.
- Attach the Keyring: Open the split ring slightly with pliers and thread it through the jump ring or directly through a reinforced loop. Ensure the ring closes fully to prevent keys from slipping off.
- Seal and Set (For New Holes): Dab a tiny drop of leather adhesive around the pierced edge to prevent fraying. Wipe away excess immediately with a dry cloth. Let dry for 30 minutes.
| Action | Do | Don't |
|---|---|---|
| Choosing Keyring | Use lightweight, smooth-edged metal rings | Avoid oversized or zinc-alloy rings that corrode |
| Creating Hole | Use an awl with gentle pressure | Never use scissors or knives |
| Attaching Hardware | Twist jump rings open sideways | Don’t pull them apart like a staple |
| Final Check | Test strength by gently tugging | Don’t add excessive weight immediately |
Real-World Example: Preserving a Sentimental Keepsake
Mark, a high school baseball coach, received a miniature leather glove keychain engraved with his team’s championship year. He wanted to attach it to his everyday keys but was hesitant—previous attempts had torn similar keepsakes. Following this guide, he used a 4mm brass jump ring installed at the base of the glove’s wrist strap, where stitching was densest. He conditioned the leather, made a precise pilot hole, and sealed it with adhesive. Two years later, the keychain remains intact, surviving daily use without visible wear. “It’s not just keys,” Mark says. “It’s a reminder of what we built.”
Maintenance Tips for Long-Term Durability
Once attached, ongoing care ensures the connection stays strong. Leather expands and contracts with temperature and moisture, and constant friction from keys can degrade even well-installed hardware.
Every three months, perform a quick inspection:
- Check for loose jump rings or signs of leather lifting
- Reapply a drop of adhesive if the hole appears widened
- Wipe down with a dry cloth to remove dirt buildup
- Recondition the leather lightly to maintain flexibility
Frequently Asked Questions
Can I attach a keyring without making a hole?
Yes. If the glove has a natural loop, lacing, or thick strap, you can thread the keyring directly through it without piercing. Just ensure the leather isn’t strained when the ring moves freely.
What if my keychain already has a tear near the attachment point?
Minor fraying can be stabilized with leather glue and a small fabric patch on the backside. For larger tears, consult a leather repair specialist. Reinforce before reattaching any hardware.
Is glue alone enough to hold the keyring?
No. Adhesive should only seal and protect—not bear mechanical load. Always pair glue with a physical anchor like a jump ring or integrated loop for lasting security.
Conclusion: Secure It Right, Keep It Forever
A baseball glove keychain carries more than keys—it holds memories, pride, and personal significance. Taking the time to attach a keyring properly ensures it withstands daily use without sacrificing its craftsmanship. By selecting the right hardware, using precision techniques, and maintaining the piece over time, you preserve both function and sentiment. Whether it’s a gift, a memento, or a symbol of your love for the game, treat it with the care it deserves.


 浙公网安备
33010002000092号
浙公网安备
33010002000092号 浙B2-20120091-4
Comments
No comments yet. Why don't you start the discussion?