
Your AirPods are a significant investment in sound quality, convenience, and everyday functionality. Yet their compact size makes them vulnerable to drops, scratches, moisture, and accidental damage. One of the most effective ways to extend their lifespan is by using a well-fitted earphone case. But simply owning a case isn’t enough—proper installation and secure usage determine how well it protects. This guide walks you through every critical step to ensure your AirPods stay safe, functional, and pristine.
Why Protection Matters for AirPods
AirPods, especially models like the AirPods Pro and second- and third-generation variants, feature precision-engineered components. The charging case contains lithium-ion batteries, sensitive circuitry, and magnetic alignment systems. Even minor impacts can misalign internal parts or crack housings. Dust and lint buildup in the charging ports can impair connectivity and charging efficiency over time. A high-quality protective case acts as a shock absorber, reduces friction, and blocks debris from entering critical areas.
“Over 60% of AirPods failures within the first year stem from physical impact or environmental exposure—not electronics.” — Dr. Alan Reyes, Consumer Electronics Durability Analyst
Choosing the Right Case for Your Model
Not all cases are created equal. Compatibility is the first priority. AirPods (1st, 2nd, 3rd gen), AirPods Pro (1st and 2nd gen), and AirPods Max each have distinct dimensions and button placements. Using an ill-fitting case can obstruct the lid opening, prevent proper closure, or interfere with wireless charging indicators.
Look for cases made from dual-material designs: a rigid outer shell (polycarbonate) paired with a soft inner silicone or TPU lining. This combination absorbs impact while preventing micro-scratches. Magnetic attachment options also enhance security when clipped to bags or pockets.
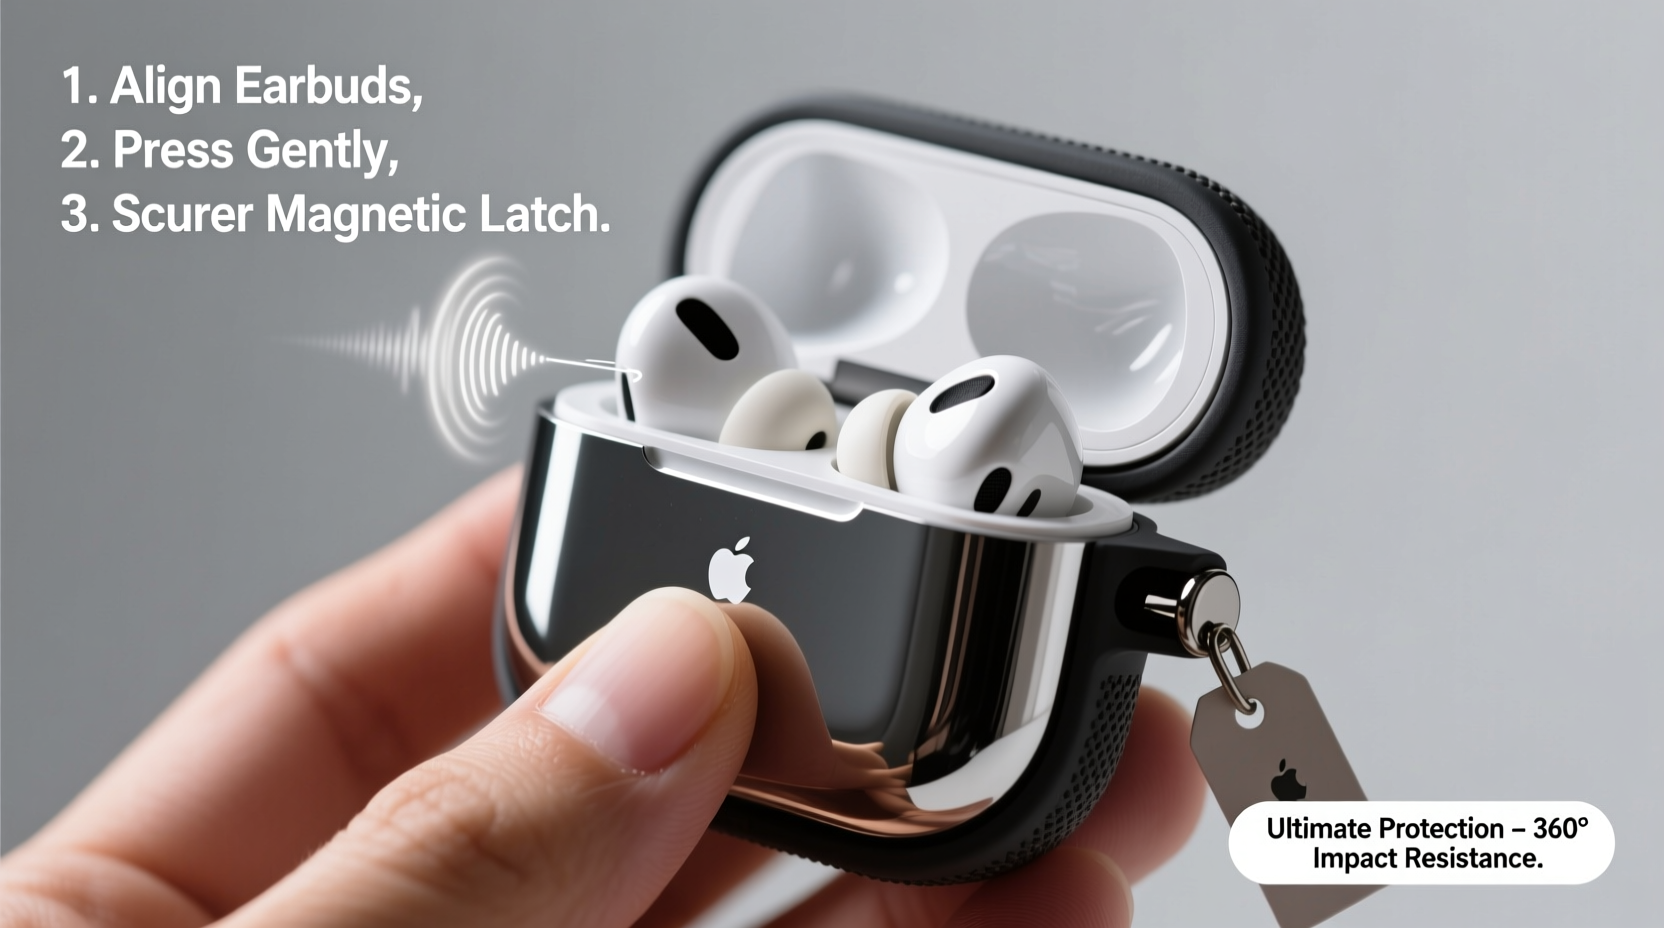
Step-by-Step Installation Guide
Installing a protective case correctly ensures full functionality without compromising protection. Follow this timeline for optimal results.
- Power Down and Clean: Close your AirPods case and ensure it’s not actively charging. Wipe the exterior with a dry microfiber cloth to remove dust, oil, or residue that could trap grit under the case.
- Inspect the Protective Case: Check for manufacturing defects such as uneven edges, stuck tabs, or warped openings. Run your finger along the interior to confirm there are no sharp ridges.
- Align the Bottom First: Hold your AirPods case with the hinge facing up. Position the bottom edge of the protective case over the base of your AirPods case. Gently press until it snaps into place at the lower half.
- Secure the Top Hinge Area: Carefully fold the top portion of the protective case over the lid. Apply even pressure starting from one side and moving across to avoid cracking. You should hear a soft click when fully seated.
- Test Functionality: Open and close the lid several times. Ensure the motion is smooth and the protective case doesn’t lift or bind. Verify that the LED indicator remains visible through any cutout window.
- Check Charging Compatibility: Place the cased AirPods on a Qi-certified wireless charger. Confirm the light turns amber/green as expected. If charging fails, reseat the case or consider a slimmer alternative.
Securing the Case for Daily Use
Once installed, maintaining the integrity of the case requires ongoing attention. A loose or poorly maintained cover defeats its purpose.
- Regularly inspect the snap-fit joints for signs of wear or stretching.
- Clean both the AirPods case and the protective sleeve monthly with a slightly damp cloth and mild soap—avoid submerging either.
- Never force the lid open if resistance occurs; this may indicate misalignment.
- Use anti-slip grips or lanyards if you frequently carry AirPods in open bags.
| Action | Do | Don’t |
|---|---|---|
| Cleaning | Use alcohol-free wipes and soft cloths | Submerge in water or use abrasive cleaners |
| Installation | Align bottom first, then hinge | Apply excessive force or twist during fitting |
| Charging | Ensure full contact on wireless pads | Leave metal-decorated cases on during charging |
| Storage | Keep in a dry, room-temperature environment | Leave in hot cars or humid bathrooms |
Real-World Example: How Proper Casing Prevented Costly Damage
Jessica, a graphic designer in Portland, uses her AirPods Pro throughout the day—at client meetings, during commutes, and while working remotely. Three months after purchase, she accidentally dropped her AirPods case from waist height onto a concrete sidewalk. The protective silicone case cracked slightly on one corner, but the internal housing remained intact. She opened it to find both earbuds securely docked, with no charging issues. “I was shocked,” she said. “The $12 case saved me at least $200 in replacement costs.” Without the added layer, experts estimate a direct impact would likely have damaged the battery compartment or magnet array.
Essential Tips for Long-Term Protection
- Replace worn cases immediately—even minor cracks compromise structural support.
- Avoid decorative cases with protruding elements that catch on fabric or bag zippers.
- Carry a backup microfiber pouch when traveling to store the case safely inside luggage.
- Consider UV sanitizing boxes that accommodate cased AirPods for hygiene without removing protection.
Frequently Asked Questions
Can I leave my AirPods case in the protective sleeve while charging?
Yes, most high-quality cases are designed to allow uninterrupted wireless charging. However, thick or metallic cases may block induction. Always test placement on your charging pad before relying on overnight charging.
Will a case affect the Find My feature?
No. The Find My network relies on Bluetooth signals and nearby Apple devices, not physical access to the case. As long as your AirPods are inside and powered, location tracking remains fully functional.
How often should I replace the protective case?
Every 6–12 months under normal use. Signs it’s time to replace include fading, stiffness, poor snap retention, or visible cracks. Frequent travelers or those in humid climates may need replacements more often.
Final Checklist Before You Go
📋 Protective Case Installation & Security Checklist- ✅ Verified compatibility with your AirPods model
- ✅ Cleaned both original case and new sleeve before installation
- ✅ Aligned bottom-first, then secured hinge area gently
- ✅ Tested lid movement and button responsiveness
- ✅ Confirmed wireless charging works with case on
- ✅ Inspected for gaps, warping, or misalignment
- ✅ Added extra security measure (strap, clip, or loop)
Conclusion: Protect What You Depend On
Your AirPods do more than deliver music—they connect you to calls, podcasts, navigation, and focus. Treating them with care starts with something as simple as a properly installed protective case. By following these steps, you’re not just avoiding cosmetic damage; you’re preserving performance, battery life, and long-term value. Take two minutes today to check your current setup. If the case is loose, cracked, or missing, now is the time to act. A small upgrade today can prevent frustration—and expense—tomorrow.


 浙公网安备
33010002000092号
浙公网安备
33010002000092号 浙B2-20120091-4
Comments
No comments yet. Why don't you start the discussion?