
Opening a Sony Xperia smartphone may seem intimidating, but with the right tools, patience, and methodical approach, it’s entirely possible to perform repairs or upgrades yourself. Whether you're replacing a cracked screen, upgrading internal storage, or fixing a faulty battery, understanding how to disassemble your device safely is the first critical step. This guide walks you through each phase with precision, highlighting common pitfalls and professional insights to ensure success without damaging your phone.
Understanding the Design of Sony Xperia Phones
Sony Xperia models, particularly recent ones like the Xperia 1 IV, 5 III, or 10 series, are known for their robust build quality, water resistance (IP65/68), and compact internal layout. Unlike older phones with removable backs, modern Xperia devices use sealed unibody designs with adhesive seals, making disassembly more complex. The frame typically combines metal and glass, with internal components tightly packed and secured using screws, clips, and delicate ribbon cables.
Before starting, identify your exact model. Internal layouts vary significantly between series. For example, the Xperia 1 line has a vertical dual-battery setup, while mid-range models often use a single-cell battery. Always consult service manuals or teardown videos specific to your model for reference.
Essential Tools and Safety Precautions
Attempting to open a Xperia without proper tools can result in cracked glass, severed cables, or short circuits. Below is a checklist of recommended equipment:
🔧 Repair Toolkit Checklist
- Precision screwdriver set (Phillips #000, P2, and tri-wing if applicable)
- Pry tools (plastic opening picks or spudgers)
- iOpener or heat gun (for softening adhesive)
- Suction cup (small, for lifting the screen)
- Tweezers (anti-static preferred)
- Magnetic mat (to organize screws)
- Isopropyl alcohol (90%+) and lint-free cloth
- Replacement adhesive strips (if resealing)
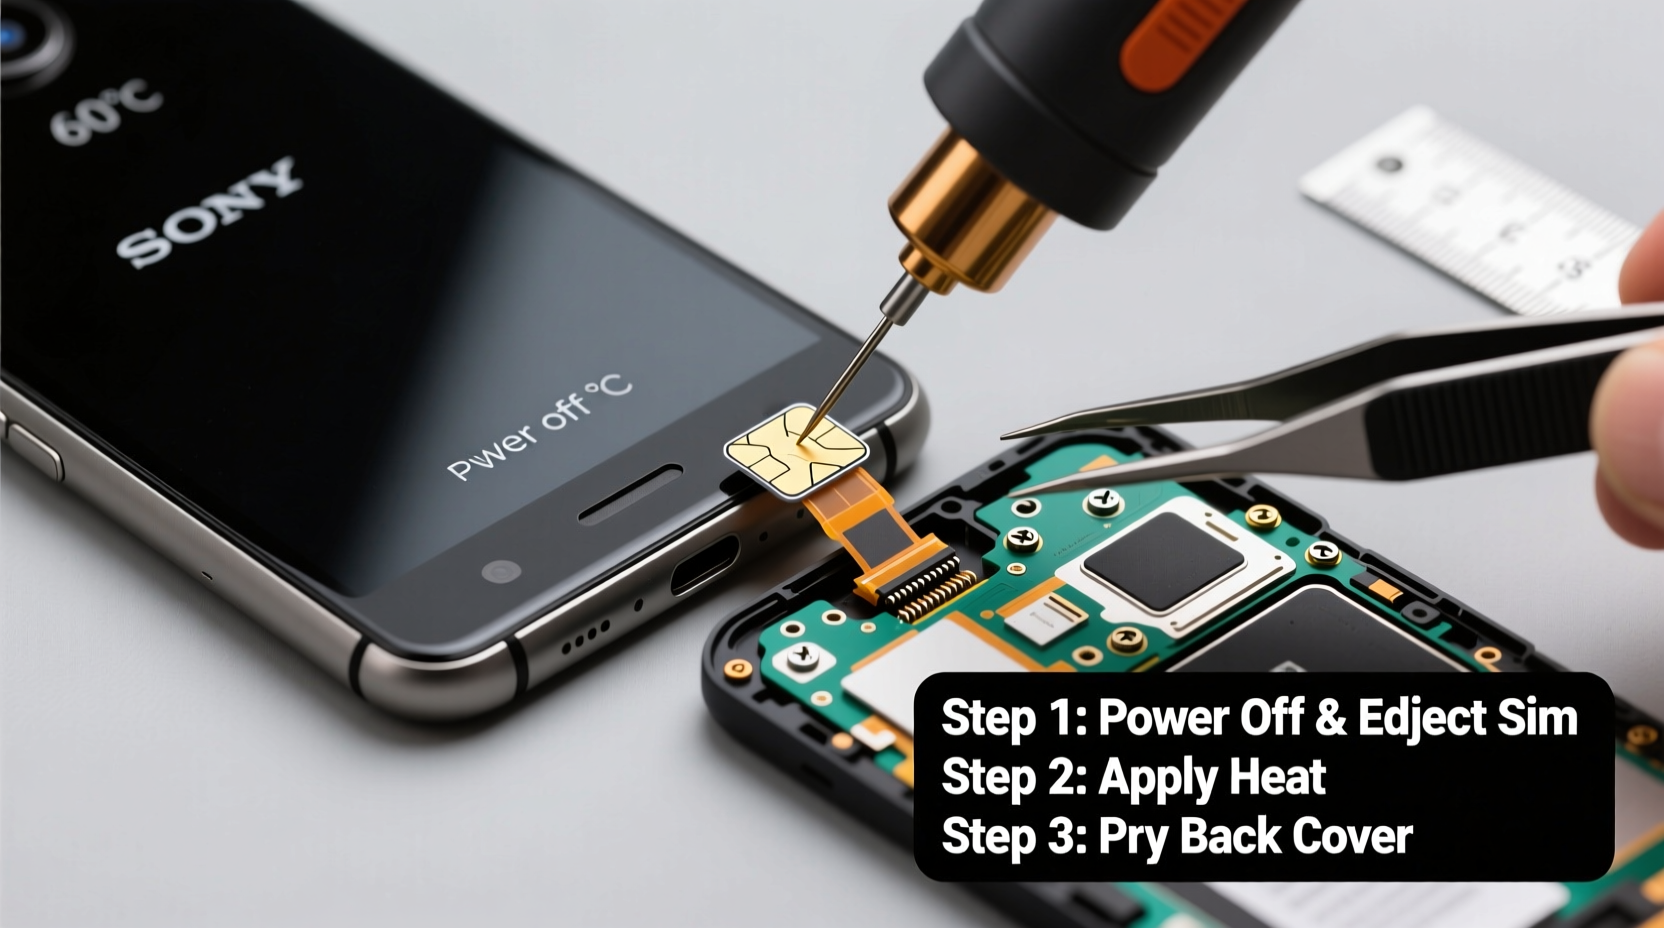
Ensure your workspace is clean, well-lit, and static-free. Work on a non-conductive surface like wood or rubber. Power off the device completely before beginning. If your Xperia has a removable SIM tray, eject it gently and set aside—this avoids accidental damage during disassembly.
“Even experienced technicians underestimate adhesive strength in modern phones. Applying controlled heat is not optional—it’s essential.” — Rafael Mendez, Mobile Repair Technician with 12 years in consumer electronics
Step-by-Step Disassembly Process
Follow this sequence carefully. Rushing any step increases the risk of irreversible damage.
- Apply heat to the edges: Use an iOpener or heat gun on low setting (around 60–70°C) along the perimeter of the back cover for 2–3 minutes. Focus on areas near the charging port and camera module where adhesive is strongest.
- Attach the suction cup: Place it near the bottom edge of the rear glass. Gently pull upward to create a slight gap.
- Insert a plastic pry tool: Slide it into the gap and slowly work around the edges. Move in small increments to avoid cracking the glass. The goal is to separate the adhesive seal, not force the case open.
- Lift the back cover: Once fully separated, remove the back panel carefully. Set it aside on a soft surface to prevent scratches.
- Document screw locations: Take photos before removing any screws. Different lengths are used in various spots—misplacing them can cause improper reassembly.
- Remove the shield plate: After removing screws, lift the metal shielding covering the motherboard and battery connector.
- Disconnect the battery: Use a spudger to gently lift the battery connector from its socket. This is crucial for safety—never skip this step.
- Disconnect other components: Depending on your repair goal, disconnect the display, camera, or charging port ribbons using the same gentle prying motion.
- Proceed with repair: Replace the damaged part or upgrade as needed. Handle all ribbon cables by the edges and avoid bending them sharply.
Common Challenges and How to Avoid Them
Even careful users encounter obstacles. Here’s a breakdown of frequent issues and solutions:
| Issue | Why It Happens | How to Prevent |
|---|---|---|
| Cracked back glass | Excessive force or uneven heating | Heat evenly; use thin tools and patience |
| Stripped screws | Incorrect screwdriver size or angle | Use precise fit tools; apply firm, straight pressure |
| Phone won’t power on after reassembly | Battery not reconnected or loose cable | Double-check all connectors before powering on |
| Loss of water resistance | Original adhesive not replaced properly | Use OEM-equivalent sealing tape and press firmly |
Real Example: Replacing a Battery in Xperia 10 III
A user in Helsinki attempted to replace the swollen battery in their Xperia 10 III after two years of heavy use. They followed online guides but skipped pre-heating the device. When they forced the back cover open with a metal tool, the glass cracked near the USB-C port. After ordering a new back housing and restarting with proper heat application, they successfully completed the repair. The lesson? Time invested in preparation saves money and frustration later.
Frequently Asked Questions
Can I reuse the original adhesive after opening the phone?
No. Once separated, the adhesive loses its bonding strength. Always replace it with new double-sided tape designed for smartphones to maintain structural integrity and water resistance.
Will opening my Xperia void the warranty?
Yes. Any physical tampering, including removing the back cover, voids the manufacturer’s warranty. If your device is under warranty, contact Sony support or an authorized service center instead.
Is it safe to use a hairdryer instead of a heat gun?
It can work in a pinch, but hairdryers often lack consistent temperature control and may overheat sensitive components. An iOpener or professional heat gun is safer and more effective.
Final Tips for Successful Repairs and Upgrades
After completing your repair, test the device before sealing it. Power it on, check touch response, camera function, and charging. If everything works, carefully reassemble in reverse order. Press the edges firmly for at least 30 seconds to activate the new adhesive. Let the phone rest untouched for 2 hours before exposing it to moisture.
Consider keeping a dedicated repair kit at home. Over time, mastering basic disassembly empowers you to extend your device’s lifespan, reduce e-waste, and save on costly service fees.


 浙公网安备
33010002000092号
浙公网安备
33010002000092号 浙B2-20120091-4
Comments
No comments yet. Why don't you start the discussion?