
Fluorescent tube lights have long been a staple in homes, garages, offices, and commercial spaces due to their energy efficiency and broad illumination. However, over time, these tubes degrade, flicker, or fail entirely—necessitating replacement. While the task may seem straightforward, improper handling can lead to broken glass, electrical hazards, or damage to the fixture. A methodical approach ensures safety, preserves components, and extends the life of your lighting system. This guide walks you through every stage—from preparation to final testing—with professional precision.
Why Proper Tube Light Replacement Matters
Tube lights operate at high voltages and contain fragile glass components. The ends are coated with conductive materials, and the internal phosphor coating can be damaged by moisture or rough contact. Additionally, older fixtures may use magnetic ballasts that retain charge even after power is off. Replacing tubes haphazardly risks electric shock, short circuits, or unnecessary strain on the ballast. Taking time to follow correct procedures protects both the user and the fixture.
“Many homeowners assume changing a tube light is as simple as twisting it out—but skipping safety steps leads to avoidable accidents.” — James Ralston, Master Electrician & Lighting Systems Consultant
Essential Tools and Safety Equipment
Before beginning, gather all necessary tools and protective gear. Having everything ready minimizes interruptions and reduces risk.
- Insulated rubber gloves (rated for electrical work)
- Safety goggles (to protect from glass shards)
- Non-conductive ladder (fiberglass preferred)
- Replacement tube (correct type and wattage)
- Volt tester or multimeter
- Dry microfiber cloth
- Wire brush (for cleaning socket contacts if corroded)
Step-by-Step Guide to Safe Removal and Replacement
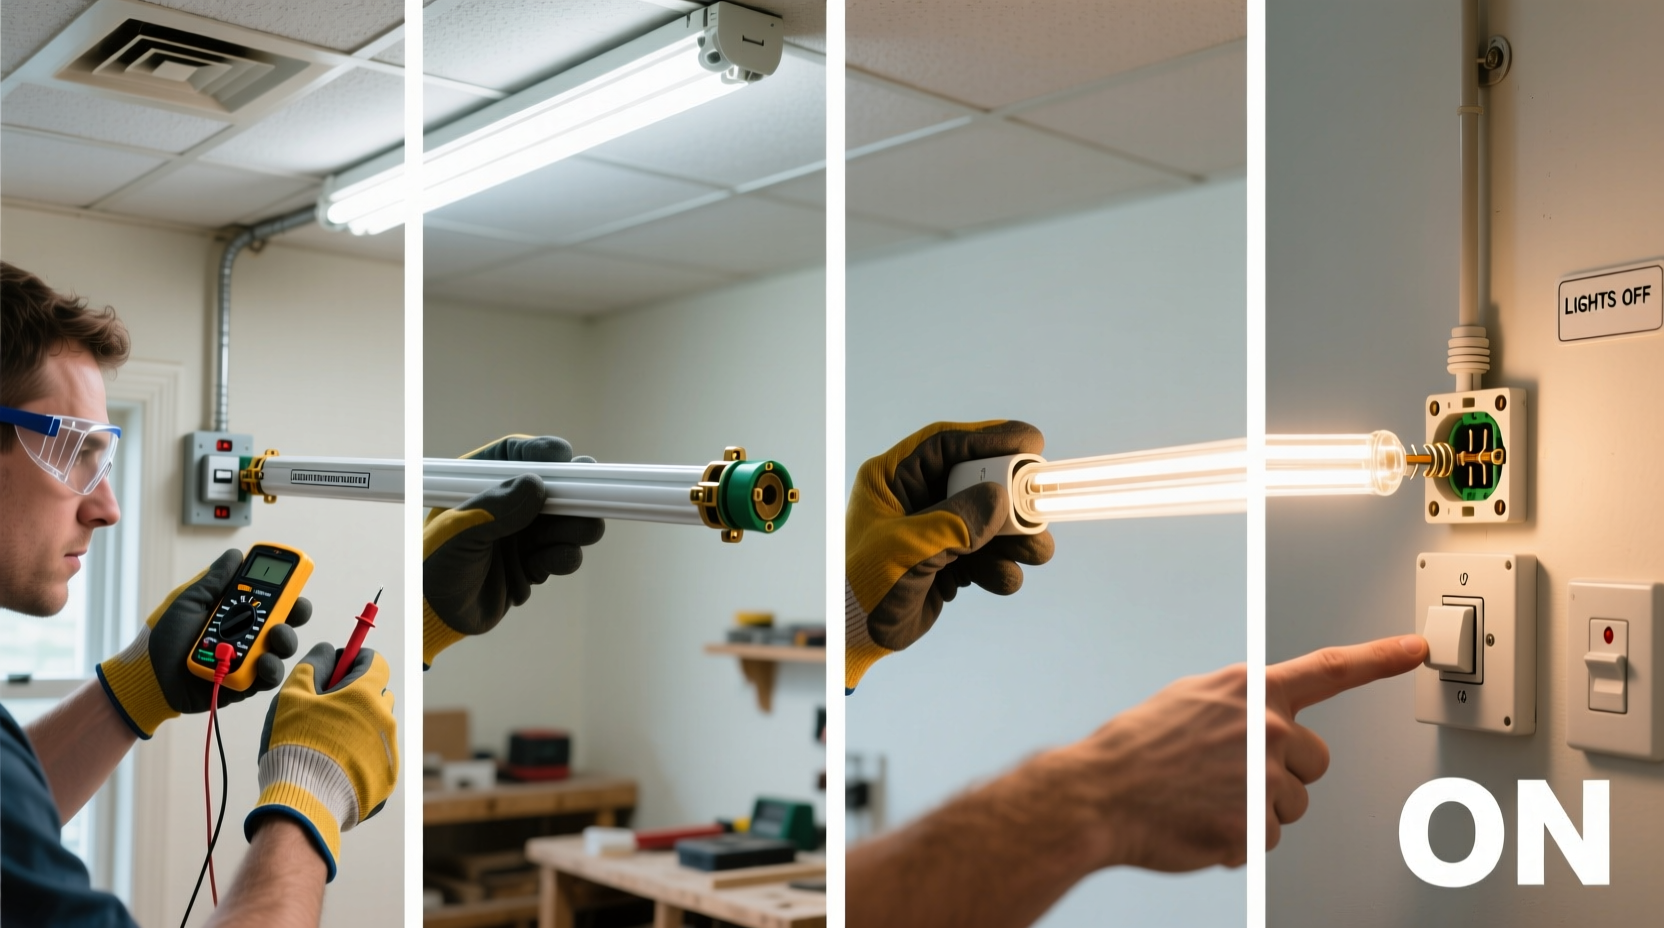
- Turn Off Power at the Source
Switch off the circuit breaker controlling the light fixture. Do not rely solely on the wall switch. Confirm power is off using a non-contact voltage tester near the fixture wires. - Allow the Fixture to Cool
If the light was recently on, wait 10–15 minutes. Fluorescent tubes and fixtures can become hot enough to cause minor burns. - Remove the Diffuser or Cover (if applicable)
In ceiling-mounted units, a plastic diffuser panel often covers the tubes. Gently lower or unclip it according to the manufacturer’s design. Set aside on a soft surface. - Rotate the Tube to Release It
Grasp the tube firmly at both ends. Rotate it 90 degrees (a quarter turn) in either direction until the pins align with the slot in the socket. The tube should now drop slightly at one end. - Slide One End Out First
Lower one end of the tube and slide the pins out of the socket. Then tilt and remove the other end. Never force the tube—if resistance occurs, double-check rotation alignment. - Inspect the Fixture and Sockets
Examine the tombstone sockets (the plastic holders at each end). Look for discoloration, melting, or corrosion. Use a dry cloth or wire brush to gently clean contact points if needed. - Check the Ballast (Optional but Recommended)
If the fixture hums, flickers, or fails to start consistently, the ballast may be failing. Signs include blackened casing or a burnt smell. Consider upgrading to an electronic ballast or switching to LED-ready components. - Insert the New Tube Carefully
Align the pins of the new tube with the socket slots. Insert one end fully, then lift and align the other. Once both ends are seated, rotate the tube 90 degrees to lock it into place. You should feel a slight resistance when secure. - Reinstall the Diffuser
Replace the cover or diffuser, ensuring clips or supports are engaged properly to prevent sagging or breakage. - Restore Power and Test
Turn the circuit breaker back on. Flip the wall switch. The new tube should illuminate instantly or within a second. If it flickers or doesn’t light, turn off power and recheck seating and compatibility.
Do’s and Don’ts During Replacement
| Do’s | Don’ts |
|---|---|
| Wear insulated gloves and eye protection | Work on a wet floor or damp environment |
| Use a voltage tester before touching wires | Assume the wall switch cuts all power |
| Clean socket contacts gently with a dry tool | Force a tube that won’t seat easily |
| Match tube length and type exactly | Touch the glass surface with bare hands (oils can create hot spots) |
| Dispose of old tubes responsibly (hazardous waste) | Throw fluorescent tubes in regular trash |
Mini Case Study: Residential Garage Upgrade
A homeowner in Portland, Oregon, experienced persistent flickering in two 4-foot fluorescent fixtures in their garage. Initially assuming the bulbs were failing, they replaced one tube—only for the issue to persist. Following this guide, they turned off the main breaker, removed both tubes, and inspected the sockets. One socket showed signs of arcing and carbon buildup. After replacing the damaged socket and installing new T8 tubes, the lights operated smoothly. Later, they upgraded both fixtures to LED-compatible ballasts, reducing energy consumption by 35%. The systematic approach prevented further damage and identified an underlying issue early.
FAQ: Common Questions About Tube Light Replacement
Can I replace a fluorescent tube with an LED tube?
Yes, but verify compatibility. Some LED tubes work with existing ballasts (plug-and-play), while others require bypassing the ballast and wiring directly to line voltage. Check manufacturer instructions before installation.
Why does my new tube flicker when I turn it on?
Minor flickering during startup is normal for fluorescent tubes, especially in cold environments. Persistent flickering suggests poor contact, incompatible ballast, or a defective tube. Ensure the tube is fully rotated into place and test in another known-good fixture if possible.
How should I dispose of old fluorescent tubes?
Fluorescent tubes contain small amounts of mercury and must be recycled as hazardous waste. Many hardware stores like Home Depot or IKEA offer free drop-off bins. Never discard them in household trash.
Final Checklist Before You Begin
- ✅ Circuit breaker is OFF and verified with a voltage tester
- ✅ Ladder is stable and placed on dry, level ground
- ✅ Safety gloves and goggles are worn
- ✅ Replacement tube matches original specs (T8, T12, length, wattage)
- ✅ Work area is clear of water and clutter
- ✅ Old tube disposal plan is in place
Conclusion: Confidence Through Preparation
Replacing a tube light doesn’t require advanced electrical knowledge, but it does demand respect for safety protocols. By turning off power at the source, using proper tools, and following a logical sequence, you eliminate most risks associated with the process. Whether maintaining a single fixture at home or managing multiple units in a workspace, attention to detail prevents damage and ensures reliable lighting. Now that you’re equipped with the right knowledge, approach your next lighting task with confidence—not caution born of fear, but assurance built on preparation.


 浙公网安备
33010002000092号
浙公网安备
33010002000092号 浙B2-20120091-4
Comments
No comments yet. Why don't you start the discussion?