
A well-maintained asphalt driveway enhances curb appeal, improves property value, and extends the lifespan of your investment. One of the most effective ways to protect asphalt from weather damage, UV degradation, and oil spills is through regular sealing. When done correctly, blacktop sealing can double the life of your driveway—often adding 10 to 15 years of service. However, improper application leads to peeling, cracking, and wasted effort. This guide walks you through every critical phase of the process, using time-tested methods that professionals rely on.
Why Sealing Matters: The Science Behind Asphalt Protection
Asphalt is a composite material made of stone aggregate bound together with bitumen—a petroleum-based binder. Over time, exposure to sunlight, rain, snow, and vehicle fluids breaks down this binder, causing the surface to oxidize, become brittle, and develop cracks. Once water penetrates these cracks, freeze-thaw cycles accelerate deterioration, leading to potholes and structural failure.
Blacktop sealer acts as a waterproof barrier. It fills surface pores, resists oil and gasoline penetration, and shields the asphalt from ultraviolet radiation. According to the National Pavement Contractors Association, driveways sealed every 2–3 years experience up to 70% less deterioration than unsealed surfaces.
“Sealing isn’t cosmetic—it’s structural preservation. A properly sealed driveway maintains flexibility and resists crack propagation far longer.” — James L. Reynolds, Certified Pavement Specialist, NCAPA
Preparation: The Foundation of a Lasting Seal
No amount of high-quality sealer can compensate for poor preparation. Over 80% of sealant failures stem from inadequate cleaning or unresolved damage. This stage demands patience and thoroughness.
Clean the Surface Completely
Begin by removing all debris, leaves, dirt, and loose gravel. Use a stiff-bristle broom or power blower for dry cleanup. For stubborn grime, grease, or oil stains, apply a commercial asphalt degreaser. Scrub affected areas with a push broom, then rinse thoroughly with a garden hose or pressure washer (use no more than 1,500 PSI to avoid damaging the surface).
Repair Cracks and Potholes
Inspect the entire surface for cracks wider than ¼ inch and any signs of potholes. Use a cold-patch asphalt repair compound for holes, compacting it with a tamper or heavy tool. For linear cracks, clean them out with a wire brush or compressed air, then fill with rubberized asphalt crack filler applied via caulk gun. Allow all repairs to cure fully before proceeding—typically 24 hours.
Dry Time Is Non-Negotiable
The driveway must be completely dry before sealing. Avoid scheduling the job immediately after rain. Ideally, allow 48 hours of dry weather with daytime temperatures above 50°F (10°C) and rising. Humidity levels below 70% are optimal.
Choosing the Right Sealer: What Works Best
Not all sealers are created equal. The type you choose impacts durability, appearance, and ease of application.
| Sealer Type | Lifespan | Best For | Drawbacks |
|---|---|---|---|
| Coal Tar Emulsion | 3–5 years | High traffic, extreme climates | Banned in some states; strong odor |
| Asphalt-Based Emulsion | 2–4 years | Eco-conscious homeowners | Slightly less UV resistance |
| Acrylic Polymer | 3–4 years | Decorative finishes, quick curing | Higher cost |
For most residential driveways, a premium asphalt-based or acrylic sealer offers the best balance of performance and environmental safety. Look for products labeled “commercial-grade” even if used at home—they contain more solids and provide thicker protection.
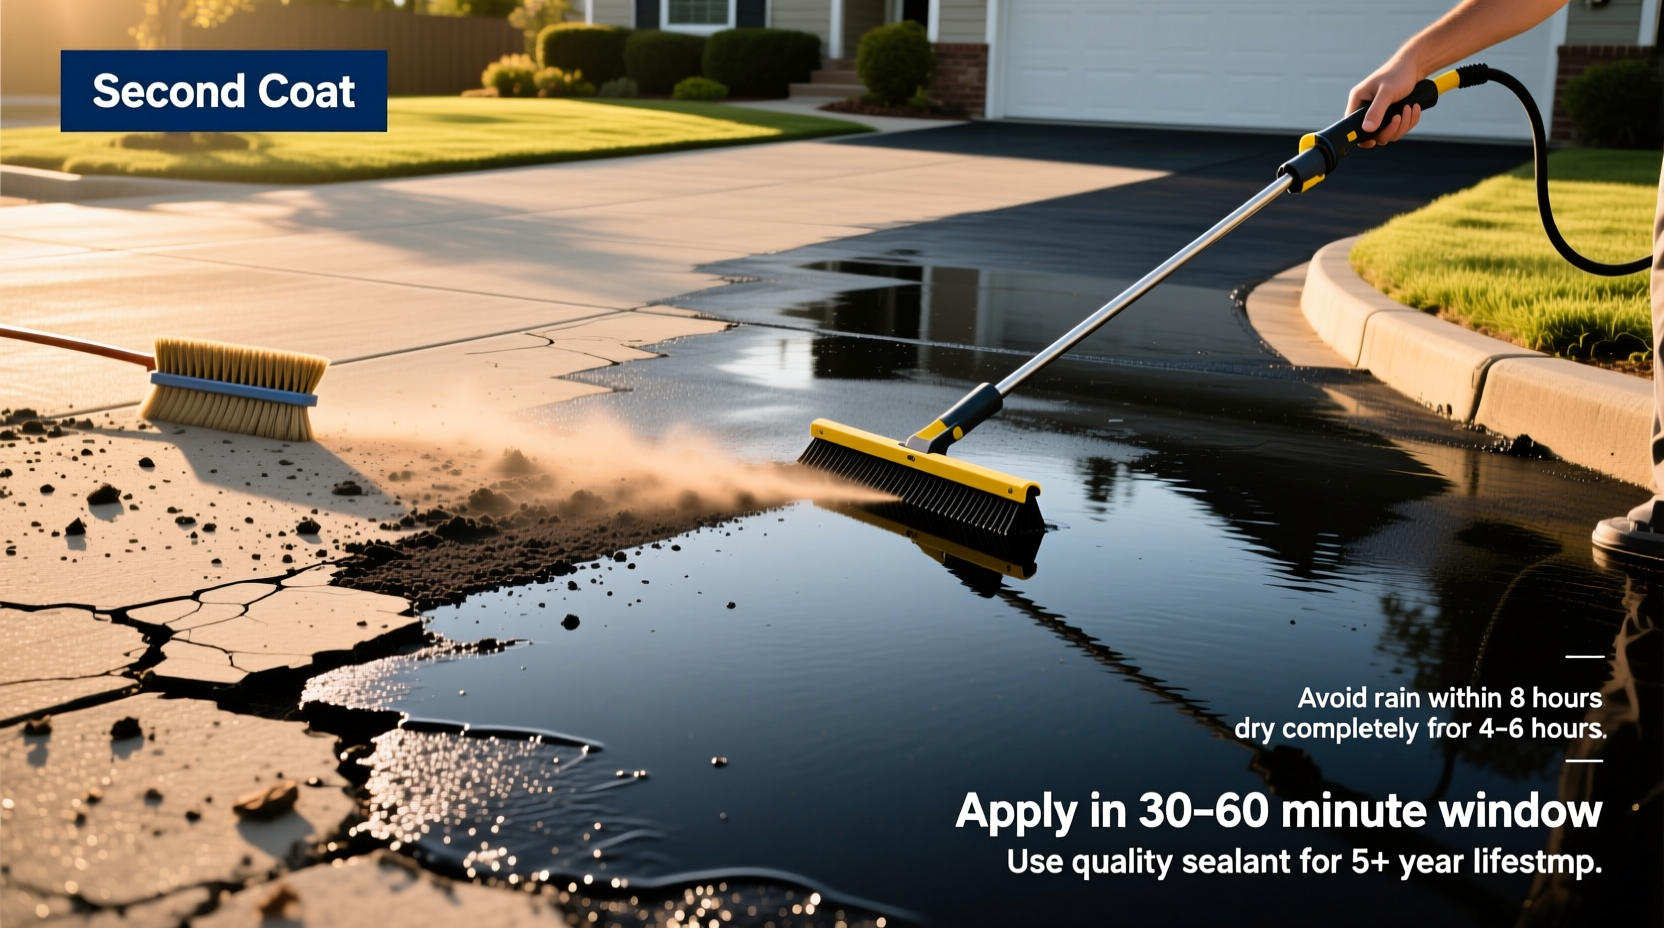
Step-by-Step Application Process
Timing, technique, and tools determine the success of your sealing project. Follow this sequence precisely.
- Mix the sealer thoroughly: Stir continuously for at least five minutes. Never thin the product unless specified by the manufacturer—adding too much water reduces film strength.
- Pre-wet applicator tools: Dip brushes or squeegee brooms in water to prevent initial sticking and ensure smooth flow.
- Start at the farthest point: Work from the garage or carport toward the street. This prevents walking over freshly sealed areas.
- Apply in manageable sections: Pour sealer into a paint tray or bucket. Use a squeegee broom or roller to spread evenly. Maintain a wet edge to avoid lap marks.
- Double-application method (recommended): Apply first coat lightly to penetrate pores. Wait 4–6 hours, then apply a second coat perpendicular to the first for uniform coverage.
- Edge detailing: Use a 4-inch brush to feather edges along sidewalks, curbs, and landscaping. Avoid pooling near foundation walls.
Post-Application Care and Long-Term Maintenance
Your work doesn’t end when the last drop is applied. Proper curing ensures maximum durability.
- Keep vehicles off the surface for at least 24–48 hours, depending on temperature and humidity.
- Avoid foot traffic for 12 hours minimum.
- Do not schedule sealing before forecasted rain—24 hours of dry weather post-application is essential.
- Trim nearby vegetation to prevent leaf accumulation, which traps moisture and promotes algae growth.
Mini Case Study: Reviving a 12-Year-Old Driveway
In suburban Columbus, Ohio, homeowner Linda M. noticed her once-smooth driveway had turned gray and developed hairline cracks. She hired a contractor who quoted $1,200 for partial repaving. Instead, she opted for DIY restoration. After deep cleaning, filling cracks, and applying two coats of polymer-modified asphalt sealer, the driveway regained its rich black finish. Three years later, it remains intact with only minor edge wear. Her total cost: $185 in materials. “I saved nearly a thousand dollars and learned a skill I’ll use every few years,” she said.
Common Mistakes to Avoid
Even experienced homeowners make errors that compromise results. Steer clear of these pitfalls:
| Do’s | Don’ts |
|---|---|
| Seal every 2–3 years | Don’t seal annually—over-sealing causes peeling |
| Work in mild, dry conditions | Don’t apply in direct midday sun or high heat |
| Use quality tools (squeegee broom, crack filler gun) | Don’t use cheap rollers that leave texture |
| Stir sealer constantly during use | Don’t let sealer sit in bucket—solids settle quickly |
FAQ
How often should I reseal my driveway?
Every 2 to 3 years is ideal for most climates. In harsh northern zones with freeze-thaw cycles, consider every 2 years. In milder southern regions, every 3 years may suffice. Inspect annually—if the surface appears light gray and water soaks in instead of beading, it’s time to seal.
Can I apply sealer over old sealer?
Yes, but only if the existing layer is sound and not peeling. If flaking occurs, remove it with a scraper or pressure washer before recoating. Never seal over failing sealer—it will trap moisture and worsen delamination.
Is it better to spray or brush on sealer?
Spraying provides faster, more even coverage but requires specialized equipment and masking of adjacent surfaces. For most homeowners, a squeegee broom delivers excellent control and penetration without overspray risks. Brushes are best for touch-ups and edges.
Conclusion: Invest a Day, Gain a Decade
Applying blacktop sealer is one of the highest-return maintenance tasks a homeowner can perform. With minimal investment and a single weekend of labor, you significantly delay costly repaving projects and maintain a clean, attractive entrance to your home. The key lies in meticulous prep, smart product selection, and disciplined execution. Whether you're preserving a new overlay or rescuing an aging surface, proper sealing pays dividends in longevity and peace of mind.


 浙公网安备
33010002000092号
浙公网安备
33010002000092号 浙B2-20120091-4
Comments
No comments yet. Why don't you start the discussion?