
Applying false lashes can feel like a rite of passage in beauty routines—dramatic, rewarding, and sometimes frustrating. For many beginners, the biggest hurdle isn’t placement or alignment; it’s the glue. Too much, and lashes clump or slide off. Too little, and they fall off before you leave the house. The good news? With the right tools, timing, and technique, even those who’ve sworn off falsies can master them. This guide breaks down every stage of the process with special attention to managing lash adhesive—the most common pain point—and offers practical solutions for clean, long-lasting results.
Understanding the Role of Lash Glue
Lash glue is more than just an adhesive—it’s the foundation of your entire look. Unlike regular glue, eyelash adhesive is formulated to be flexible, skin-safe, and quick-drying. However, its behavior changes depending on how it’s applied, how long it’s been out of the tube, and even the humidity in your bathroom.
Most beginners make one of two mistakes: applying glue directly onto the lash band and immediately placing it on the lid (which leads to slipping), or not allowing the glue to become tacky before application. The key is understanding that eyelash glue works best when it reaches a “tacky” consistency—a stage between wet and dry where it grips without sliding.
“Lash adhesive isn’t meant to work instantly. It needs 30 to 45 seconds to activate properly. Skipping this step is the number one reason lashes fail.” — Dana Reyes, Celebrity Makeup Artist and Lash Educator
Essential Tools and Products
Before diving into the steps, gather the right supplies. Using beginner-friendly products makes a significant difference, especially when dealing with glue sensitivity or inconsistent drying times.
- False lashes: Choose lightweight, strip lashes labeled “beginner-friendly” or “natural volume.” Avoid dramatic styles with thick bands at first.
- Lash adhesive: Opt for a latex-free, sensitive-formula glue if you have watery eyes or allergies. Black glue helps hide the band but requires precision; clear glue is more forgiving.
- Tweezers or lash applicator: Precision tools give better control than fingers.
- Small scissors: To trim lashes to fit your eye shape.
- Mirror: A magnifying mirror or well-lit vanity mirror is essential.
- Eye primer or setting spray: Helps create a dry, oil-free surface for better adhesion.
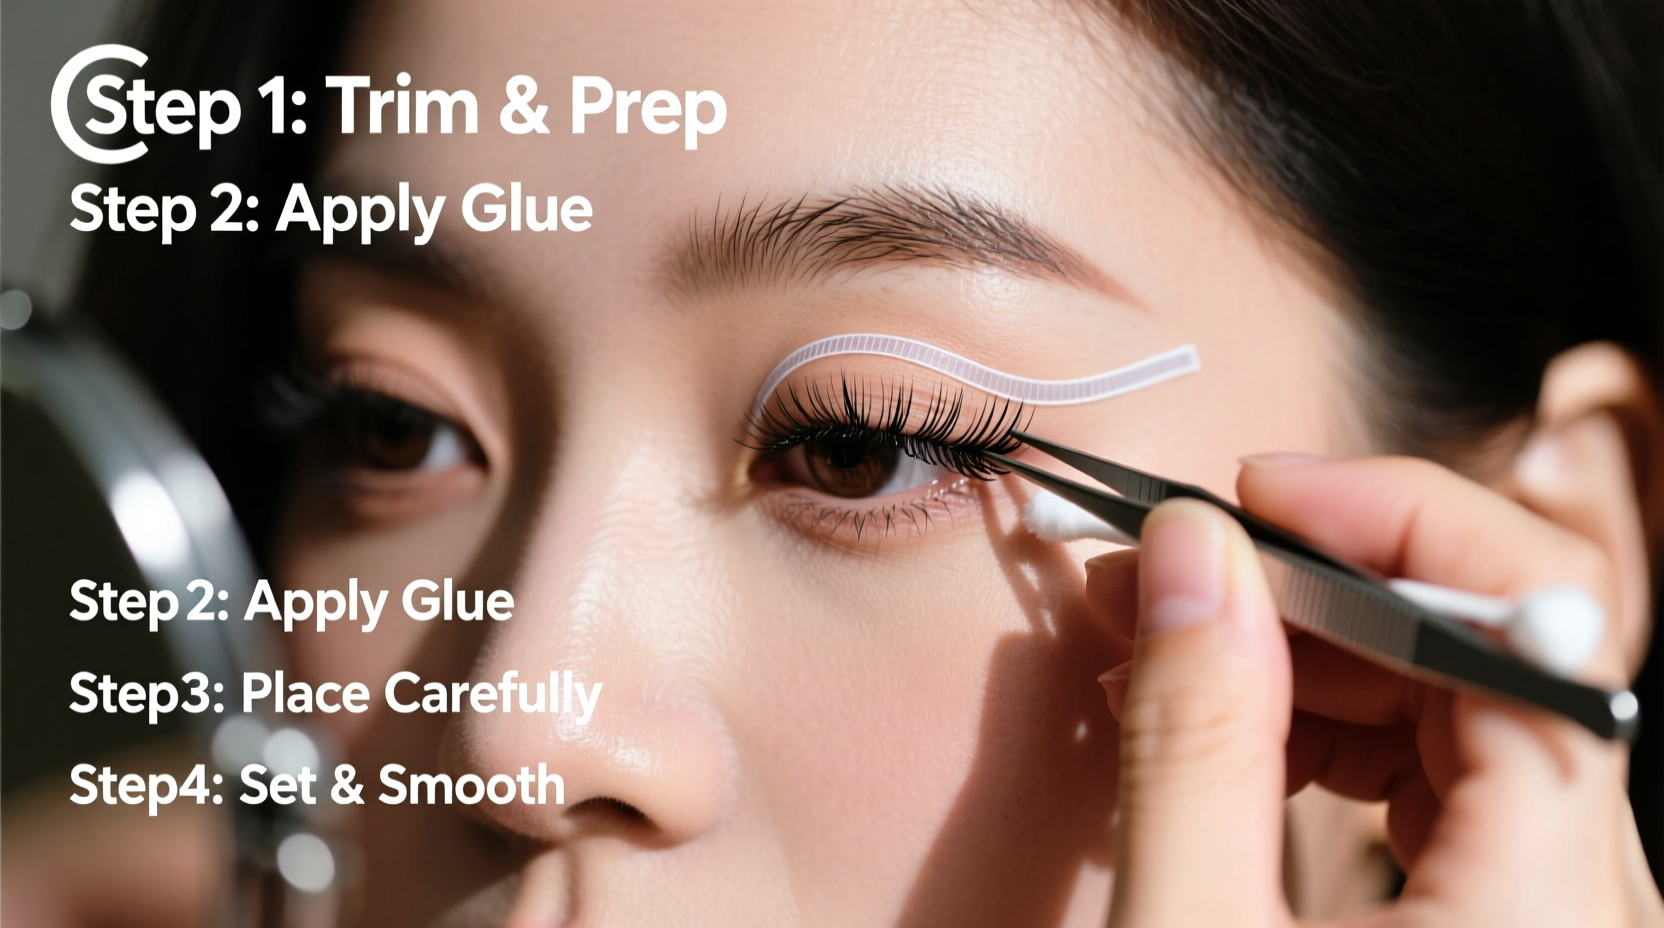
Step-by-Step Guide to Applying False Lashes Without Glue Mishaps
Follow this detailed sequence to minimize mess, maximize hold, and eliminate frustration.
- Prep your natural lashes. Curl your real lashes and apply a light coat of mascara to help blend the falsies later. Avoid heavy or waterproof formulas—they can repel glue.
- Measure and trim the lash strip. Hold the lash against your lash line. If it extends past your outer corner, snip small sections from the outer end—not the inner—to maintain the band’s integrity.
- Apply a thin layer of glue to the lash band. Squeeze a tiny dot of glue onto the back of your hand. Use the tip of a bobby pin or the edge of the glue nozzle to spread a very thin, even layer along the entire band. Less is more—excess glue will ooze out and cause clumping.
- Wait for the glue to become tacky. This is the most critical step. Set the lash down and wait 30–45 seconds. The glue should no longer be glossy or wet but slightly sticky to the touch. This ensures grip without slippage.
- Position the lash using tweezers or an applicator. Look down into a mirror placed on your counter. Align the center of the lash with your pupil, then secure the inner and outer corners. Start from the middle and press gently outward.
- Press and hold for 10 seconds. Use your fingertip or a cotton swab to lightly press the band along the lash line. Focus on the inner and outer corners, which tend to lift first.
- Blend with your natural lashes. Use your lash curler (lightly) over both real and fake lashes, or apply a second coat of mascara to fuse them seamlessly.
- Fix minor gaps with concealer or liner. If the band shows, use a fine-tip eyeliner to draw a thin line over it, or dab a touch of concealer on the inner corner to blur the edge.
Common Glue Mistakes and How to Fix Them
| Issue | Cause | Solution |
|---|---|---|
| Lashes won’t stick | Glue applied too early or too late; oily eyelids | Blot lids with tissue, reapply fresh glue, wait 30 sec |
| Glue oozing out | Too much adhesive used | Wipe excess with a pointed cotton swab before it dries |
| Lash lifts at the corners | Poor seal or movement during drying | Press corners firmly; use a lash sealant or clear glue dot |
| Itchy, red eyes | Allergic reaction to latex or formaldehyde in glue | Switch to hypoallergenic, medical-grade adhesive |
| Glue dries too fast | Humidity, old glue, or wide bottle opening | Use fresher glue; store with silica; apply in short bursts |
Realistic Example: Sarah’s First Successful Application
Sarah had tried false lashes three times before giving up. Each attempt ended with glue in her eye, crooked strips, or complete detachment within minutes. On her fourth try, she followed a structured method focused on glue timing.
She started by cleaning her eyelids with micellar water and letting them dry completely. She trimmed her lashes to fit her wide-set eyes and applied a pea-sized amount of glue using a toothpick for precision. Instead of rushing, she set a timer for 35 seconds while the glue became tacky. Using tweezers, she placed the center first, then adjusted the ends. She held each side for five seconds with a cotton bud. The result? Her lashes stayed put through a humid evening out, and she received compliments all night.
The turning point wasn’t a new product—it was patience with the glue.
Pro Tips for Glue Confidence
Even with perfect technique, environmental factors and product quality affect results. These strategies build reliability into your routine.
- Prime your eyelids. Use a mattifying primer or a dusting of translucent powder to absorb oils that weaken glue adhesion.
- Replace glue every 6–8 weeks. Old adhesive loses its bonding power and can harbor bacteria.
- Practice with inexpensive lashes. Use drugstore pairs to test glue timing and placement before using high-end sets.
- Keep a glue pen handy. Some brands offer precision-tip pens that dispense controlled amounts, reducing mess.
- Store lashes properly. After use, peel off residual glue and return them to their case. Reusable lashes can last 15+ wears with care.
“Beginners often underestimate prep time. Your eyelid is a moving, oily surface. Prepping it like you would a canvas makes all the difference.” — Lena Cho, Professional Bridal Makeup Artist
Checklist: Pre-Lash Application Routine
Run through this list before every application to avoid common pitfalls:
- ✅ Cleanse and dry eyelids thoroughly
- ✅ Curl natural lashes and apply light mascara
- ✅ Trim lashes to fit eye shape
- ✅ Shake glue gently (if applicable) and apply thin layer
- ✅ Wait 30–45 seconds for tackiness
- ✅ Position lashes from center outward
- ✅ Press and hold band in place for 10 seconds
- ✅ Blend with makeup as needed
Frequently Asked Questions
How do I stop my lash glue from stinging?
Stinging is often caused by latex or formaldehyde in traditional glues. Switch to a medical-grade, hypoallergenic formula labeled “sensitive” or “latex-free.” Also, ensure no glue gets on your eyeball—use precise tools and avoid blinking during application.
Can I wear false lashes every day?
Yes, but with caution. Daily wear can strain natural lashes if removal is rough or glue builds up. Use a gentle oil-based remover, take breaks weekly, and consider magnetic lashes for lower maintenance.
Why does my glue dry in the bottle so fast?
Exposure to air and humidity causes premature drying. After each use, wipe the nozzle clean, screw the cap on tightly, and store upright in a cool, dry place. Some users keep a mini desiccant pack in their makeup drawer to help.
Mastering the Details Builds Confidence
Applying false lashes isn’t about perfection on the first try—it’s about consistency and learning from small adjustments. The glue challenge fades once you understand its rhythm: apply thin, wait patiently, and press with purpose. Over time, what once felt fiddly becomes second nature. Many professionals admit their early attempts were messy, but persistence turned frustration into finesse.
Don’t let one bad experience deter you. With the right tools, timing, and mindset, anyone can achieve fluttery, camera-ready lashes—even if you’ve struggled before.


 浙公网安备
33010002000092号
浙公网安备
33010002000092号 浙B2-20120091-4
Comments
No comments yet. Why don't you start the discussion?