
Personalizing your everyday accessories is one of the simplest ways to express individuality. A rainbow bead pendant adds color, charm, and a touch of whimsy to any bag—whether it’s a tote, backpack, or crossbody. The process of attaching one is straightforward, but doing it correctly ensures both durability and visual appeal. This guide walks you through each phase with precision, offering expert-backed techniques and practical advice so your pendant stays secure and stylish.
Why Add a Rainbow Bead Pendant?
Rainbow bead pendants have surged in popularity due to their vibrant aesthetic and symbolic meaning—often representing inclusivity, joy, and self-expression. Beyond symbolism, they serve as functional yet decorative accents that elevate even the most basic bags. Unlike permanent modifications, bead pendants are removable, making them ideal for rotating seasonal styles or matching moods.
When properly attached, these pendants withstand daily wear without damaging the bag’s structure. They’re especially popular among students, travelers, and fashion enthusiasts who value both function and flair.
“Accessories like bead pendants transform utilitarian items into personal statements. It’s minimal effort for maximum impact.” — Lila Nguyen, Fashion Stylist & Accessory Designer
Materials You’ll Need
Before beginning, gather the necessary tools. Having everything on hand streamlines the process and reduces the risk of losing small components.
- Rainbow bead pendant with jump ring or chain attachment
- Small pliers (jewelry or needle-nose)
- Keychain clasp or lobster clasp (optional, for added security)
- Split ring (if not already part of the pendant)
- Measuring tape or ruler (for placement accuracy)
- Soft cloth (to protect bag surface during work)
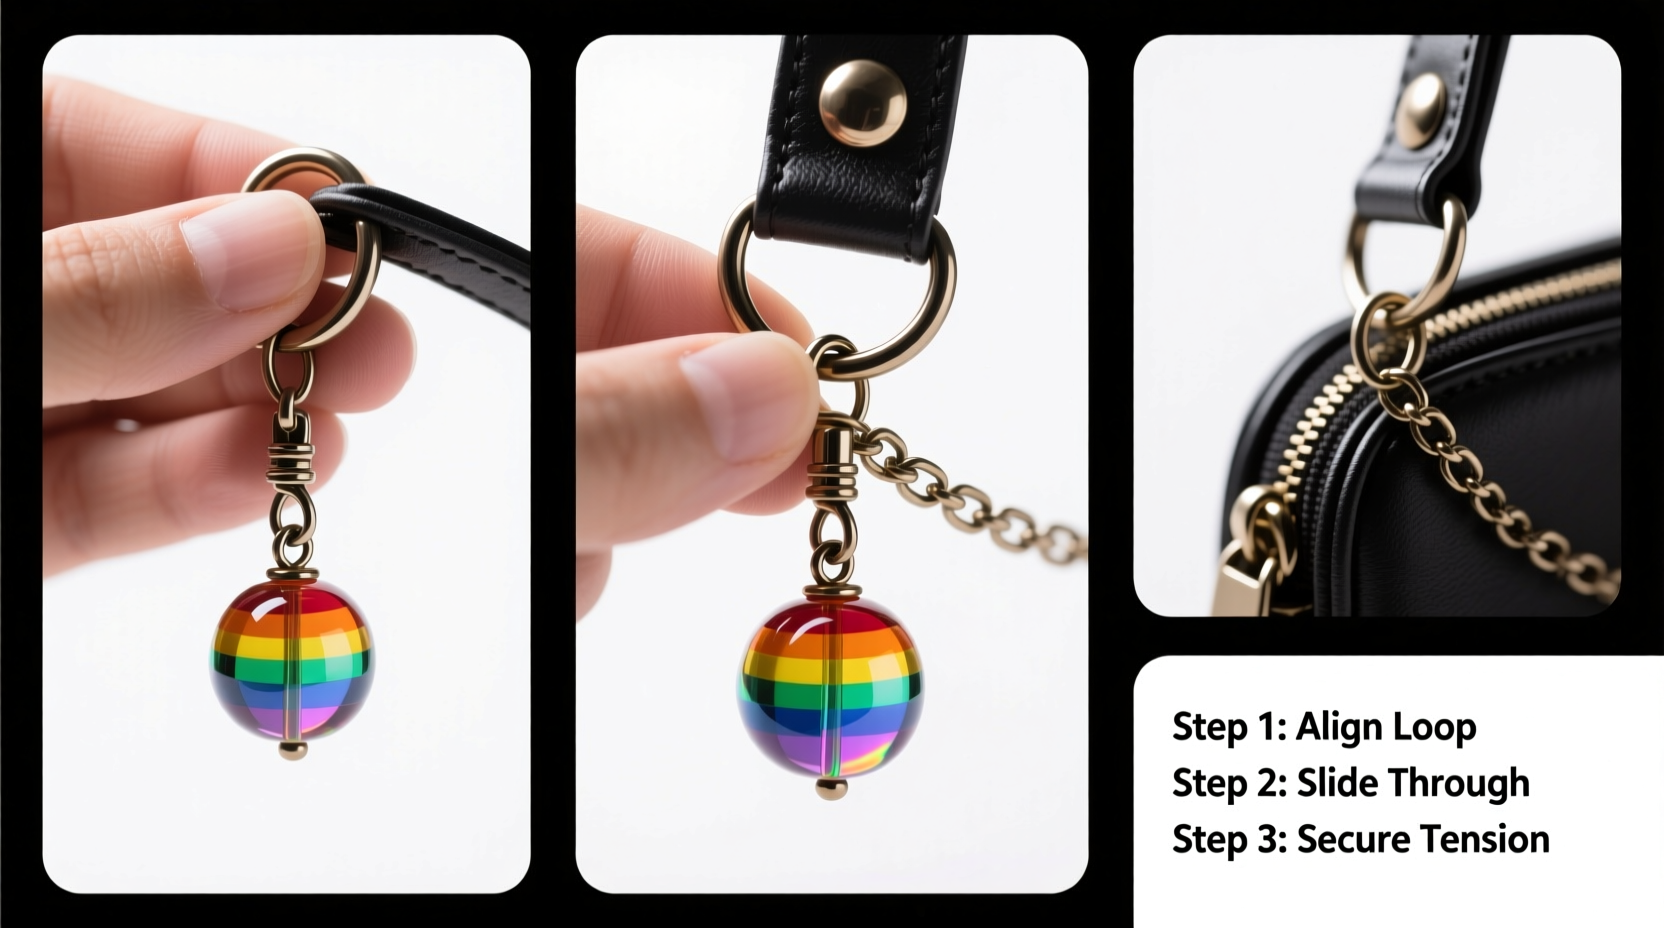
Step-by-Step Guide to Secure Attachment
Follow this detailed sequence to ensure your rainbow bead pendant is both eye-catching and securely fastened.
- Inspect Your Bag’s Attachment Points
Select a sturdy location such as a zipper pull, D-ring, handle connector, or strap buckle. Avoid stitching seams or thin fabric areas that could tear under pressure. - Clean the Area Gently
Wipe the chosen spot with a dry or slightly damp cloth. Removing dust and oils helps prevent long-term grime buildup around hardware. - Open the Jump Ring (If Applicable)
Position the pliers on either side of the jump ring. Twist sideways—do not pull apart, which can weaken or misshape the metal. - Attach the Pendant to a Split Ring or Clasp
If your pendant lacks a direct loop, thread it onto a split ring first. Then connect the split ring to the zipper pull or D-ring. For frequent swapping, use a lobster clasp instead. - Secure the Connection
Ensure all rings are fully closed and clasps are locked. Give the pendant a gentle tug to test stability. - Adjust Pendant Positioning
Center the pendant so colors display evenly. Rotate beads if needed to showcase the full spectrum. - Test Daily Use Motion
Simulate opening the zipper or swinging the bag to confirm the pendant doesn’t snag or interfere with functionality.
| Attachment Method | Best For | Security Level | Reversibility |
|---|---|---|---|
| Zipper Pull Hook | Daily-use handbags, backpacks | Moderate | High – easy removal |
| D-Ring or Strap Loop | Bags with external hardware | High | High |
| Sewn-on Loop + Clasp | Fabric-only bags without metal parts | Medium (depends on thread strength) | Low – requires sewing |
| Magnetic Clip Adapter | Delicate materials or temporary decor | Low | Very High |
Avoid These Common Mistakes
Even simple customizations can go wrong without attention to detail. Steering clear of these pitfalls keeps your bag intact and your pendant secure.
- Forcing open jump rings: Pulling them apart weakens the metal and creates gaps where detachment can occur.
- Attaching to fragile zippers: Thin pulls may bend or break under the weight of additional accessories.
- Using glue or adhesives: These damage surfaces and make future removal difficult or impossible.
- Overloading with multiple pendants: Too much weight stresses connection points and increases tangling risks.
- Ignoring bead material quality: Cheap plastic beads may fade, crack, or leach color onto fabric over time.
Real Example: Maya’s Commuter Tote Upgrade
Maya, a graphic designer in Portland, wanted her plain black canvas tote to reflect her vibrant personality. She purchased a handmade rainbow bead pendant featuring recycled glass beads and a brass jump ring. Using needle-nose pliers, she attached it to the tote’s leather zipper pull during her lunch break.
After two months of daily subway commutes and coffee runs, the pendant remained intact. “I love how people notice it,” she said. “It starts conversations—and I haven’t lost it once.” Her only adjustment was switching to a sturdier split ring after noticing slight wobbling in the original clasp.
Checklist: Attaching Your Rainbow Bead Pendant Safely
Use this quick-reference checklist before, during, and after installation:
- ☐ Choose a durable attachment point (zipper, D-ring, strap)
- ☐ Confirm pendant weight is appropriate for the bag’s hardware
- ☐ Gather pliers, clasp, and soft work surface
- ☐ Open jump ring with twisting motion—not pulling
- ☐ Connect pendant securely using split ring or lobster clasp
- ☐ Close all connections completely
- ☐ Test for movement and interference with bag function
- ☐ Clean hands and tools afterward to maintain hygiene
Frequently Asked Questions
Can I attach a bead pendant to a leather bag without damaging it?
Yes, as long as you use existing hardware like D-rings or zipper pulls. Never pierce or glue anything directly onto leather, as this causes irreversible damage. Stick to clip-on or ring-based attachments.
How do I clean a rainbow bead pendant?
Wipe gently with a microfiber cloth. For deeper cleaning, use mild soap and water, then air-dry completely before reattaching. Avoid submerging metal components to prevent tarnishing.
What if my bag doesn’t have a zipper or D-ring?
You can add a small metal loop via sewing or a rivet (for advanced users), or use a secure magnetic clip designed for accessories. Alternatively, slide the pendant onto a shoulder strap if it has a loose weave or opening.
Final Thoughts: Make It Yours, Wear It Proud
Adding a rainbow bead pendant to your bag isn’t just about decoration—it’s an act of ownership. You’re transforming a mass-produced item into something uniquely yours. With the right tools and technique, the process takes less than ten minutes and delivers lasting satisfaction.
Don’t wait for a special occasion to personalize your gear. Start today: pick a pendant, choose your spot, and make that confident twist with the pliers. Whether you’re heading to class, work, or a weekend outing, let your bag tell a story before you even speak.


 浙公网安备
33010002000092号
浙公网安备
33010002000092号 浙B2-20120091-4
Comments
No comments yet. Why don't you start the discussion?