
In an age where memories are captured in pixels, safeguarding your digital photo library is as essential as protecting physical heirlooms. With smartphones becoming the primary camera for most people, Android devices now store thousands of irreplaceable images. Yet, internal storage fails, phones get lost or damaged, and cloud services aren’t always accessible. The most reliable solution? Backing up your Android photos directly to an external drive.
This method gives you full control over your data, eliminates recurring subscription costs, and ensures long-term preservation without relying on internet connectivity. Whether you're preserving family moments, travel snapshots, or creative photography, this comprehensive guide walks you through every stage of transferring and archiving your Android photos to an external hard drive or USB flash drive—securely and efficiently.
Why Back Up Photos to an External Drive?
While Google Photos offers convenient cloud storage, it comes with limitations. After June 2021, all new uploads count against your free 15 GB quota across Gmail, Drive, and Photos. For heavy users, that fills up fast. Subscriptions help, but they’re ongoing expenses. More importantly, cloud storage depends on stable internet access and service continuity—neither guaranteed forever.
An external drive provides a one-time investment with massive storage capacity—up to several terabytes. You retain ownership of your files, avoid vendor lock-in, and can access them anytime, anywhere. Plus, having a physical backup complements cloud solutions, forming part of a robust 3-2-1 backup strategy: three copies of your data, two local (phone and external drive), and one offsite (cloud).
“Physical backups are still the gold standard for long-term digital preservation. They offer permanence, speed, and independence from third-party platforms.” — Dr. Alan Reed, Digital Archivist at Pacific Data Preservation Institute
What You’ll Need Before Starting
Before diving into the transfer process, gather the necessary tools. Preparing ahead prevents interruptions and ensures smooth execution.
- Android smartphone or tablet – Running Android 6.0 (Marshmallow) or later for optimal USB OTG support.
- External storage device – Either a portable SSD, HDD, or high-capacity USB flash drive (minimum 64GB recommended).
- USB OTG (On-The-Go) adapter or cable – Connects your phone’s charging port (USB-C or micro-USB) to a standard USB-A port.
- File manager app – Use your phone’s built-in file explorer or download a trusted third-party option like Solid Explorer or FX File Explorer.
- Sufficient battery life or power source – Transferring large photo libraries takes time; keep your phone charged.
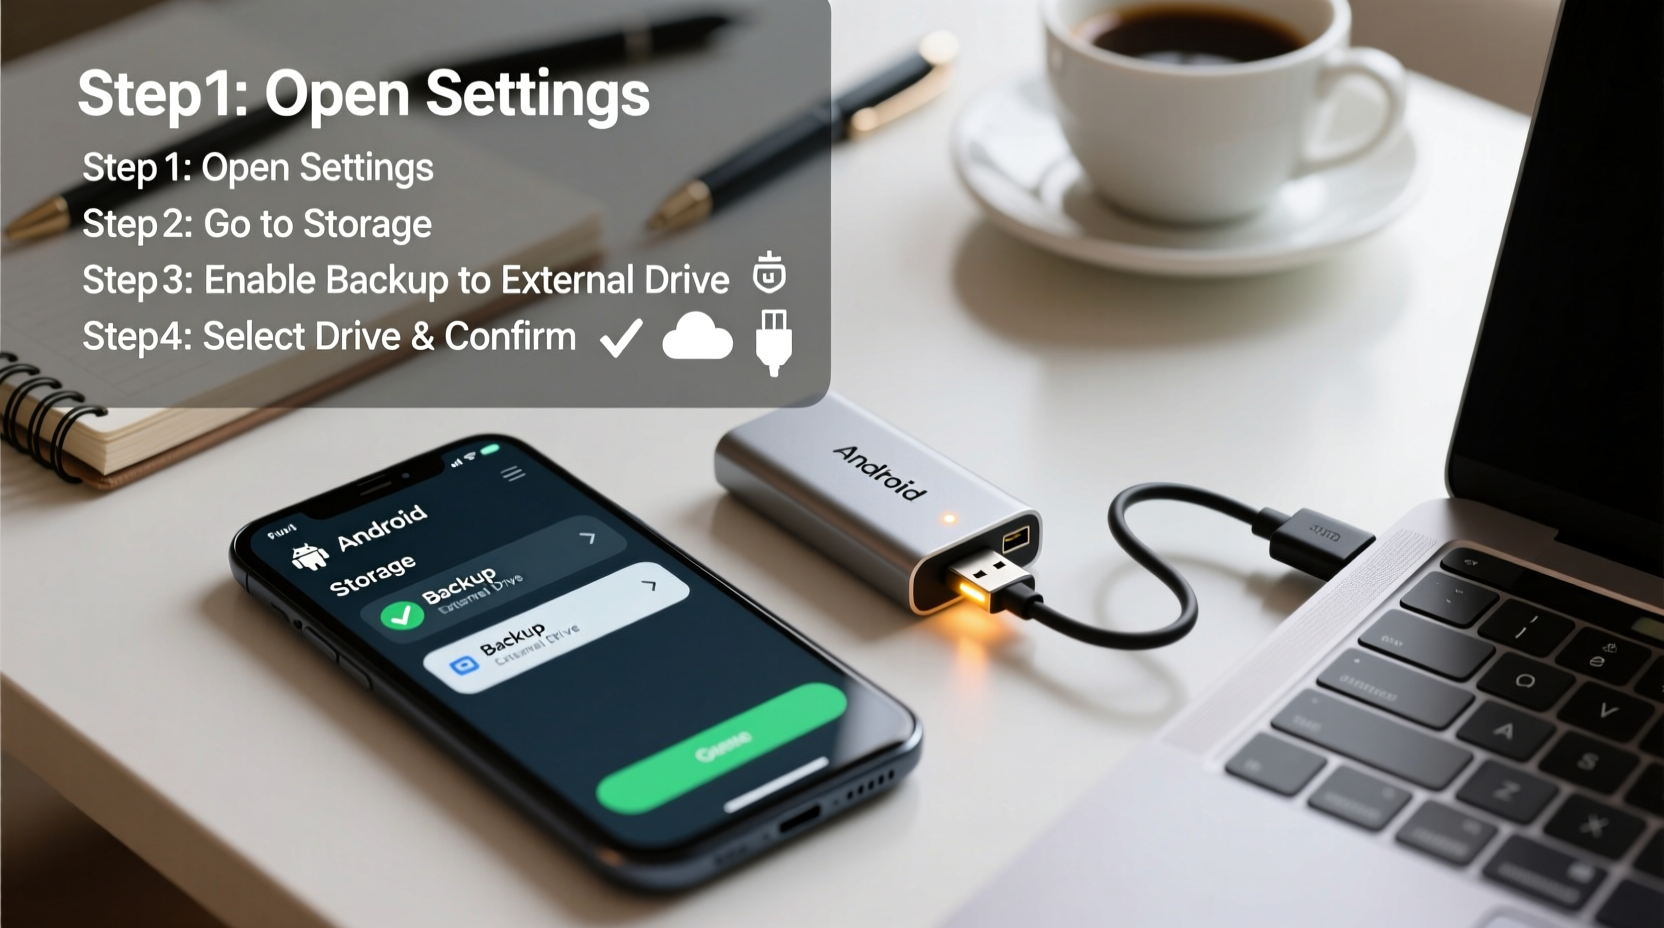
Step-by-Step Guide to Transfer Photos
Follow this structured sequence to move your photos safely from your Android device to an external drive. This method works regardless of brand—Samsung, Google Pixel, OnePlus, etc.—as long as the device supports USB OTG.
- Connect the external drive to your Android phone
Plug the USB end of the drive into the OTG adapter, then connect the adapter to your phone. Most modern Android devices will detect the drive automatically. A notification should appear saying “USB drive mounted” or similar. - Navigate to your photo storage location
Open your preferred file manager app. Navigate toInternal Storage > DCIM > Camera. This folder contains most photos taken with your camera. If you’ve saved images elsewhere (e.g., Downloads, WhatsApp Images), locate those folders too. - Select photos for backup
Long-press on a photo to enter selection mode. Choose individual files or tap “Select All” if backing up everything. Be mindful of duplicates or temporary files created by apps. - Copy the selected photos
Tap the “Copy” button (usually represented by two sheets of paper). Do not use “Move” unless you intend to delete originals after confirmation. - Navigate to the external drive
In your file manager, switch to the “Storage” or “Devices” section and select your connected external drive. Create a new folder named something like “Android_Photos_Backup_YYYY-MM-DD” for organization. - Paste the photos
Enter the newly created folder and tap “Paste.” The transfer will begin. Large batches may take minutes or even hours depending on volume and connection speed. - Verify the transfer
Once complete, open the folder on the external drive and browse through a sample of photos to confirm they copied correctly. Check image integrity and metadata if needed. - Safely eject the drive
Return to your phone’s notifications panel, find the USB drive entry, and tap “Unmount” or “Safely remove.” Never pull the drive out while active—it risks data corruption.
Best Practices for Organizing and Maintaining Backups
Backing up once isn’t enough. To truly protect your memories, adopt a routine and structure that makes retrieval easy and minimizes risk.
Create a Logical Folder Hierarchy
Instead of dumping all photos into one folder, organize them chronologically or thematically:
/Photos/2024/01_January_Family_Trip/Photos/2024/06_Birthday_Party/Photos/Archived/Pre-2020_Restored_Albums
This structure simplifies searching and preserves context years later.
Use Descriptive Filenames (When Possible)
Most camera apps save files as DSC_XXXX.jpg. Consider renaming important albums manually after transfer. For example: Italy_Vacation_Day3_Sunset.jpg. Avoid special characters and spaces; use underscores instead.
Schedule Regular Backups
Set a monthly reminder to plug in your drive and repeat the process. Automate less, but stay consistent. Think of it like changing smoke detector batteries—routine maintenance prevents disaster.
Maintain Multiple Copies
Keep a second copy on a different drive stored in another location (e.g., parent’s house, office). This protects against fire, theft, or natural disasters affecting your primary backup.
| Practice | Recommended | Avoid |
|---|---|---|
| Backup Frequency | Monthly or quarterly | Only when storage runs low |
| File Organization | Year/Month_Event naming | All photos in root folder |
| Drive Type | Portable SSD with encryption | Old USB 2.0 flash drives |
| Data Verification | Check random samples post-transfer | Assume success without checking |
Real-World Example: Recovering From a Phone Crash
Sophia, a freelance photographer based in Portland, relied solely on her Pixel phone for client shoots and personal work. She uploaded some photos to Google Photos but didn’t consistently manage storage. One morning, her phone failed to boot after a software update. Despite attempts at recovery, the internal storage was corrupted.
Luckily, she had backed up her last three months of photos—including a wedding shoot—to a Samsung T7 Shield SSD via USB OTG just two weeks prior. Using her laptop, she accessed the drive, delivered the client gallery on schedule, and avoided financial loss. “That 20-minute monthly ritual saved my reputation,” she said. “Now I back up every Friday without fail.”
Sophia now maintains two external drives—one for current projects, one rotated offsite—and uses the same transfer steps outlined here. Her experience underscores how simple actions today prevent crises tomorrow.
Troubleshooting Common Issues
Even with careful planning, technical hiccups occur. Here’s how to handle frequent problems during Android-to-drive transfers.
Phone Doesn’t Recognize the External Drive
This is often due to insufficient power delivery. Try these fixes:
- Use a powered USB hub between the drive and phone.
- Switch to a lower-power device (e.g., USB flash drive instead of desktop HDD).
- Ensure your OTG adapter is compatible with your model (check manufacturer specs).
Transfer Is Extremely Slow
If copying 100 photos takes over 10 minutes, evaluate your hardware:
- Older USB 2.0 drives max out at ~30 MB/s; upgrade to USB 3.0+ for speeds over 100 MB/s.
- Clean your phone’s cache and close background apps before starting.
- Avoid wireless charging during transfer—it can reduce performance.
Files Appear Corrupted After Transfer
To prevent data loss:
- Always unmount the drive properly before disconnecting.
- Use reliable brands (SanDisk, Samsung, WD) known for firmware stability.
- Run periodic checks on the drive using tools like CHKDSK (Windows) or Disk Utility (Mac).
Alternative Methods Worth Considering
While direct USB OTG transfer is the most straightforward, other options exist depending on your setup.
Using a Computer as a Middleman
Connect your Android to a PC or Mac via USB cable, copy photos to the computer, then transfer to the external drive. Slower but useful if your phone lacks OTG support.
Wi-Fi Transfer Apps
Tools like Send Anywhere or Portal by Western Digital let you wirelessly push files from phone to a network-connected drive. Requires both devices on the same Wi-Fi and consumes battery quickly.
Dedicated Backup Devices
Products like the WD My Passport Wireless Pro act as standalone hubs. You can connect your phone over Wi-Fi and back up directly without a computer. Higher cost but excellent for travelers.
FAQ: Common Questions About Android Photo Backups
Can I automate photo backups to an external drive?
Currently, Android does not natively support scheduled automatic transfers to external drives. Some third-party apps claim automation, but they often require root access or have reliability issues. Manual transfer remains the safest approach.
Will backing up delete photos from my phone?
No—unless you choose “Move” instead of “Copy” during transfer. Always use “Copy” to preserve originals until you’ve verified the backup is complete and accurate.
How long do external drives last?
Most consumer-grade drives last 3–5 years under regular use. Mechanical hard drives are more prone to failure than solid-state drives. Experts recommend refreshing your backup media every 3–4 years and migrating data to new drives proactively.
Final Checklist: Ensure a Successful Backup
- ✅ Verify drive compatibility with your Android model
- Confirm USB OTG support in settings or online documentation.
- ✅ Charge your phone fully before starting
- Interruptions during transfer can corrupt files.
- ✅ Use “Copy,” not “Move,” initially
- Preserve originals until backup is confirmed.
- ✅ Create dated folders on the drive
- Maintain order and track versions over time.
- ✅ Unmount the drive safely
- Prevent data loss from improper ejection.
- ✅ Test restore a few images
- Prove the backup works before relying on it.
Take Control of Your Digital Legacy Today
Your photos are more than files—they’re fragments of your life, frozen in time. Relying solely on a smartphone or cloud service puts them at risk. By taking just an hour each month to back up your Android photos to an external drive, you build a resilient archive immune to glitches, outages, and obsolescence.
Start small. Use what you already own. Follow the steps carefully. Over time, this habit becomes second nature. And decades from now, when someone asks, “What did the world look like back then?”—you’ll be able to show them, one preserved pixel at a time.


 浙公网安备
33010002000092号
浙公网安备
33010002000092号 浙B2-20120091-4
Comments
No comments yet. Why don't you start the discussion?