
Smartphones have become our primary cameras, and for many, the iPhone holds thousands of irreplaceable photos—birthdays, travels, family moments—that we can’t afford to lose. While iCloud offers a convenient backup solution, its limited free storage and recurring subscription costs push users toward alternatives. One of the most secure, cost-effective, and future-proof options is backing up directly to an external solid-state drive (SSD). This method gives you full control over your data, avoids monthly fees, and ensures long-term accessibility.
Yet, unlike drag-and-drop file transfers on a desktop, moving iPhone photos to an external SSD isn't immediately obvious. Apple’s ecosystem prioritizes cloud integration, and direct hardware access requires specific tools and preparation. This guide walks through the entire process—from choosing compatible hardware to verifying your final backup—with no technical jargon or guesswork.
Why Avoid iCloud? The Case for Local Backups
iCloud Photo Library is seamless for light users, but it has limitations. The free tier offers only 5GB of storage, which fills quickly with high-resolution photos and videos from modern iPhones. Upgrading means ongoing costs: $0.99/month for 50GB, $2.99 for 200GB, or $9.99 for 2TB. Over five years, that’s nearly $600 spent just to keep your photos safe.
Beyond cost, privacy and reliability are growing concerns. Storing sensitive personal media in the cloud increases exposure to potential breaches or account hijacking. Moreover, if your internet connection drops during upload, incomplete backups can lead to gaps in your photo library.
“Local backups give users autonomy. You own the drive, you own the data—no third-party access, no surprise fees.” — David Lin, Data Security Consultant
An external SSD solves these issues. These drives are fast, durable, and capable of holding multiple terabytes of data. A 1TB SSD costs under $80 and can store over 250,000 photos. Once set up, the same drive can back up multiple devices for years.
Required Tools and Compatibility Checklist
Not all SSDs work with iPhones. Apple uses proprietary protocols, so compatibility depends on three key components: the drive itself, the enclosure (if using a portable SSD), and the connector. Here's what you need:
- iPhone (iOS 13 or later) – Older versions may lack USB drive support.
- External SSD with USB-C or Lightning interface – Must be formatted correctly (more on this later).
- Apple Camera Connection Kit (Lightning to USB3) or USB-C to USB-C cable – Depends on your iPhone model.
- Power source (optional but recommended) – Some SSDs draw more power than the iPhone can supply.
The iPhone’s Files app supports external drives, but only if they use exFAT or MS-DOS (FAT) formatting. Most new SSDs come pre-formatted for Windows (NTFS), which iOS cannot write to. You’ll need to reformat the drive using a Mac or PC before first use.
Do’s and Don’ts When Choosing an SSD
| Do | Don’t |
|---|---|
| Choose exFAT-formatted SSDs | Buy NTFS-only drives without planning to reformat |
| Use SSDs with built-in battery or Y-cable for power | Use large desktop drives needing external power |
| Pick rugged, portable models (e.g., Samsung T7, SanDisk Extreme) | Use outdated USB 2.0 drives |
| Opt for at least 512GB capacity | Assume all “phone-compatible” drives work out of the box |
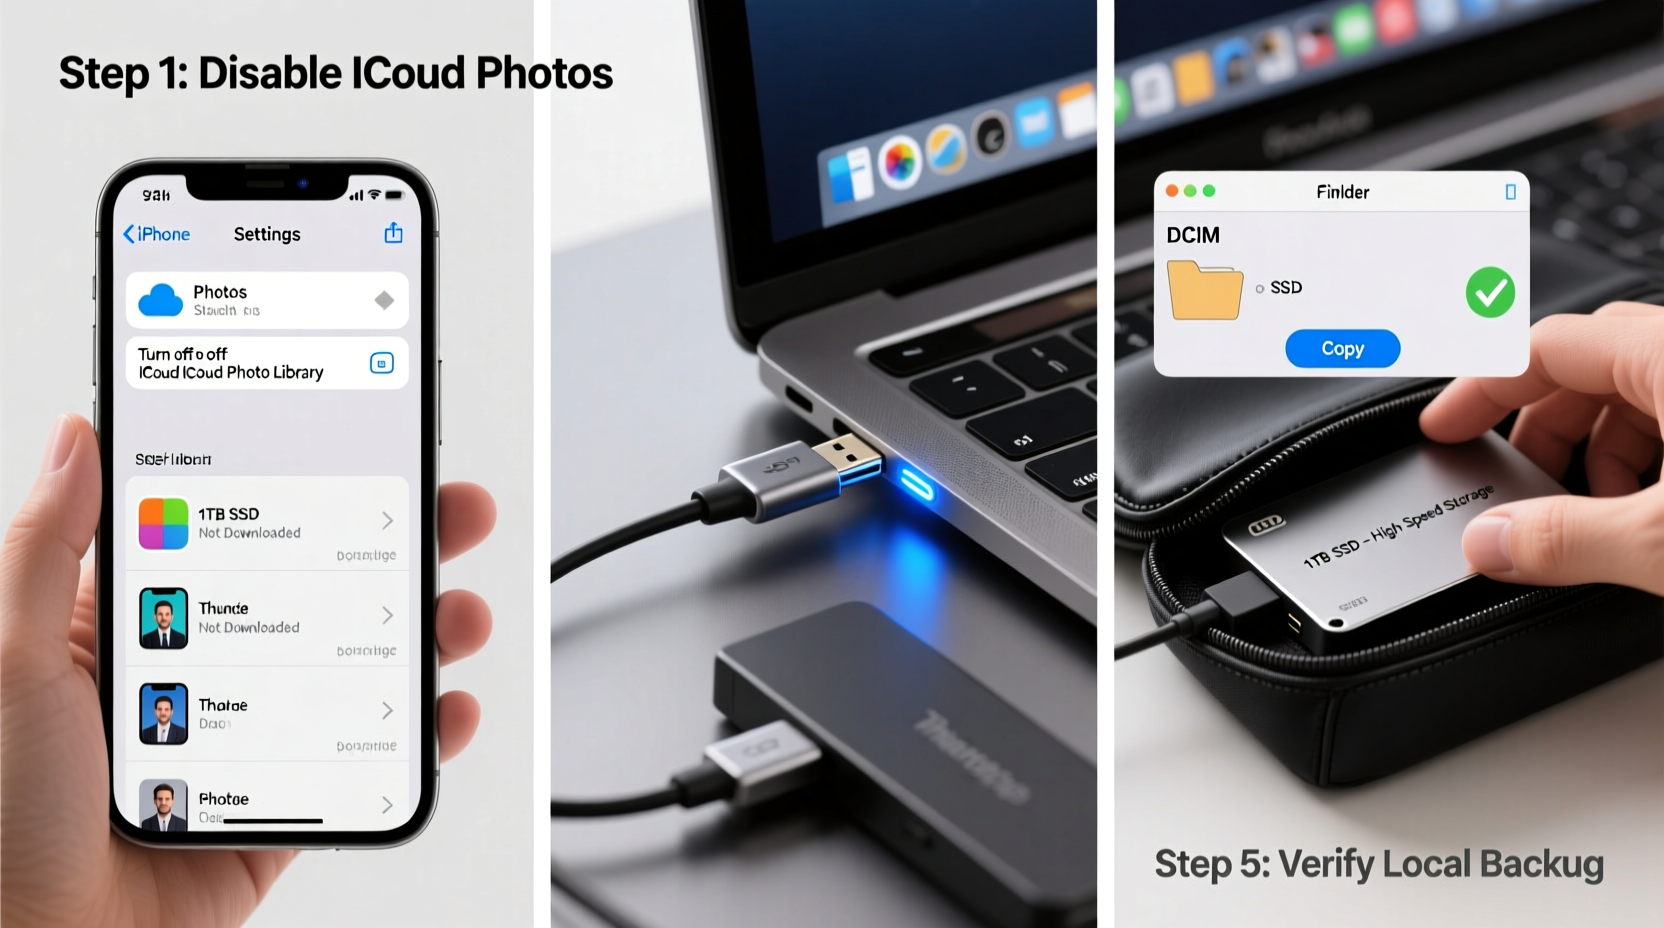
Step-by-Step: Transferring Photos to Your External SSD
Follow this sequence carefully. Skipping steps may result in failed connections or corrupted files.
- Reformat the SSD (if needed)
Connect the SSD to a Mac or Windows PC. On macOS, open Disk Utility, select the drive, choose “Erase,” then set format to ExFAT and scheme to GUID Partition Map. On Windows, use File Explorer: right-click the drive > Format > select exFAT. - Connect the SSD to Your iPhone
For Lightning iPhones: Use the Apple Camera Connection Kit. Plug the USB-A end into the adapter, then connect the SSD via USB-A to USB-C cable.
For USB-C iPhones (iPhone 15 and later): Use a USB-C to USB-C cable directly. - Launch the Files App
Open the Files app on your iPhone. Under “Locations,” you should see your SSD listed. If not, disconnect and reconnect. Ensure the drive isn’t spinning down due to inactivity. - Navigate to Your Photos
In the Files app, go to “Browse” > “On My iPhone” > [Your iPhone Name] > DCIM. This folder contains all camera photos and videos. Note: Hidden or recently deleted items won’t appear here. - Create a Backup Folder on the SSD
Tap the “…” menu in the top-right of the Files app, select “New Folder,” and name it something like “iPhone_Photos_Backup_May2025.” Organizing by date helps track multiple backups. - Copy Photos to the SSD
Open the DCIM folder, tap “Select,” then choose the photos or folders you want to back up. Tap “Copy,” navigate to your newly created folder on the SSD, and tap “Paste.”
Note: Large video files may take several minutes to transfer. Do not disconnect the drive during this process. - Verify the Transfer
After copying, open the backup folder on the SSD and confirm all files are present. Tap any photo or video to preview it directly from the drive. - Safely Eject the Drive
Press and hold the SSD’s name in the Locations panel until a “Remove” option appears. Tap it before physically disconnecting. This prevents data corruption.
Real-World Example: Sarah’s Travel Backup Routine
Sarah, a freelance photographer, travels frequently with her iPhone 14 Pro. During a two-week trip across Japan, she captured over 2,000 photos and 40GB of 4K video. She knew iCloud would take days to upload over spotty hotel Wi-Fi and cost extra for temporary storage.
Instead, she used a 1TB Samsung T7 SSD and the Apple Camera Connection Kit. Each evening, she connected the SSD to her iPhone, opened the Files app, and copied that day’s DCIM folder into a dated subfolder (“Japan_Trip_2025/Day_03”). By the trip’s end, she had a complete, organized local backup. She later imported the files to her MacBook for editing and kept the SSD as a master archive.
“It gave me peace of mind,” she said. “No waiting, no syncing errors. I owned my photos the moment I took them.”
Troubleshooting Common Issues
Even with the right gear, problems can occur. Here’s how to resolve them:
- SSD not showing up in Files app? – Reboot your iPhone, try a different cable, or check if the drive needs external power. Some SSDs require more current than the iPhone can deliver.
- Transfer stuck or extremely slow? – Close background apps, ensure the SSD isn’t overheating, and avoid using Bluetooth peripherals during transfer.
- Files copied but won’t open? – The SSD may be failing or improperly formatted. Test it on a computer. Also, verify the original files aren’t corrupted.
- “Not Enough Space” error? – Even if the SSD shows available space, iOS reserves some for system use. Delete old backups or upgrade to a larger drive.
“Always test your hardware setup at home before relying on it in the field. A beach vacation isn’t the time to discover your SSD doesn’t play well with iOS.” — Marcus Reed, Mobile Workflow Trainer
Best Practices for Long-Term Photo Preservation
Backing up is only the first step. To ensure your photos remain accessible for decades, follow these principles:
1. Use the 3-2-1 Rule
Keep 3 copies of important data: 1 primary (iPhone), 2 backups (e.g., SSD + another drive stored elsewhere). This protects against theft, fire, or drive failure.
2. Rotate Drives Every 3–5 Years
SSDs have a finite lifespan. Even when unused, data degrades over time. Refresh your archive by copying to a new drive every few years.
3. Store in Climate-Controlled Conditions
Heat, humidity, and magnetic fields damage storage devices. Keep your SSD in a cool, dry place away from electronics.
4. Maintain File Organization
Create a consistent naming convention: Year_Month_Event (e.g., 2025_06_Bali_Trip). Use subfolders to separate photos and videos.
Frequently Asked Questions
Can I back up Live Photos and HEIC files to an SSD?
Yes. The iPhone stores Live Photos as .HEIC image files paired with .mov video clips. When you copy the DCIM folder, both components transfer together. They’ll retain full functionality when viewed on compatible devices.
Will backing up to an SSD delete photos from my iPhone?
No. Copying files to an external SSD is non-destructive. Your originals remain on the iPhone unless you manually delete them. However, never assume a successful transfer—always verify files on the SSD before deleting anything.
Can I use a flash drive instead of an SSD?
You can, but SSDs are strongly preferred. Flash drives have slower write speeds, lower durability, and smaller capacities. For large photo libraries, an SSD provides faster transfers and better reliability.
Conclusion: Take Control of Your Digital Memories
Your photos are more than data—they’re pieces of your life. Relying solely on iCloud means trusting a service beyond your control, both technically and financially. By backing up to an external SSD, you reclaim ownership. You eliminate recurring fees, reduce dependency on internet connectivity, and build a resilient personal archive.
The initial setup takes less than an hour. After that, regular backups become routine—quick, reliable, and silent. Whether you're a casual snapper or a mobile photography enthusiast, investing in a $70 SSD today could save you from irreversible loss tomorrow.


 浙公网安备
33010002000092号
浙公网安备
33010002000092号 浙B2-20120091-4
Comments
No comments yet. Why don't you start the discussion?