
Booting Windows 10 from a USB drive is an essential skill for anyone managing PCs—whether you're installing the OS on a new machine, recovering a corrupted system, or troubleshooting startup issues. Unlike traditional DVD-based installations, USB drives offer faster boot times, reusability, and portability. However, many users struggle with incorrect configurations, incompatible media, or BIOS settings that prevent successful booting.
This comprehensive guide walks through every phase of the process: preparing your USB drive, configuring firmware settings, initiating the boot sequence, and navigating the Windows setup environment. By following these steps, you’ll gain confidence in performing clean installations and emergency recoveries without relying on pre-installed recovery partitions or optical media.
Why Boot from USB?
There are several compelling reasons to boot Windows 10 from a USB drive:
- Clean Installation: Remove bloatware and start fresh with a pristine OS environment.
- System Recovery: Restore access when your hard drive fails or the OS won’t load.
- Hardware Upgrades: Install Windows on a new SSD or replace a failing drive.
- Portability: Carry a trusted installation tool across multiple machines.
- Speed: USB 3.0 drives are significantly faster than DVDs for data transfer during setup.
“Having a bootable Windows 10 USB drive is like carrying a digital first-aid kit—it can save hours of downtime.” — Mark Tran, Senior IT Support Specialist
What You’ll Need Before Starting
Before creating a bootable USB, ensure you have the following components ready:
Required Materials
- A working computer (Windows, Mac, or Linux) to create the bootable drive
- A blank USB flash drive (8GB minimum)
- Downloaded Windows 10 ISO file from Microsoft’s official site
- Administrative access to the target PC
- Internet connection (recommended for driver downloads and activation)
Recommended Tools
| Tool | Purpose | Platform |
|---|---|---|
| Rufus | Create bootable USB quickly with advanced options | Windows |
| Windows Media Creation Tool | Official Microsoft utility for ISO creation | Windows only |
| UNetbootin | Alternative cross-platform tool (less reliable for Windows) | Windows/macOS/Linux |
Creating a Bootable Windows 10 USB Drive
The success of your boot process depends heavily on how the USB was prepared. Follow this timeline to create a reliable bootable drive using the recommended method.
Step-by-Step Timeline Using Rufus (Recommended)
- Download Rufus: Visit rufus.ie and download the latest portable version.
- Insert Your USB Drive: Plug it into a USB 3.0 port if available for faster writing speeds.
- Launch Rufus: Run as administrator to avoid permission errors.
- Select Device: Choose your USB drive under “Device.” Double-check the drive letter to avoid overwriting another disk.
- Boot Selection: Click “SELECT” next to “Boot selection” and choose your downloaded Windows 10 ISO file.
- Partition Scheme: For modern systems with UEFI firmware, select “GPT” and “UEFI (non CSM).” For older PCs, use “MBR” and “BIOS (or UEFI-CSM).”
- File System: Leave as default (usually NTFS).
- Volume Label: Name it something recognizable like “Win10_Install”.
- Start: Click “START” and confirm all data will be erased.
- Wait for Completion: This takes 5–15 minutes depending on USB speed and ISO size.
Configuring BIOS/UEFI to Boot from USB
Even with a properly created bootable USB, your PC must be configured to recognize it as a valid boot source. Accessing and adjusting firmware settings is often the most confusing part for beginners.
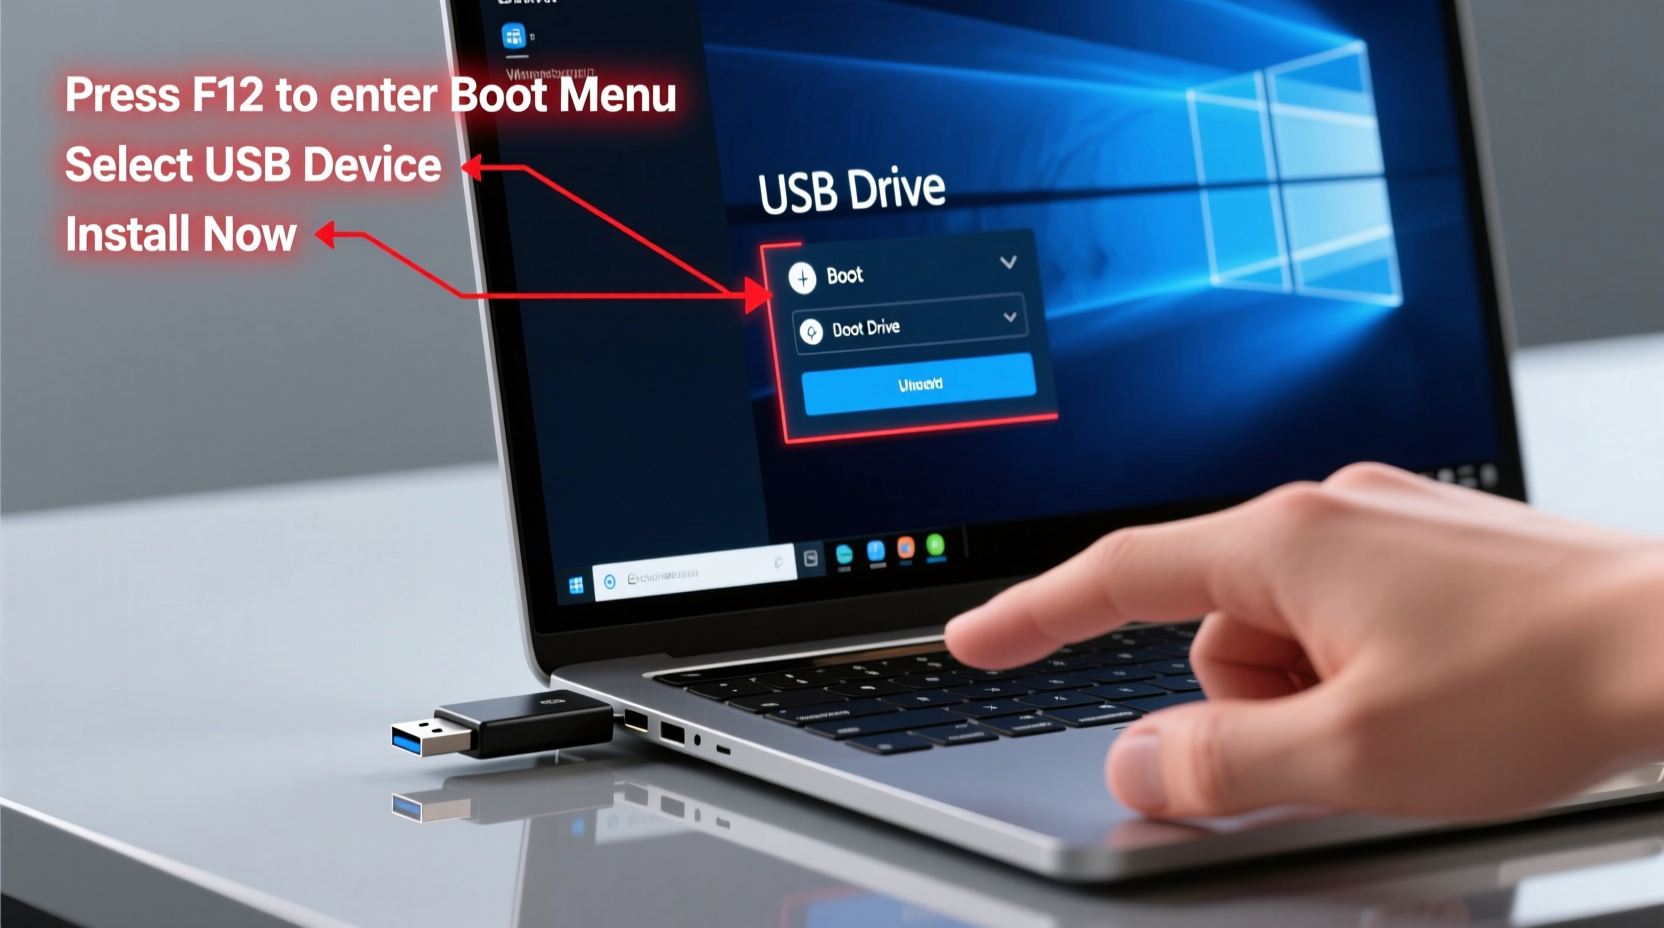
Accessing the Boot Menu
During startup, press one of the following keys repeatedly (before the Windows logo appears):
- F12 – Dell, Lenovo, HP
- F10 – HP, some custom builds
- ESC – Many laptops and desktops
- F2 or DEL – Common for entering full BIOS setup
The exact key varies by manufacturer. Look for a brief splash screen indicating which key to press for “Boot Menu” or “Setup.”
Changing Boot Order in BIOS/UEFI
- Restart the computer and enter BIOS/UEFI using the correct key.
- Navigate to the “Boot” tab using arrow keys.
- Locate the boot priority list and move “USB Drive,” “Removable Devices,” or your specific USB model to the top.
- If available, enable “Legacy Boot” or “CSM (Compatibility Support Module)” only if your USB was formatted with MBR.
- Disable “Secure Boot” temporarily if the system refuses to boot from external media.
- Save changes and exit (usually F10).
“Modern UEFI systems expect GPT-partitioned drives. Mixing MBR and UEFI often causes silent boot failures.” — Lin Zhao, Firmware Engineer
Troubleshooting Common Boot Issues
Despite careful preparation, problems can occur. Here’s how to resolve them efficiently.
Common Problems & Solutions
| Issue | Possible Cause | Solution |
|---|---|---|
| PC ignores USB drive | Wrong boot mode or disabled USB boot | Enable USB in BIOS; check Secure Boot/CSM settings |
| “No bootable device found” | Corrupted or improperly written ISO | Recreate USB using Rufus with correct partition scheme |
| Stuck on black screen after boot | Outdated BIOS or incompatible USB 3.0 controller | Update BIOS; try a different USB port or drive |
| Installation fails mid-process | Damaged ISO or failing hardware | Verify ISO checksum; test RAM and SSD health |
Mini Case Study: Recovering a Frozen Laptop
Sarah, a freelance graphic designer, encountered a critical issue when her laptop froze during a Windows update. The machine looped endlessly at the loading screen. She used a previously created Windows 10 USB drive to boot into recovery mode. From there, she accessed “Startup Repair,” which restored the bootloader. When that failed, she used “Reset this PC” with cloud download to reinstall Windows cleanly—all within 45 minutes. Her project deadlines were preserved, and she avoided costly repair services.
Using the Windows Setup Environment
Once successfully booted, you'll enter the Windows Setup interface. This environment allows more than just installation—it supports repair, formatting, and diagnostic tools.
Key Actions Available After Boot
- Install Now: Begin a fresh Windows 10 installation.
- Repair Your Computer: Access recovery options like System Restore, Command Prompt, or Reset.
- Command Prompt: Run diskpart, chkdsk, or bcdboot to fix boot records manually.
- Format Drives: Clean infected or malfunctioning partitions before reinstalling.
FAQ
Can I use the same USB drive for multiple computers?
Yes. A bootable Windows 10 USB works across different makes and models, provided they support the same architecture (64-bit vs 32-bit) and firmware type (UEFI or legacy BIOS).
Will booting from USB erase my files?
Booting alone does not delete anything. However, proceeding with installation or formatting will erase data on selected drives. Always back up important files first.
How do I know if my USB is bootable?
If your PC starts loading the Windows setup screen instead of going directly to the current OS or showing an error, the USB is functioning correctly. You can also verify using Rufus—the tool clearly indicates whether the drive is bootable.
Final Checklist Before You Begin
- ✅ Downloaded official Windows 10 ISO
- From Microsoft’s website to avoid malware risks.
- ✅ Used Rufus or Media Creation Tool
- To ensure proper boot sector configuration.
- ✅ Selected correct partition scheme (GPT for UEFI, MBR for BIOS)
- Mismatched schemes are the #1 cause of boot failure.
- ✅ Configured BIOS to prioritize USB
- Confirmed boot order and disabled conflicting security features.
- ✅ Backed up personal data
- Prevents irreversible loss during reinstallation.
Conclusion
Mastering the ability to boot Windows 10 from a USB drive transforms how you manage PC maintenance and emergencies. Whether setting up a new workstation or rescuing a failed system, this skill saves time, reduces dependency on third-party tools, and empowers you with control over your computing environment. With a properly prepared USB drive and familiarity with firmware settings, recovery becomes predictable rather than panic-inducing.


 浙公网安备
33010002000092号
浙公网安备
33010002000092号 浙B2-20120091-4
Comments
No comments yet. Why don't you start the discussion?