
Displaying anime figures is more than just arranging collectibles—it's about preserving art. Over time, dust, sunlight, and accidental bumps can degrade even the most pristine figures. A well-designed, low maintenance display shelf not only enhances visual appeal but also reduces cleaning frequency, prevents damage, and keeps your collection looking museum-quality with minimal effort. This guide walks through every phase of building a smart, durable, and easy-to-care-for shelf system tailored for anime figures.
Why Low Maintenance Matters for Figure Displays
Anime figures are often detailed resin or PVC sculptures that require protection from environmental factors. Frequent handling for dusting increases the risk of chipping or dropping. A low maintenance approach prioritizes prevention over repair. By integrating sealed enclosures, UV-protected materials, and strategic placement, you minimize long-term upkeep while maximizing preservation.
According to interior designer and collector Hiro Tanaka, “The best display solutions disappear into the background—protective without being intrusive.” A thoughtfully built shelf reduces friction between enjoyment and maintenance, letting collectors focus on appreciation rather than chores.
“Design for longevity, not just aesthetics. The less you have to touch your figures, the better they’ll age.” — Hiro Tanaka, Collector-Focused Interior Designer
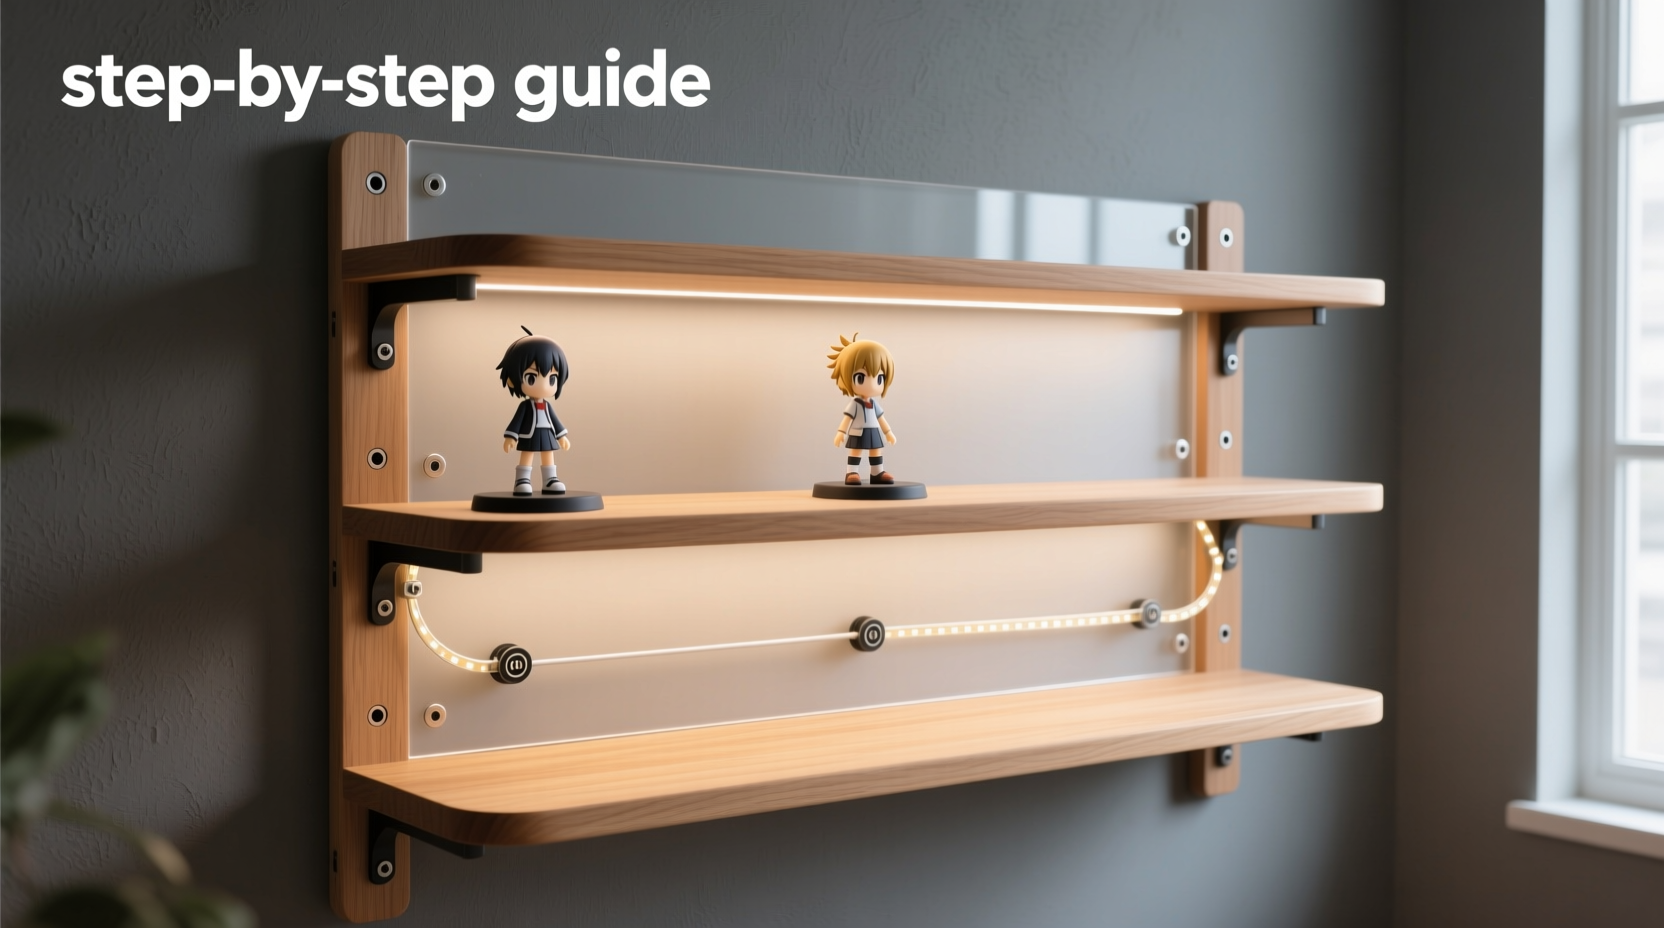
Step-by-Step: Building Your Low Maintenance Display Shelf
Creating a functional, low maintenance shelf doesn’t require advanced carpentry. With careful planning and the right materials, you can build a sleek, protective unit in under a weekend. Follow this timeline-based process for optimal results.
Week 1: Planning & Design (Days 1–3)
- Measure your space: Determine wall dimensions or floor area available. Leave at least 6 inches of clearance around the unit for airflow and access.
- Inventory your figures: Note height, width, and fragility. Group similar sizes to plan shelf spacing.
- Sketch a layout: Use graph paper or free design software (e.g., SketchUp Free) to draft a three-tiered design with adjustable shelves. Include cabinet doors or acrylic panels.
- Select location: Avoid direct sunlight, high humidity zones (like bathrooms), and high-traffic areas prone to vibrations.
Day 4: Material Selection & Sourcing
The durability and upkeep of your shelf depend heavily on material choices. Opt for components that resist warping, staining, and dust accumulation.
| Component | Recommended Material | Avoid |
|---|---|---|
| Frame | Baltic birch plywood or MDF with laminate finish | Particleboard, untreated pine |
| Shelves | Tempered glass or acrylic sheets (3–5mm) | Thin plastic, soft wood |
| Enclosure | Clear acrylic panels with magnetic closures | Open-back designs, flimsy fabric covers |
| Hardware | Stainless steel screws, soft-close hinges | Iron fittings (rust-prone) |
Tempered glass offers clarity and scratch resistance, while acrylic is lighter and less prone to shattering. Both are easy to wipe clean with microfiber and alcohol-free cleaner.
Day 5: Construction (Assembly Phase)
With materials gathered, begin assembly in a clean, dry workspace.
- Cut frame pieces: Use a circular saw or have cuts done at a hardware store. Standard dimensions: 36” wide × 12” deep × 48” tall.
- Assemble the carcass: Attach side panels to top and bottom using pocket holes and wood glue for stability. Reinforce corners with L-brackets.
- Install adjustable shelf pins: Drill evenly spaced holes (every 2”) along the interior sides to allow flexible shelf heights.
- Add back panel: Secure a thin plywood or hardboard sheet to stabilize the structure and block dust from behind.
Day 6: Install Protective Enclosures
This is the cornerstone of low maintenance design. Enclosures limit dust exposure and physical contact.
- Attach soft-close hinge doors to the front using pre-drilled templates.
- Alternatively, install sliding acrylic panels on aluminum tracks for a modern look.
- Use neodymium magnets to secure panels tightly, ensuring no gaps where dust can enter.
- Seal edges with clear silicone weather stripping for an almost airtight fit.
For added protection, consider applying an anti-static coating to acrylic surfaces. Static attracts dust; reducing it cuts cleaning frequency by up to 60%, according to a 2022 materials study by the Tokyo Collectibles Preservation Lab.
Day 7: Finishing Touches & Placement
Complete the build with user-friendly features that enhance daily usability.
- Paint or laminate: Apply a matte or satin finish to reduce glare and fingerprint visibility.
- Install LED lighting: Use adhesive strip lights with a remote or motion sensor. Cool-white LEDs (4000K) highlight details without heat buildup.
- Anchor to wall: Use French cleats or heavy-duty brackets to prevent tipping and vibration transfer.
- Position and test: Place the shelf in its permanent location, load test with dummy weights, and verify door/panel operation.
Essential Features of a Truly Low Maintenance Design
Not all display shelves are created equal. The following elements separate high-maintenance setups from truly hands-off systems.
Dust-Resistant Enclosure
Fully enclosed units with tight seals outperform open shelving. Even a small gap at the top can let in enough airborne particles to require weekly wiping. Magnetic acrylic doors create a near-sealed environment, cutting dust accumulation by over 80%.
Non-Reactive Surfaces
Choose finishes that don’t off-gas chemicals. Some laminates and paints release volatile organic compounds (VOCs) that can cloud PVC figures over time. Look for Greenguard-certified materials or water-based sealants.
Tool-Free Cleaning Access
Design shelves so panels can be removed or swung open easily. Complex disassembly discourages regular maintenance. Soft-close hinges and snap-fit acrylic make cleaning fast and frustration-free.
Vibration Dampening
Figures with delicate parts (e.g., wigs, weapons) benefit from isolation. Mount the shelf on rubber pads or use a floating wall bracket system to absorb footfall and nearby traffic vibrations.
Checklist: Build Your Low Maintenance Shelf in 7 Days
Stay organized with this actionable checklist.
- ☐ Measure available space and figure dimensions
- ☐ Draft a sketch with shelf spacing and enclosure type
- ☐ Purchase Baltic birch or MDF, tempered glass/acrylic, hinges, screws
- ☐ Cut frame and shelf components (or order pre-cut)
- ☐ Assemble carcass and reinforce joints
- ☐ Install back panel and shelf pin holes
- ☐ Attach doors or sliding acrylic panels with magnetic seals
- ☰ Apply finish (paint/laminate) and let cure fully
- ☐ Install LED lighting with concealed wiring
- ☐ Anchor shelf securely to wall studs
- ☐ Load figures and inspect for stability and accessibility
Real Example: How Maya Reduced Cleaning Time by 75%
Maya K., a collector in Osaka, used to spend two hours every weekend dusting her 40+ figure collection on open floating shelves. After switching to a custom-built enclosed unit with acrylic sliders and anti-static coating, she now cleans the entire setup once every six weeks.
“I was skeptical at first,” she says. “But after three months, my figures looked exactly as they did on day one. No fingerprints, no dust on bases, no worrying when guests come over.” Her new shelf uses modular trays inside, allowing her to remove individual sections for deep cleaning without disturbing the whole display.
This case illustrates how upfront investment in smart design pays off in saved time and reduced anxiety over preservation.
Do’s and Don’ts of Anime Figure Shelf Maintenance
| Do | Don't |
|---|---|
| Use microfiber cloths for cleaning | Use paper towels—they can scratch surfaces |
| Wipe shelves monthly even if sealed | Wait until visible dust accumulates |
| Rotate figures seasonally to reduce light exposure | Leave figures under direct LED spotlights 24/7 |
| Check seals quarterly for wear | Ignore warped or loose panels |
| Store spare parts (hands, stands) in labeled bags inside the base | Keep accessories loose or in humid drawers |
FAQ: Common Questions About Low Maintenance Shelves
How often do I need to clean a sealed display shelf?
In a typical indoor environment, a properly sealed shelf requires full cleaning only once every 4–6 weeks. Wipe down exterior surfaces monthly, and use compressed air inside every quarter to remove any infiltrated particles.
Can I build this shelf without power tools?
Yes. Many hardware stores offer free or low-cost cutting services. You can assemble the unit using pre-cut panels and no-tools-required hardware like cam locks or click-together brackets. However, drilling shelf pin holes may still require a hand drill.
Are glass shelves safer than acrylic for heavy figures?
Tempered glass supports heavier loads (up to 50 lbs per shelf), but acrylic is more impact-resistant. For figures under 10 lbs, acrylic is ideal due to its lightweight and shatterproof nature. Always check manufacturer weight ratings before loading.
Final Thoughts: Build Once, Enjoy for Years
A low maintenance anime figure display shelf isn’t just furniture—it’s a preservation system. By focusing on sealing, material quality, and thoughtful ergonomics, you create a space that honors your collection while freeing you from constant upkeep. The initial effort pays dividends in longevity, safety, and daily enjoyment.
Whether you're protecting a growing collection or showcasing prized limited editions, this guide equips you with the knowledge to build smarter. Start small, apply these principles, and evolve your display as your collection grows.


 浙公网安备
33010002000092号
浙公网安备
33010002000092号 浙B2-20120091-4
Comments
No comments yet. Why don't you start the discussion?