
A well-built deck transforms your backyard into an inviting extension of your home. More than just a place to relax, a thoughtfully constructed deck adds value, improves curb appeal, and creates a functional space for entertaining or quiet evenings outdoors. While many homeowners dream of a custom deck, the process can seem daunting without clear direction. This guide breaks down every phase—from planning to finishing touches—so you can build a structure that’s not only strong and safe but also reflects your personal style.
1. Planning Your Deck: Design and Permits
The foundation of any successful deck project lies in thoughtful planning. Start by assessing your yard’s topography, sun exposure, and existing landscaping. Decide on the deck’s primary purpose: Is it for dining, lounging, or hosting gatherings? This will influence size, shape, and layout.
Determine whether your deck will be ground-level, raised, or multi-tiered. Simple rectangular designs are easier and more cost-effective, while L-shaped or wraparound decks offer visual interest and expanded utility. Use graph paper or free online deck design tools to sketch layouts and experiment with dimensions.
Next, check local building codes and homeowner association (HOA) regulations. Most jurisdictions require permits for elevated decks or those exceeding a certain square footage. Submitting engineered plans may be necessary, especially if attaching to your home. Skipping this step risks fines or forced demolition.
2. Material Selection: Balancing Durability and Aesthetics
Your choice of materials affects both longevity and appearance. Traditional pressure-treated lumber remains popular due to its affordability and strength. However, it requires regular sealing and is prone to warping over time.
For low maintenance and enhanced resistance to rot and insects, consider composite decking. Made from wood fibers and plastic, composites resist fading, staining, and scratching. Brands like Trex and Fiberon offer realistic wood grain textures in a range of colors.
If natural beauty is a priority, hardwoods such as ipe or cumaru provide exceptional durability and rich tones. These tropical hardwoods are dense and weather-resistant but come at a higher price and require specialized fasteners.
“Choosing the right material isn’t just about looks—it’s about matching performance to your climate and lifestyle.” — Daniel Reyes, Certified Deck Builder & NAHB Member
| Material | Lifespan | Maintenance Level | Cost (per sq ft) |
|---|---|---|---|
| Pressure-Treated Wood | 10–15 years | High (sealing, staining) | $3–$5 |
| Composite Decking | 25+ years | Low (occasional cleaning) | $8–$14 |
| Tropical Hardwood | 30+ years | Medium (oiling recommended) | $12–$18 |
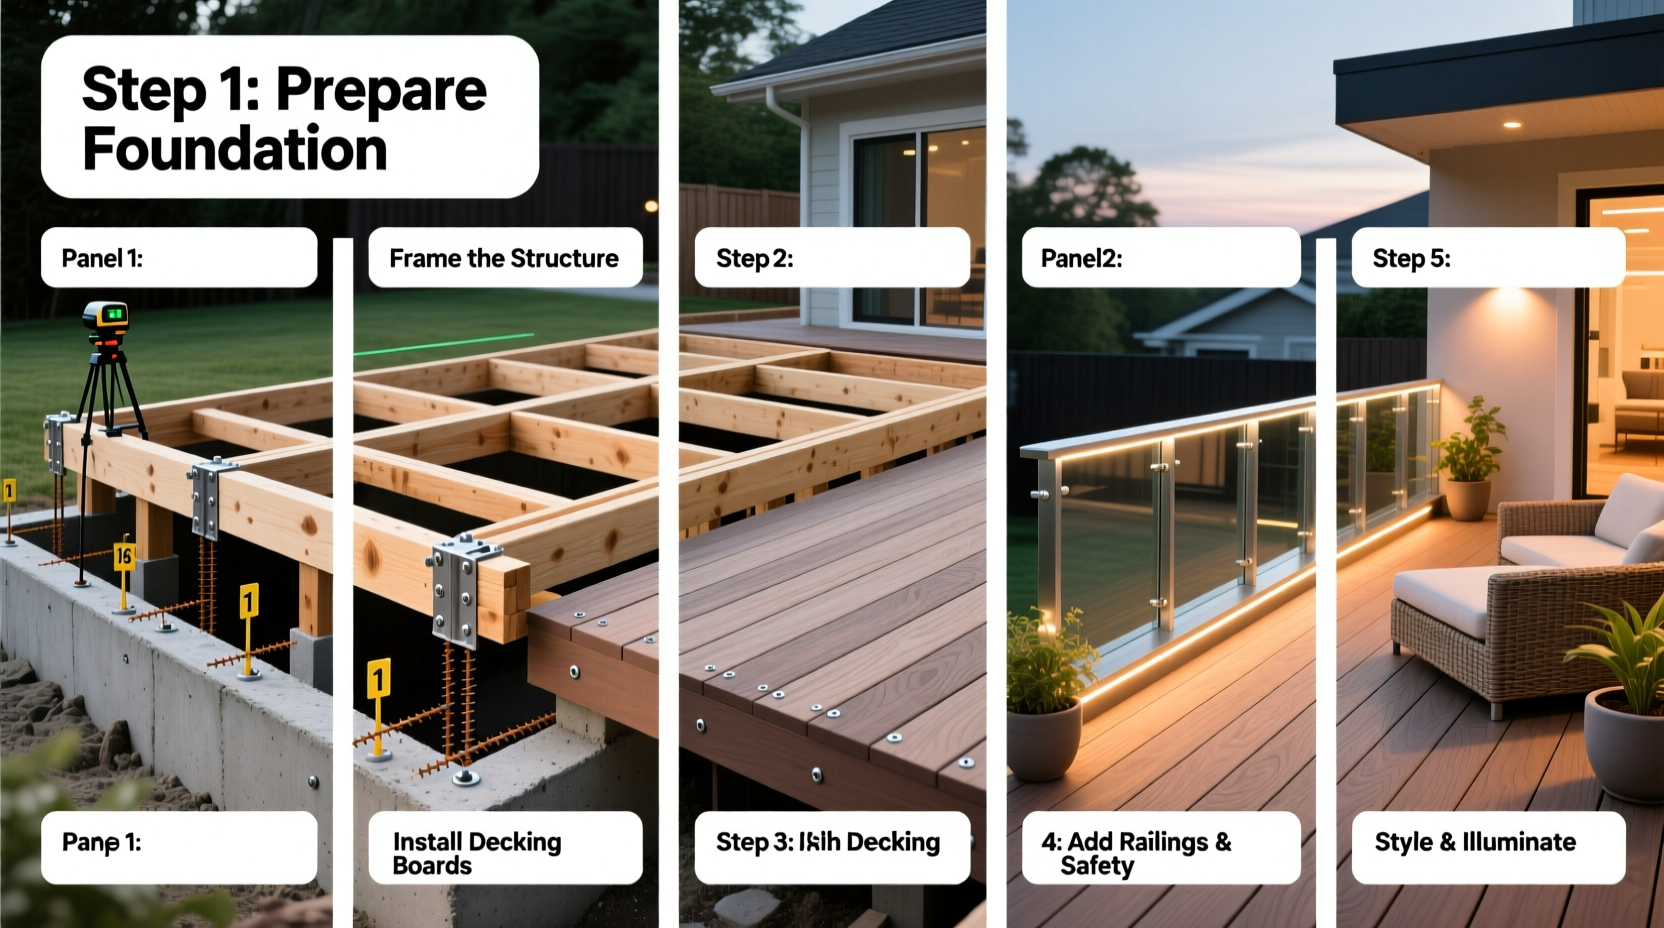
3. Foundation and Framing: Building for Stability
A stable deck begins with a solid foundation. For elevated platforms, concrete footings are essential. Use a post-hole digger to excavate below the frost line (typically 36–48 inches deep in most regions). Insert sonotubes, brace them vertically, and pour concrete. Embed adjustable post anchors into the wet concrete for secure beam attachment.
Once footings cure (usually after 48–72 hours), install support beams made from double 2x8 or 2x10 pressure-treated lumber. These rest on the post anchors and run parallel to the house. Next, attach joists perpendicular to the beams using hurricane ties or joist hangers. Space joists 12 or 16 inches apart depending on decking material requirements.
If your deck attaches to the house, install a ledger board securely bolted to the rim joist. Flashing must be installed behind the ledger to prevent water intrusion into the home’s structure—a common cause of long-term damage.
4. Step-by-Step Construction Timeline
Follow this sequence to ensure structural integrity and workflow efficiency:
- Week 1: Finalize design, obtain permits, order materials.
- Week 2: Clear site, mark layout with stakes and string lines, dig footings.
- Week 3: Pour concrete footings, allow curing time.
- Week 4: Install beams, ledger board, and joists; ensure level alignment.
- Week 5: Lay decking boards starting from the house outward, leaving proper gaps for drainage.
- Week 6: Add railings, stairs, and lighting; perform final inspections.
- Week 7: Clean surface, apply sealant (if using wood), and enjoy.
This seven-week timeline assumes weekend work and favorable weather. Adjust accordingly for larger decks or full-time builds.
5. Finishing Touches: Style Meets Function
Once the structure is complete, elevate its appeal with smart design elements. Railing choices go beyond safety—they contribute significantly to aesthetics. Cable railings offer a modern, open feel, while traditional wood balusters suit classic homes. Consider adding built-in benches or planter boxes along the perimeter to maximize usability.
Lighting enhances ambiance and extends usability into the evening. Solar-powered path lights, recessed step lights, or string lanterns create warmth without complex wiring. For shaded areas, ceiling fans or pergola covers improve comfort during hot months.
Finally, integrate landscaping. Surround the deck with gravel, mulch, or pavers to manage runoff and define boundaries. Container gardens or climbing vines on supports add color and privacy.
Real Example: The Riverstone Backyard Upgrade
The Thompson family in Portland wanted a durable yet elegant deck for year-round use in a rainy climate. They chose composite decking in a warm gray tone for fade and moisture resistance. Their design included a slightly elevated platform with integrated bench seating and glass-panel railings to preserve views of their garden. By working with a structural engineer early on, they ensured proper drainage and met city codes. Two years later, the deck remains splinter-free and vibrant, even through heavy winter rains.
Essential Deck-Building Checklist
- Confirm local permit requirements
- Select appropriate materials for climate and usage
- Dig footings below frost line
- Install flashing behind ledger board
- Use code-compliant joist spacing and fasteners
- Leave 1/8-inch gap between decking boards
- Install guardrails if deck is over 30 inches high
- Inspect all connections before final use
Frequently Asked Questions
How high can a deck be without requiring railings?
In most U.S. jurisdictions, guardrails are required if the deck surface is 30 inches or more above ground level. Always verify with local code enforcement, as standards vary by municipality.
Can I build a deck directly on the ground?
Yes, but ground-level decks still need a stable base. Use gravel or crushed stone beneath the frame to prevent moisture buildup. Avoid direct soil contact with wood components to reduce rot risk.
What’s the average cost of a 12x16-foot deck?
Using pressure-treated wood, expect $2,500–$4,000 in materials and basic labor. Composite materials can raise the total to $7,000–$10,000. DIY projects typically save 30–50% on labor costs.
Conclusion: Build With Confidence
Constructing a sturdy and stylish deck is one of the most rewarding home improvement projects you can undertake. With careful planning, quality materials, and attention to structural details, your outdoor platform will stand up to the elements and serve as a centerpiece for memories. Whether you're grilling with friends, reading in solitude, or watching the sunset, your new deck becomes more than wood and fasteners—it becomes part of your daily life.


 浙公网安备
33010002000092号
浙公网安备
33010002000092号 浙B2-20120091-4
Comments
No comments yet. Why don't you start the discussion?