
Building a custom arcade cabinet is more than a DIY project—it’s a gateway to reliving the golden age of gaming with full control over design, performance, and nostalgia. Unlike off-the-shelf retro consoles, a custom cabinet lets you choose every component, from the monitor and controls to the cabinet style and game library. Whether you're aiming for a classic upright look or a sleek bar-top version, this guide walks you through each phase with precision and clarity. No prior woodworking or electronics experience is required, just patience, attention to detail, and a love for pixelated adventures.
1. Planning Your Arcade Cabinet: Design and Scope
The foundation of any successful build starts with thoughtful planning. Before purchasing materials or cutting wood, define the purpose, size, and aesthetic of your cabinet. Will it be a full-sized upright model (around 5–6 feet tall), or a compact bar-top unit that fits on a desk? Your space, budget, and intended use will dictate this decision.
Sketch a rough blueprint or use free CAD tools like SketchUp Free to visualize dimensions. Standard upright cabinets are typically 30 inches wide, 24 inches deep, and 60 inches high. Bar-top models range from 24x16 inches to 36x20 inches in footprint. Include space for internal components: a mini PC or Raspberry Pi, power supply, audio amplifier, and wiring channels.
Choose a theme early—whether it’s a replica of a Pac-Man cabinet, a minimalist modern design, or a multi-system powerhouse. This influences panel colors, artwork placement, and control layout. Many builders print custom side art and marquee signs using online services or home printers on adhesive vinyl.
2. Gathering Materials and Tools
A complete arcade cabinet requires both structural and electronic components. Sourcing them wisely ensures reliability and cost efficiency. Begin with a checklist to avoid mid-build delays.
Checklist: Essential Components
- Wood (1/2\" or 3/4\" plywood or MDF)
- Screws, wood glue, sandpaper, edge banding
- Joystick (Sanwa JLF-TP-8YT highly recommended)
- Action buttons (Sanwa OBSF-30 preferred)
- Control interface (Ultimarc IPAC V4 or Teensy-based encoder)
- Monitor (LCD 19\"–24\", preferably 4:3 or support for resolution scaling)
- Mini PC or Raspberry Pi 4 (4GB+ RAM)
- Power supply and distribution block
- Speakers and small amplifier (e.g., PAM8403 or larger)
- Marquee light (LED strip or neon flex)
- Artwork (printed or hand-painted)
- Cabinet hardware (hinges, latch, rubber feet)
Tools needed include a circular saw or table saw, drill, screwdrivers, wire cutters, soldering iron (if not using pre-wired harnesses), clamps, and measuring tape. If you lack workshop access, consider ordering pre-cut panels from CNC services like Ponoko or sending designs to local makerspaces.
“Invest in quality controls. A $30 joystick lasts longer and feels better than five cheap ones.” — Mike Chen, Retro Build Community Moderator
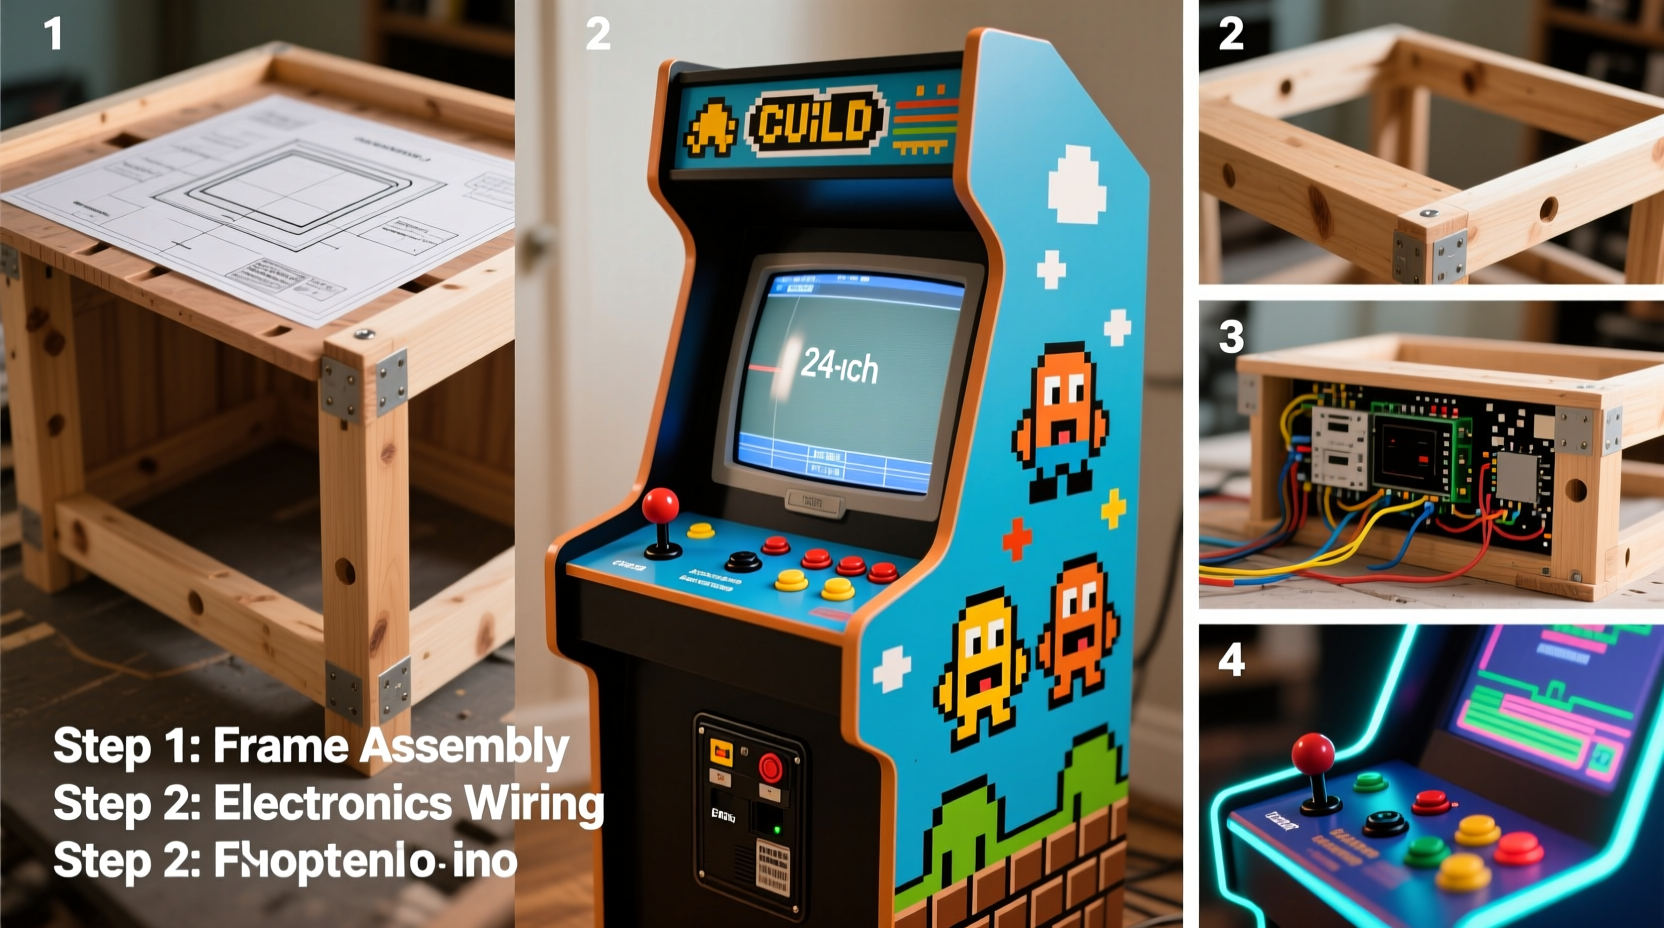
3. Building the Cabinet: Woodwork and Assembly
Constructing the frame is the most physically demanding stage. Use 3/4-inch MDF for rigidity and smooth finishing, though plywood offers better durability if exposed to moisture. Cut six main panels: top, bottom, left/right sides, front, and back. The front panel includes the bezel—the frame around the screen—and the control panel area below.
Assemble the base box first. Apply wood glue along edges, clamp, then screw from the outside using 1.5-inch wood screws. Pre-drill holes to prevent splitting. Reinforce corners with L-brackets inside. Sand all surfaces progressively from 80 to 220 grit for a smooth finish.
The control panel is mounted at a slight angle (10–15 degrees) for ergonomics. It can be fixed or removable—removable is better for maintenance. Cut holes for the joystick and buttons using a hole saw (1.25\" for Sanwa sticks, 1\" for buttons). Route a channel underneath to feed wires neatly to the control board.
For the monitor mount, build a shelf inside the upper cabinet or use adjustable brackets. Ensure at least 2 inches of clearance behind the screen for cables and airflow. Install ventilation fans if using a mini PC to prevent overheating.
Do’s and Don’ts During Assembly
| Do | Don't |
|---|---|
| Pre-sand all pieces before assembly | Use nails instead of screws and glue |
| Label each panel during cutting | Over-tighten screws near edges |
| Test-fit components before final attachment | Forget cable management paths |
| Seal MDF with primer before painting | Paint before assembling—hard to reach spots get missed |
4. Electronics and Software Setup
This phase brings your cabinet to life. Wiring must be clean, secure, and logically organized. Start by mounting the control interface (e.g., IPAC V4) inside the cabinet, ideally near the control panel. Connect each button and joystick direction to the encoder using 22 AWG stranded wire. Label wires as you go—mistakes here lead to phantom inputs.
Connect the encoder to your computer via USB. Most modern solutions emulate a standard keyboard or gamepad, so no drivers are needed for basic functionality. Test inputs using the built-in test mode on the IPAC or software like JoyToKey or HTML5 Gamepad Tester.
Install the monitor and connect via HDMI. For authentic CRT-like scanlines, use a shader-enabled frontend such as RetroArch. Pair with an amplifier and 4–8 ohm speakers (4\"x6\" or 5.25\") mounted behind the marquee or side panels. Power everything through a single switched outlet strip hidden inside, controlled by a front-panel rocker switch.
Software choice defines your user experience. Two popular options:
- RetroPie (on Raspberry Pi): Lightweight, community-supported, supports thousands of emulators. Ideal for beginners.
- Windows + LaunchBox/Big Box: More powerful, supports commercial ROMs and original discs. Better for N64, Dreamcast, and PS2 games.
Organize ROMs into folders by system (e.g., “SNES,” “NeoGeo”). Use EmulationStation (RetroPie) or Big Box (LaunchBox) for a console-style interface navigable with your joystick. Enable attract mode videos for extra flair.
“The magic happens when the software feels invisible. Spend time tuning the frontend so gameplay is seamless.” — Lena Patel, Digital Preservation Archivist & DIY Gamer
5. Real Example: Alex’s First Cabinet Journey
Alex Rodriguez, a graphic designer from Portland, spent six weekends building his first bar-top arcade. With no prior experience, he started by watching YouTube tutorials and downloading free plans from the Arcadeforge community. He chose a 24x16-inch MDF kit, painted it matte black with red accents, and used a Raspberry Pi 4 with RetroPie.
His biggest challenge was wiring the 8-button layout for fighting games. He accidentally reversed two player inputs, causing confusion during testing. After tracing connections with a multimeter, he corrected the issue and added color-coded labels. He installed a 19-inch 4:3 LCD monitor, which perfectly displayed 480p content without stretching.
What made the difference? Joining the Reddit r/Arcade subreddit. Members helped him troubleshoot audio static by suggesting a ground loop isolator. He later added LED backlighting under the control panel, synced to game themes using WLED and ESPHome.
Today, Alex’s cabinet hosts monthly game nights. His advice: “Start simple. Get one system working flawlessly before expanding. And don’t skip documentation—take photos at each step.”
Step-by-Step Timeline: From Concept to Play
- Week 1: Finalize design, order materials, and print artwork.
- Week 2: Cut and assemble main cabinet structure; sand and prime.
- Week 3: Paint and apply decals; build and install control panel.
- Week 4: Wire controls to encoder; mount monitor and speakers.
- Week 5: Install computer, load software, transfer ROMs.
- Week 6: Test all systems, calibrate inputs, refine UI.
- Week 7: Host first game session and enjoy.
Frequently Asked Questions
Can I use a modern flat-screen TV instead of a monitor?
Yes, but large TVs often have input lag and scaling issues. A dedicated 19\"–24\" computer monitor with low response time and minimal processing offers better performance. Avoid OLED screens due to burn-in risk from static elements like score displays.
Is emulation legal?
Emulators themselves are legal software. However, downloading copyrighted ROMs you don’t own is not. To stay compliant, extract ROMs from games you physically own or use homebrew/public domain titles. Some developers release freeware versions of old games (e.g., Doom shareware).
How much does a full build cost?
A basic bar-top cabinet ranges from $350–$600, depending on component quality. Upright builds with premium controls and large monitors can reach $900–$1,200. Costs drop significantly if you repurpose parts like power supplies or reuse an old PC.
Final Steps and Long-Term Enjoyment
Your arcade cabinet isn’t just a machine—it’s a centerpiece of entertainment and craftsmanship. Once operational, dedicate time to curating your game library. Add favorites from childhood, discover obscure titles, or create playlists for different moods: co-op beat-em-ups for friends, puzzle games for quiet evenings, or rhythm challenges for family competitions.
Maintenance is minimal. Dust the interior every few months, check button responsiveness, and update software periodically. Consider adding network boot options or cloud sync for ROM backups. As skills grow, explore advanced mods: force feedback joysticks, marquee animations, or even a built-in cocktail glass holder.
The satisfaction of flipping the power switch and hearing the startup chime—followed by the click of a genuine Sanwa button launching Galaga or Street Fighter II—is unmatched. You’ve not only preserved gaming history but personalized it.


 浙公网安备
33010002000092号
浙公网安备
33010002000092号 浙B2-20120091-4
Comments
No comments yet. Why don't you start the discussion?